
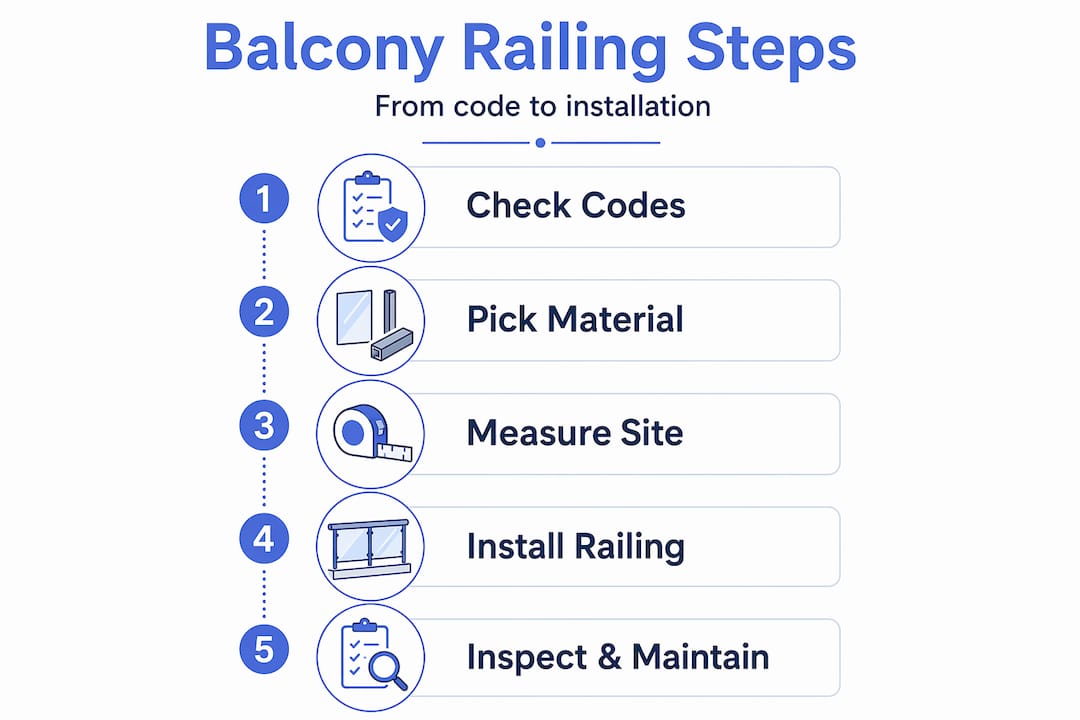
How to Plan Balcony Railing: a Homeowner's Guide
Getting your balcony railing right takes more than picking a style you like online. When you start thinking about how to plan balcony railing, two things compete for your attention: what looks good and what keeps everyone safe. Most homeowners underestimate how specific the code requirements are, and that gap between assumption and reality is exactly where costly mistakes happen. This guide walks you through safety standards, material choices, site prep, installation basics, and long-term maintenance so you can move from idea to finished project with confidence.
Table of Contents
- Key takeaways
- How to plan balcony railing: safety standards and codes
- Choosing the right material and design
- Preparing your site for installation
- Step-by-step installation overview
- Inspection, maintenance, and common problems
- What I have learned planning and building balcony railings
- Ready to take your balcony project to the next level?
- FAQ
Key takeaways
| Point | Details |
|---|---|
| Know your height requirements | Residential guardrails must be at least 36 inches high; commercial locations require 42 inches. |
| Apply the 4-inch sphere rule | Baluster spacing must be tight enough that a 4-inch sphere cannot pass through any opening. |
| Match material to your space | Small balconies gain from glass or cable railing; heavy materials can make compact spaces feel closed in. |
| Permits matter more than you think | Structural railing changes typically require a permit; skipping this step creates liability issues at resale. |
| Inspect before you sign off | Check height, spacing, load capacity, and post anchoring before requesting a final inspection. |
How to plan balcony railing: safety standards and codes
Before you sketch a single design, you need to understand what the law actually requires. Guardrails are mandatory when your balcony sits 30 inches or more above grade, with a minimum height of 36 inches for residential use and 42 inches for commercial settings. That measurement is taken from the deck surface to the top of the rail. Not the bottom of a post cap. Not the middle of a top rail. The top of the usable surface.
The 4-inch sphere rule is equally firm. No opening in your guardrail system, including spaces between balusters, between panels, or between the bottom rail and the deck surface, can allow a 4-inch sphere to pass through. This rule exists specifically to prevent young children from slipping through or getting their heads trapped. What many homeowners miss is that bottom rail gaps cannot exceed 4 inches either, meaning the space between your deck surface and the lowest rail element counts too.
Structural requirements go beyond spacing. Railings must resist at least 200 pounds of horizontal force. That standard is designed to prevent a railing from failing when someone leans heavily against it or a crowd pushes toward the edge. Your post anchoring, hardware, and connection points all feed into that number.
For glass railing code specifics, the building codes for glass railings resource from Glassrailingstore breaks down exactly what regulators look for in residential applications.
A few code points worth organizing before you apply for permits:
- Minimum guardrail height: 36 inches residential, 42 inches commercial
- Maximum baluster or panel opening: 4-inch sphere cannot pass through
- Bottom rail gap: no more than 4 inches from deck surface
- Structural load: minimum 200 pounds horizontal resistance at top rail
- Handrail graspability: 1.25 to 2-inch circular cross-section, or a comparable graspable profile
Pro Tip: Local jurisdictions often adopt the IRC with amendments. Always call your local building department before finalizing your design. A 10-minute phone call can prevent expensive rework.
Choosing the right material and design
Once you understand the baseline code requirements, you get to make the interesting decisions. Material selection drives both the look of your railing and how well it holds up over time. Here is a clear breakdown of your main options:

| Material | Best for | Main challenge |
|---|---|---|
| Wood | Traditional homes, painted or stained finishes | Requires regular maintenance, can rot or warp |
| Aluminum | Low-maintenance modern or transitional looks | Limited load capacity if improperly anchored |
| Cable | Open sightlines, coastal or contemporary styles | Requires tension checks; codes vary by state |
| Framed glass | DIY projects, budget-conscious modern look | Frame can feel visually heavy on small balconies |
| Frameless glass | Premium aesthetics, unobstructed views | More complex mounting; higher material cost |
Small balconies under 80 sq ft benefit most from open railing systems like glass or cable. Bulky wood or filled aluminum panels can make a compact space feel like an enclosed cage rather than an outdoor retreat. Glass, in particular, preserves sightlines while still meeting every structural requirement.
Framed glass railings tend to be more budget-friendly and easier for DIY installation compared to frameless systems, which require more precise mounting and often need professional-grade tools to execute cleanly. If you are planning a DIY glass railing project on a tighter budget, framed is usually the smarter starting point.
One design detail that many homeowners overlook: graspability compliance. If you choose a wide-profile top rail for aesthetic reasons, it may not meet the graspability standard on its own. The secondary handrail solution is the standard fix. You install your decorative top rail for appearance, then add a code-compliant graspable handrail below or alongside it. It costs a bit more but keeps your design intact without creating a code violation.
Glass railings also boost property value in ways that other materials typically do not match. The combination of clean lines and preserved views appeals strongly to buyers, which matters if resale is part of your long-term plan.
Pro Tip: For exterior balconies exposed to salt air or high moisture, marine-grade stainless steel hardware is not optional. Standard hardware corrodes faster than you expect and will require full replacement within a few years.
Preparing your site for installation
Solid preparation separates a smooth installation from a frustrating one. Start by measuring your entire balcony perimeter precisely, including any return walls, corners, or transitions to stairs. You need exact linear footage to order the right amount of material, and you need precise post spacing measurements to confirm your layout will clear both the 4-inch sphere rule and structural anchoring requirements.
Here is a practical checklist for site prep before any material arrives:
- Measure balcony perimeter and note all corners, transitions, and obstacles
- Identify post locations based on material specifications and structural framing below the deck surface
- Mark post centers with chalk or tape so you can verify spacing visually before drilling
- Assess deck surface condition, especially around post anchor points, to catch any rot or soft spots early
- Confirm drainage patterns so you know where water pools after rain, since that affects post anchoring methods and hardware choices
- Contact your local building department to confirm permit requirements and submit your application before ordering materials
On the permit question, building permits are generally required for new railing installations or structural changes. A cosmetic like-for-like replacement might not trigger a permit requirement, but adding a new glass system where none existed before almost always does. Skipping permits creates real problems at resale, when a buyer’s inspector flags the unpermitted work.
Pro Tip: Before you mark post locations on paper, do a physical dry-run on site. Walk the balcony with a tape measure and physically stand at each proposed post location. You will catch clearance issues and awkward spacing situations that never show up in drawings.
The tools and materials you will want on hand before starting installation include a level, drill with masonry or wood bits as appropriate, torque wrench, tape measure, chalk line, safety glasses, and gloves. If you are working with tempered glass panels, you will also need suction cup handles, since bare-hand manipulation of large glass panels is both difficult and dangerous.
Step-by-step installation overview
With your site prepped and permits in hand, installation follows a logical sequence. Here is the high-level flow every homeowner should understand before the project starts:
- Install posts first. Bolting posts directly to the deck frame is the preferred anchoring method. Surface-mounted post bases are faster but more vulnerable to lateral force. Through-bolting into the structural framing gives you the load resistance the code demands.
- Check post plumb and spacing. Every post must be plumb and within the spacing tolerance your hardware specifies. Errors here compound through the whole run.
- Install bottom rail or base channel. This component determines where your panels or balusters sit. Measure and mark before fastening. Once the bottom channel is set, your spacing is locked in.
- Set balusters or glass panels. Whether you are using individual balusters or glass panels, maintain the 4-inch sphere spacing across the entire run. Account for actual baluster width, not just the gap between them.
- Mount the top rail. Secure it to all posts and verify that it sits at or above the required height for your application.
- Install handrail if required. If your top rail does not meet graspability standards, add a compliant handrail at this stage.
- Final alignment check. Walk the entire run and apply moderate lateral pressure at multiple points. If anything moves noticeably, recheck your post anchoring before calling the project complete.
The most common DIY mistake is rushing post anchoring to get to the visible work faster. A wobbly post base that gets covered by a beautiful glass panel is still a structural problem. Check each post before moving to the next step.
Pro Tip: For DIY glass railing tips that go deeper than this overview, the DIY glass stair railing guide from Glassrailingstore covers installation methods, hardware choices, and common challenges specific to glass systems.
Inspection, maintenance, and common problems
After installation, your first job is to self-inspect before the building inspector arrives. Work through these checks systematically:
- Height verification: Measure guardrail height at multiple points, especially at corners and post locations where height can dip unexpectedly.
- Sphere rule check: Use an actual 4-inch ball or a rolled tape measure at 4-inch diameter to test every opening, including the bottom rail gap.
- Load test: Apply firm lateral pressure at the top rail midpoint between posts. There should be minimal flex. Significant movement indicates an anchoring problem.
- Graspability: Grip the handrail and walk the full run. Your hand should wrap comfortably without losing grip at any point.
- Hardware tightness: Check every fastener, bolt, and set screw. Vibration during installation can back hardware out slightly.
For ongoing maintenance, the work varies by material. Wood needs annual inspection for rot, checking, and paint or stain condition. Metal and aluminum benefit from a seasonal cleaning and hardware retightening, especially after winter. Glass panels need only mild soap and water for cleaning, but you should inspect hardware, clamps, and base channels twice a year for corrosion or loosening.
When to call a professional: if you find a post that cannot be re-anchored through standard methods, if glass panels show chips near mounting hardware, or if your railing fails a load test, those are situations where a licensed contractor provides more value than a DIY repair attempt.
What I have learned planning and building balcony railings
I have watched homeowners invest weeks of planning into beautiful railing designs, only to get to installation day and realize their baluster calculations ignored actual baluster width. The spacing calculation needs to account for the physical width of each baluster, not just the gap between them. That distinction alone has caused more code violations on otherwise well-planned projects than any other single detail.
My honest take: the homeowners who have the smoothest projects are the ones who treat code compliance not as a hurdle but as a design constraint. Once you accept that your railing must hit 36 inches, resist 200 pounds, and block a 4-inch sphere, you stop fighting those parameters and start designing within them. That mindset shift produces better results every time.
I also think most people wait too long to contact their local building department. Inspectors are not adversaries. In my experience, a brief early conversation saves far more time than it costs. You learn the local amendments, the preferred anchoring methods inspectors want to see, and sometimes you get informal guidance that keeps your project on track from day one.
The material choice that surprises people most: glass is often simpler to comply with than they expect. A quality tempered glass panel eliminates the baluster spacing problem entirely because there are no individual balusters to measure. That simplification is worth something, both in planning time and inspection confidence.
— Fuanne
Ready to take your balcony project to the next level?
Glassrailingstore makes it straightforward to move from planning to purchase with products engineered specifically for code compliance and real-world durability. Their engineered glass railing systems are load-tested and backed by documentation you can present directly to your building department, which removes significant guesswork from the compliance process.
Whether you are looking for frameless panels, framed systems, or marine-grade hardware for a coastal balcony, Glassrailingstore offers tempered glass panels in sizes suited for residential guardrail heights. If you prefer professional support, their certified installer network connects you with experienced glass railing contractors who know local codes. From first measurement to final inspection, the resources are there.
FAQ
1. What height does a balcony railing need to be?
Residential balcony guardrails must be at least 36 inches high when the balcony is 30 or more inches above grade. Commercial applications require a minimum of 42 inches.
2. How much space can I have between balusters?
No opening in your guardrail can allow a 4-inch sphere to pass through. This applies to gaps between balusters, between panels, and between the deck surface and the bottom rail.
3. Do I need a permit to replace or install a balcony railing?
Structural railing installations and new guardrail systems almost always require a permit. Cosmetic like-for-like replacements may not, but always confirm with your local building department before starting work.
4. Is glass railing a good option for a small balcony?
Yes. Glass railing is one of the best choices for small balconies because it preserves sightlines and avoids the enclosed feeling that solid or heavy materials create. Frameless systems offer the most visual openness.
5. How do I know if my railing is strong enough?
Apply firm lateral pressure at the top rail midpoint between posts. The railing should show minimal flex. Your system also needs to meet the minimum 200-pound horizontal load resistance required by residential building codes.
Recommended
- DIY glass stair railing: A complete homeowner’s guide – The Glass Railing Store
- How to install deck railing for a safe, stylish deck – The Glass Railing Store
- How to calculate safe baluster spacing for glass railings – The Glass Railing Store
- Avoid these glass railing mistakes for a safe, stylish home – The Glass Railing Store