
How to calculate safe baluster spacing for glass railings
Failing a railing inspection because of a spacing error is more than an inconvenience. It can delay your project by weeks, trigger costly rework, and in the worst case, leave a dangerous gap that puts children or guests at real risk. Baluster spacing is one of the most scrutinized elements in any railing system, and glass railings add an extra layer of complexity because the rules apply to panel gaps, bottom clearances, and corner transitions, not just the obvious spaces between posts. This guide walks you through the codes, the math, and the hands-on steps you need to get it right the first time.
Table of Contents
- Understanding baluster spacing codes and why they matter
- What you need before starting: tools, materials, and code checks
- Step-by-step: How to calculate and set safe baluster spacing
- Verification, common mistakes, and troubleshooting tips
- What most guides miss about baluster spacing and lasting safety
- Get code-compliant glass railing solutions
- Frequently asked questions
Key Takeaways
| Point | Details |
|---|---|
| Minimum gap rule | No gap in the railing system should permit a 4-inch sphere to pass through. |
| Always verify local codes | Local authorities may require stricter standards or different railing heights. |
| Use proper tools | A tape measure and 4-inch test sphere help ensure accurate, safe spacing. |
| Inspect for common failures | Corners, panel transitions, and bottom gaps are frequent problem areas. |
| Code is a baseline | True safety involves both compliance and high-quality installation with ongoing checks. |
Understanding baluster spacing codes and why they matter
Baluster spacing refers to the clear opening between any two vertical or panel elements in a railing system, measured from the inside face of one element to the inside face of the next. For glass railings, this includes the gap between adjacent glass panels, the gap from the bottom of the glass to the walking surface, and any open space at corners or transitions.
The universal benchmark for residential and commercial construction is the 4-inch sphere rule. Under the International Residential Code (IRC), baluster spacing for residential railings must maintain a maximum clear opening of 4 inches, verified by confirming that no 4-inch sphere can pass through any opening from the walking surface up to guard height. The same principle carries into commercial construction: under the International Building Code (IBC), commercial baluster openings follow the identical 4-inch sphere rule, though with higher structural load requirements, including a 200-pound concentrated load at any point on the top rail.
Why does this specific measurement exist? The 4-inch threshold is based on the average head size of a small child. A gap wider than 4 inches creates a real risk that a young child could push their head through and become trapped, or squeeze through entirely. The code is not arbitrary; it reflects decades of injury data.
“A railing that looks safe is not the same as a railing that is safe. The 4-inch sphere rule exists because visual judgment is unreliable. Always test physically.”
Here is a quick comparison of key code requirements across settings:
| Setting | Min. guard height | Max. baluster opening | Load requirement |
|---|---|---|---|
| Residential (IRC) | 36 inches | 4 inches | 200 lb top rail |
| Commercial (IBC) | 42 inches | 4 inches | 200 lb concentrated |
| Stairs (residential) | 34 to 38 inches handrail | 4 inches | 200 lb top rail |
| Pool fence (varies) | 48 inches typical | 4 inches | Local code applies |
Consequences of getting this wrong go beyond a failed inspection. Non-compliant railings can void your homeowner’s insurance, expose you to personal liability if someone is injured, and create a mandatory disclosure issue when you sell the property. Correcting spacing errors after panels are set in base shoes or post-mounted hardware is expensive and time-consuming. Getting it right before the inspector arrives is always the better path.
For a broader overview of what the installation process involves, the glass railing installation tips on our site walk through the full sequence from planning to final inspection.
What you need before starting: tools, materials, and code checks
With the rules and rationale clear, gather your tools, materials, and do some local due diligence to avoid surprises.
Before you measure a single inch, confirm which version of the building code your jurisdiction has adopted. Many states and municipalities adopt the IRC or IBC with local amendments. Always verify with your local AHJ (Authority Having Jurisdiction) because some residential areas require a 42-inch guard height rather than the IRC minimum of 36 inches, and some jurisdictions have additional restrictions on glass panel thickness or lamination type.
Tools you will need:
- Tape measure (25-foot minimum for longer runs)
- 4-inch test sphere or a 4-inch diameter ball (a standard tennis ball at 2.5 inches is too small; use a purpose-made gauge or a 4-inch PVC coupling)
- Level (both a 4-foot level and a torpedo level for tight spaces)
- Pencil and marking tape for layout
- Drill and appropriate bits for your base shoe or post hardware
- Torque wrench if your hardware specifies torque values
Materials checklist:
- Tempered or laminated tempered glass panels (minimum 3/8-inch tempered for most residential applications)
- Base shoes, standoffs, or post-mount hardware rated for your panel thickness
- Top rail or cap rail if your design requires one
- Stainless steel or powder-coated hardware appropriate for your exposure level
One of the smartest moves you can make at this stage is ordering pre-cut panels that already meet the dimensional requirements for your specific run length. Custom glass railing solutions eliminate the guesswork of field cutting and ensure every panel arrives at the correct width to maintain compliant spacing right out of the box.
| Baluster type | Spacing control | Climbability risk | Maintenance level |
|---|---|---|---|
| Tempered glass panels | Controlled by panel width and gaps | Low (no footholds) | Low to moderate |
| Cable railing | Tension-dependent | Moderate | Moderate |
| Wood balusters | Measured individually | Low to moderate | High |
| Metal balusters | Measured individually | Low | Low |
Pro Tip: Call your local building department before ordering materials. Ask specifically whether they have adopted any local amendments to the IRC or IBC that affect glass railing systems. A five-minute phone call can save you from ordering panels that do not meet local thickness or lamination requirements.
Step-by-step: How to calculate and set safe baluster spacing
Once you have your materials and code knowledge in hand, follow these steps to lay out and install your balusters properly.
1. Measure your total span: Start by measuring the full length of the railing run from the inside face of the starting post or wall to the inside face of the ending post or wall. Write this number down and double-check it.
2. Determine your panel width: For glass railings, the panel width is typically fixed by the product you order. Common widths run from 36 to 72 inches. The gap between panels is what you control through hardware selection and layout.

3. Calculate the number of panels and gaps: Divide your total span by the panel width plus the planned gap between panels. For example, a 120-inch run using 36-inch panels with a 3/8-inch gap between each would accommodate three panels with gaps that fall well within the 4-inch maximum.
4. Verify the bottom gap: The space between the bottom edge of your glass panel and the walking surface is just as regulated as the space between panels. Glass panels and balusters must comply with the 4-inch sphere rule at every opening, including the gap below panels, between adjacent panels, and at edges and corners. Typical compliant bottom gaps run between 10mm and 50mm (roughly 3/8 inch to 2 inches), but always test physically.
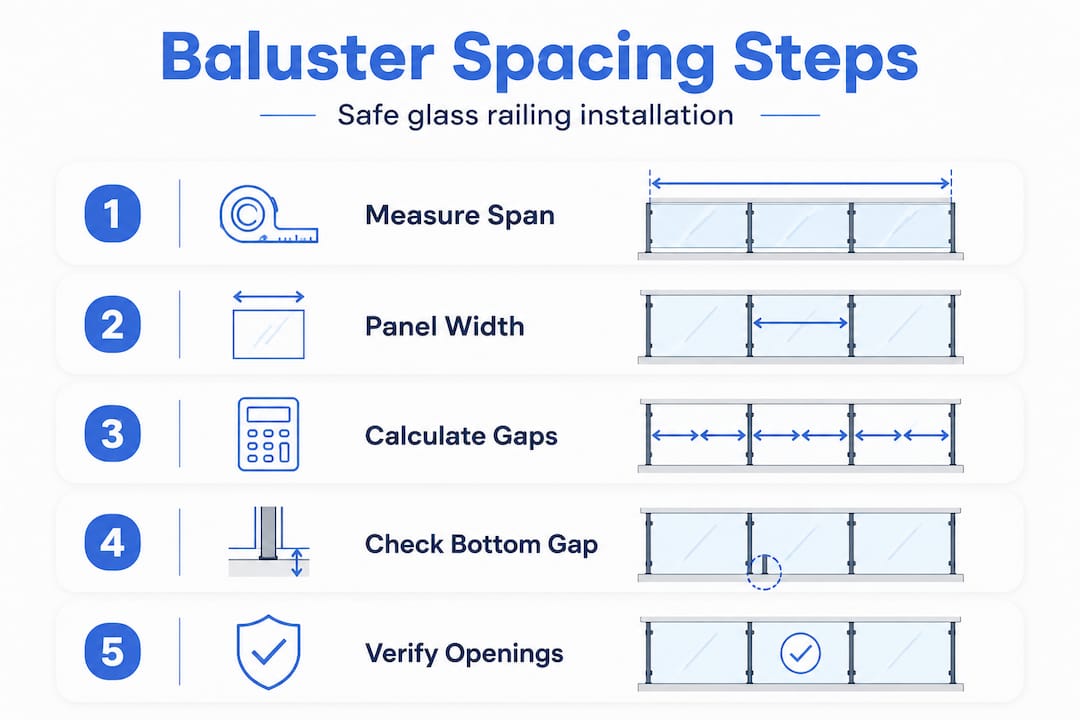
5. Mark your base shoe or post locations: Use your tape measure and level to mark exact positions on the deck or floor surface. Snap a chalk line to keep everything aligned.
6. Set your hardware and dry-fit panels: Before final fastening, set every panel in place and run your 4-inch test sphere along the entire length. Check every gap, every corner, and the full bottom edge. This is your last easy chance to adjust.
7. Fasten and torque to spec: Once you confirm all openings pass the sphere test, fasten your hardware to the manufacturer’s specifications. For code-compliant glass panels with pre-drilled standoff holes, follow the torque values in the product documentation to avoid cracking the glass.
8. Install top rail if required: Some frameless designs using laminated tempered glass tested to ASTM E2353 can omit the top rail, but most residential installations still include one for grip and aesthetics.
Pro Tip: Corners and transitions are where inspectors look first and where DIYers fail most often. At every inside and outside corner, run the test sphere in multiple directions, not just straight along the run. An angled approach can reveal gaps that a straight pass misses entirely. Review the full installation process for glass railings before you start to anticipate these moments.
Verification, common mistakes, and troubleshooting tips
After installation, thorough inspection and proactive troubleshooting keep your railing safe and problem-free.
Inspection steps after installation:
- Walk the entire railing length with your 4-inch test sphere and press it into every gap, including bottom edges, panel-to-panel joints, and corner returns.
- Check that the top rail height meets your local minimum (36 or 42 inches) measured vertically from the walking surface, not along the slope.
- Confirm all hardware is tight and that no panel rocks or shifts when moderate lateral pressure is applied.
- Photograph your completed installation with a tape measure visible in the frame. This documentation protects you during resale or future inspections.
Common failure points during inspection include corners, transitions between runs, bottom gaps, and cable sag in hybrid systems. Knowing where inspectors focus helps you prioritize your own pre-inspection check.
Most frequent mistakes and fixes:
- Wide corner gaps: Happens when two panel runs meet at an angle without a filler piece. Fix by adding a custom-cut glass filler or a stainless steel corner post that closes the gap.
- Bottom gap too large: Occurs when base shoe placement is too high or the floor surface is uneven. Fix by shimming the base shoe down or adding a bottom trim piece.
- Panel movement: Caused by undertightened set screws in the base shoe. Fix by torquing to spec and rechecking after 30 days as hardware seats in.
- Uneven panel heights: Results from an unlevel base shoe run. Fix before final fastening by re-leveling the shoe and re-marking positions.
“Document everything. A photo of your 4-inch sphere test at every joint takes five minutes and can resolve a dispute in five seconds.”
Troubleshooting quick reference:
- Sphere passes through a gap: identify whether it is a panel gap, bottom gap, or corner gap, then address the specific hardware or filler needed
- Panel feels loose: re-torque set screws; if glass has shifted, reseat in base shoe before re-tightening
- Inspector flags a measurement: request a re-measurement with a calibrated gauge; sometimes the issue is measurement technique, not actual non-compliance
Keep a copy of your local code adoption, your product spec sheets, and your inspection photos in a folder with your property records. Buyers, insurers, and future inspectors will appreciate the paper trail.
For a complete walkthrough of what to check at each stage, the detailed inspection checklist covers every step from hardware torque to final sign-off.
What most guides miss about baluster spacing and lasting safety
Most articles on baluster spacing stop at passing inspection. That is a fine goal, but it is also the bare minimum. Here is what we have learned from working with homeowners, contractors, and architects across hundreds of glass railing projects: code compliance is the starting line, not the finish line.
The 4-inch sphere rule tells you the largest gap you are allowed. It does not tell you anything about how climbable your railing is, how it will perform after five winters, or whether a change in how your space is used might create new risks. A deck that was originally built for adults entertaining outdoors becomes a different safety environment the moment grandchildren start visiting regularly.
Horizontal balusters are technically allowed if they pass the sphere test, but they create a ladder-like structure that children can climb easily. Many jurisdictions flag this as a concern even when the spacing is technically compliant. Glass panels eliminate this problem entirely because there are no footholds. That is one of the strongest practical arguments for glass over cable or horizontal metal systems in family homes.
Glass railings also require a different kind of ongoing attention than wood or metal. The glass itself does not rot or corrode, but the hardware does shift over time, especially in freeze-thaw climates. Set screws can loosen. Base shoe sealant can crack, allowing water infiltration that corrodes fasteners from the inside. A railing that passed inspection three years ago may have a loose panel today that creates a safety risk without any visible warning sign.
We recommend a simple annual check: run your hand along every panel to feel for movement, inspect all visible hardware for corrosion or loosening, and re-run the 4-inch sphere test at corners and transitions. It takes less than 20 minutes for most residential installations and gives you genuine confidence that your railing is still performing as designed.
For projects where the stakes are higher, such as commercial decks, rooftop terraces, or elevated pool surrounds, consider advanced custom glass solutions with heavier glass thickness and marine-grade hardware that holds up better under repeated load and environmental stress.
Get code-compliant glass railing solutions
Ready to ensure your next project meets every safety and aesthetic goal? At Glass Railing Store, we carry a full selection of tempered glass panels and hardware designed to keep your installation compliant from day one. Our 46-inch glass panels are a popular choice for residential decks and balconies, offering the right dimensions for most standard runs while maintaining the clean, unobstructed look homeowners want.
If you prefer to leave the measuring and installation to the pros, our professional installation services connect you with experienced installers who know local code requirements and handle everything from layout to final inspection. For projects that need a tailored approach, our custom solutions let you specify exact dimensions, glass thickness, and hardware finish so every panel arrives ready to install. Free shipping is available on orders over $3,000, making it easy to outfit an entire deck or commercial project without added freight costs.
FAQs
1. What is the maximum gap allowed between balusters in a glass railing?
The largest gap allowed is 4 inches, meaning no opening should let a 4-inch sphere pass through, per IRC and IBC codes. This applies to all baluster openings from the walking surface to guard height.
2. Do I need to check local building codes for baluster spacing?
Yes, always confirm with your local authority because some areas adopt stricter requirements or different height rules. Local AHJ amendments can require 42-inch heights or specific glass specifications that differ from the base IRC.
3. Are horizontal balusters allowed on glass railing systems?
Horizontal balusters are allowed if they pass the 4-inch sphere test, but vertical balusters are safer in most homes. Horizontal configurations may raise climbability concerns and are flagged in some jurisdictions even when technically compliant.
4. How do I test if my railing is code compliant?
Use a 4-inch test sphere and try it at all panel joints, corners, and transitions along the railing. Common failure points include corners, bottom gaps, and transitions between runs, so prioritize those areas.
5. What’s the minimum height for residential and commercial glass railings?
Guards must be at least 36 inches high for homes and 42 inches for commercial spaces. Some residential jurisdictions require 42-inch guard height as a local amendment, so always verify before ordering materials.
Recommended
- 33.6" Height Tempered Glass Panel – The Glass Railing Store
- 39.6" Height Tempered Glass Panel – The Glass Railing Store
- 60" Height Tempered Glass Panel for Glass Railing – The Glass Railing Store
- 46" Height Tempered Glass Panel for Glass Railing – The Glass Railing Store