Glass Railing Installation Guide
Welcome to the installation guide for The Glass Railing Store's frameless glass railing system. This guide provides step-by-step instructions and useful tips to ensure a successful installation. For any questions or support, please contact us.
The installation video:
The installation PDF:

(click on the image to download the PDF)
Before You Begin
- Inspect Your Packages: Check all packages for shipping damage and confirm your piece count with the packing list. If any damage or missing parts are found, contact our customer support within 3 business days of delivery.
- Building Codes: Ensure compliance with local building codes. We are not responsible for code compliance and will not accept returns for non-compliance.
- Handling Glass Panels: Due to the weight and nature of glass panels, we recommend a two-person lift. Avoid letting glass edges contact hard surfaces such as concrete.
- Safety Gear: Wear safety glasses, safety boots, work gloves, and other appropriate safety gear when handling glass and using power tools.
Tools You’ll Need
- Measuring Tape
- Level
- Pencil
- Power Drill with 1/8’’ and 5/16’’ Drill Bits
- Allen Key
Components
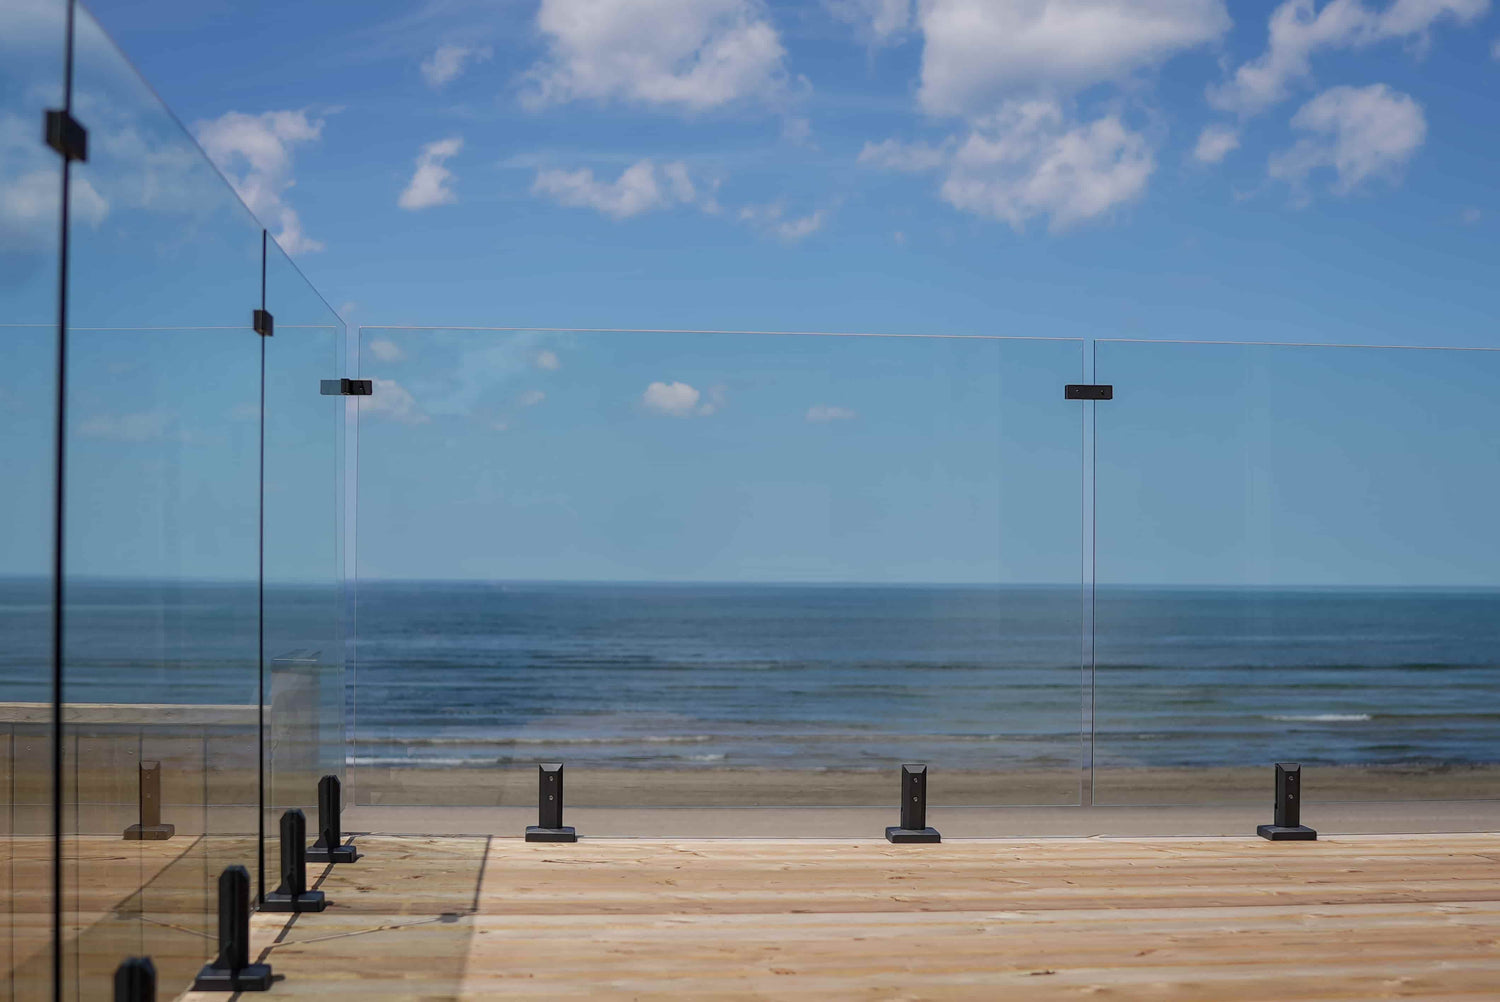
- Glass Panels
- Square Glass Clamps
- Gaskets (2 per clamp)
- Setting Blocks
- Screws
- Wall Anchors
Installation Steps
Ground Marking
1. Chalk Line: Begin by marking the ground with a chalk line to define the glass line. This step is crucial as it guides us throughout the installation process. Ensure the line is marked accurately, as it will determine the alignment of the fence.
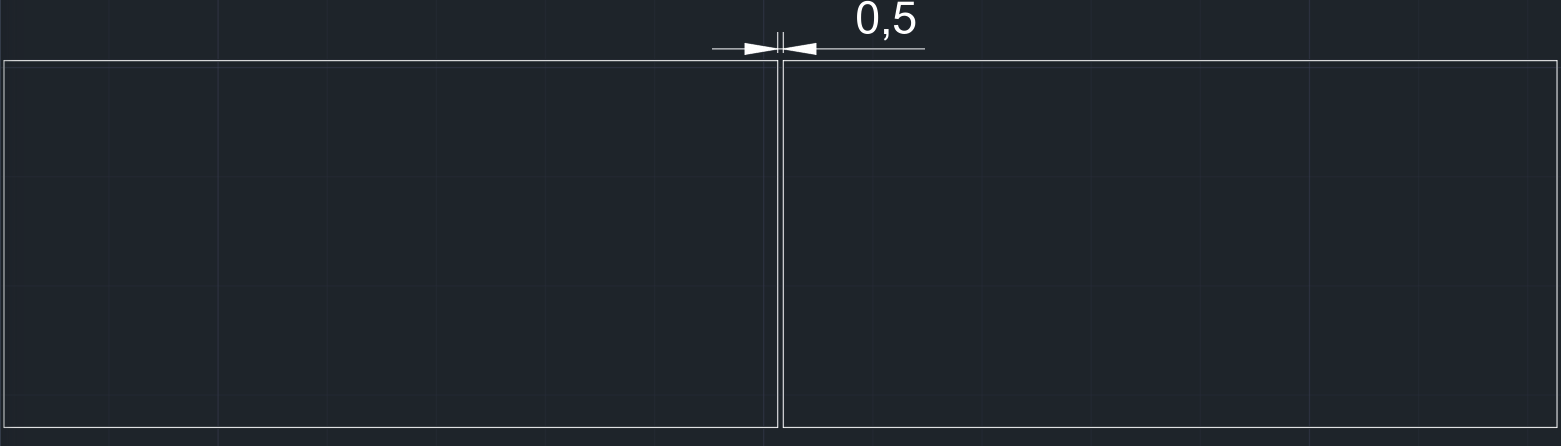
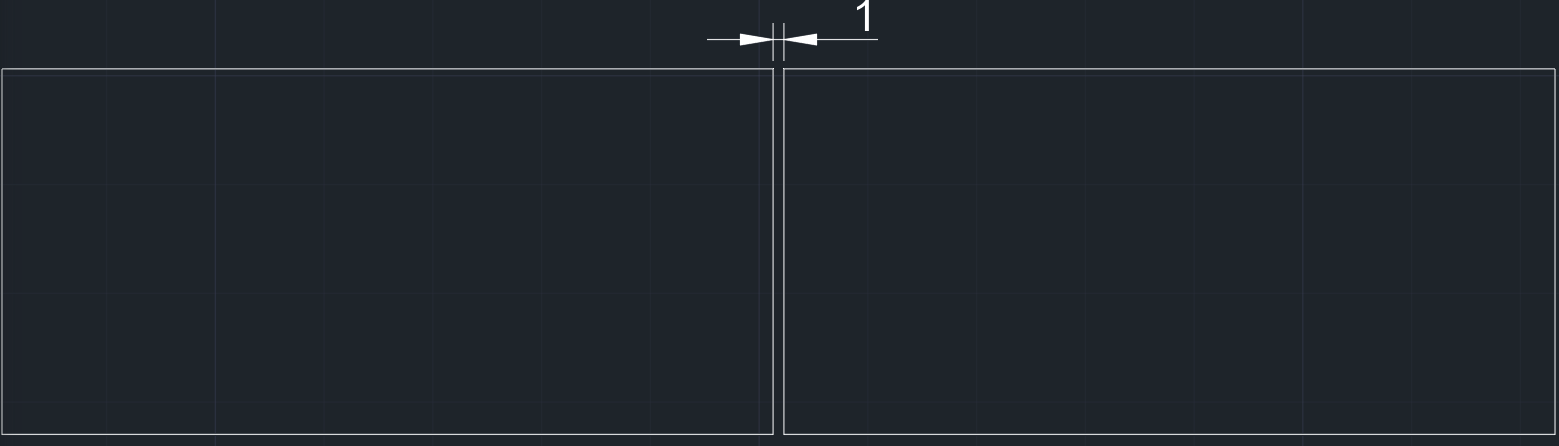
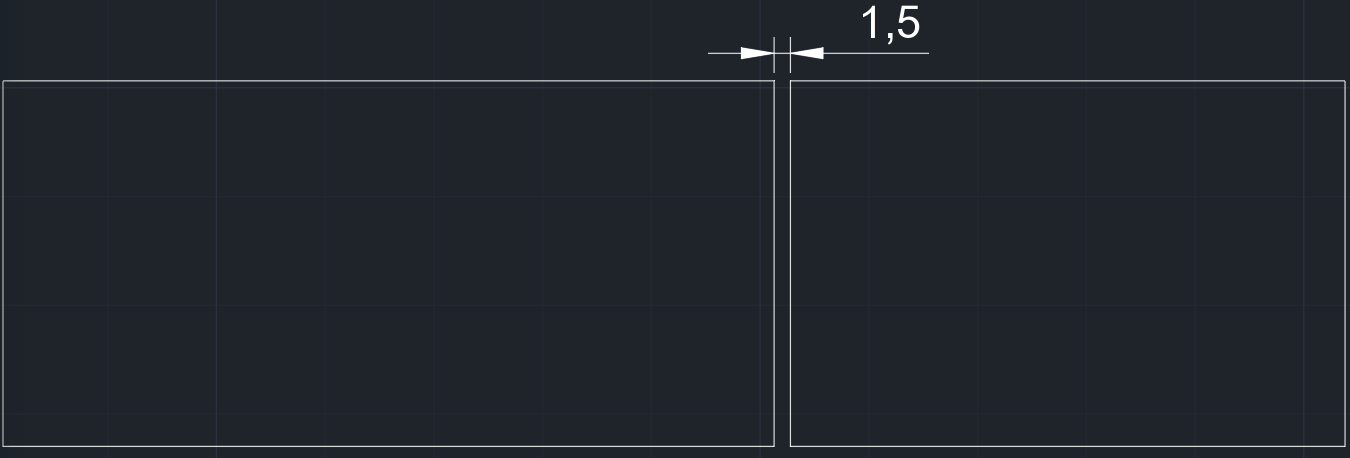
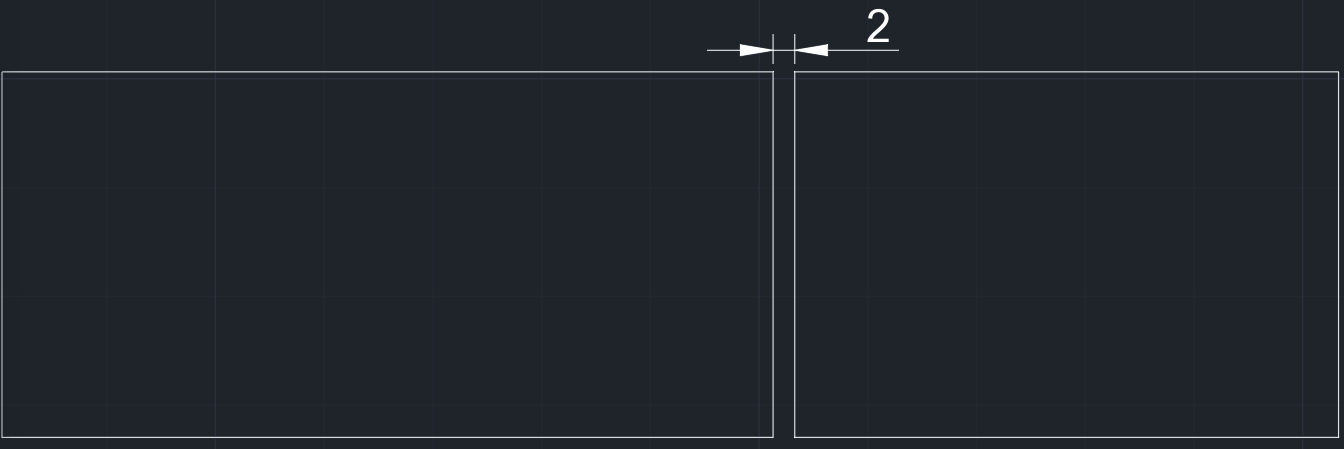
2. Mark Glass Dimensions and Spacing: Based on the glass measurements selected for your project, mark these dimensions on the ground. Typically, we leave about 1 inch of space between each glass panel, but the spacing can vary from 3/4 inch to 2 inches. It's essential that the space always remains smaller than 4 inches to comply with building codes.
 3. Mark Spigot Locations: The spigots should be placed at approximately 25% of the glass length from the edge for maximum stability. This location may be adjusted slightly depending on your project's specific requirements.

Drilling Holes for Spigot Screws
Use the spigot as a guide to drill holes at the correct locations. It's vital not to move the spigots during drilling to keep the fence line straight. We recommend using HILTI's XXXX drill bit and XXXX drill, though the specific tools you use are not crucial.

Screwing in the Screws
For screwing, use a drill with an attachment made for our screws. Ensure the spigot remains aligned with the chalk line during this process to prevent the glass from being installed crookedly. Decide which side will have the tightening screws, usually placed on the less visible side, whether it's facing the pool or the interior of a deck/balcony.

First Adjustment of the Spigot
Using a magnetic level, check if the spigot is straight. Most times, it will require some adjustment. Use a wrench and an Allen key to adjust the spigot until it is level.

Placing the Cap to Cover the Screws
Inserting the Glass into the Spigots
This delicate step requires two people. Carefully slide the glass into the two spigots, ensuring that the rubber inside the spigot is ready to receive the glass. Make sure the glass does not touch the metal of the spigot or another glass piece during insertion. After the glass is in the spigots, position it according to the ground markings made earlier.

Adjusting the Height of the Glasses
Use 4 pieces of wood to create levers at each end of the glass, making it easier to adjust the height. Start with the glass that appears highest due to ground elevation, as you cannot lower a glass below the spigot limit. Instead, raise the glass to match the height of the highest glass. Ensure all glasses are at the same height and tighten the screws firmly with an Allen key.

Adjusting the Angle of the Glasses
Once all glasses are at the correct height, ensure they are also at the right angle. Start from a corner and adjust two screws at a time to achieve a straight line.
Placing the Clamps
Again, starting from the corners, you can place the clamps at the height you desire, typically 6 inches below the glass height, to solidify your glass fence line.

How to Install Cap Rails
-
Clean the Glass Panels
Begin by cleaning the top of the glass panels. Ensure there is no dust, debris, or dirt on the surface to ensure a secure fit for the cap rail.
-
Prepare the Rubber Gasket
Take the rubber gasket and place it on the top edge of the railing. Press down on the gasket firmly to ensure it is securely in place and evenly distributed along the entire length of the railing.
-
Position the Cap Rail
Place the cap rail directly on top of the rubber gasket. Carefully align it with the railing and gently lower it into position. Once the cap rail is positioned, apply slight pressure to make sure it fits securely into place with the rubber gasket. Ensure the cap rail is fully seated and aligned properly, creating a tight seal between the glass panels and the cap rail.
-
Check for Proper Fit
Verify that the cap rail is snugly in place and there are no gaps. If necessary, apply more pressure to ensure a firm, secure connection.
Door Installation
1. Door Installation (Inline Configuration):
For an inline configuration, ensure the door opening is 36”. Install two spring-loaded door hinges and a magnetic door latch. Adjust the door closing speed with Allen key screws on the hinges. For pool railing, the door latch should be on the pool side, with the door swinging outward.
2. Door Installation (Corner Door Configuration - Wall/Post to Glass):
Ensure the door opening is 36”. Install two spring-loaded door hinges and a magnetic door latch. Adjust the door closing speed with Allen key screws on the hinges. For pool railing, the door latch should be on the pool side, with the door swinging outward.
3. Door Installation (Corner Door Configuration - Glass to Glass):
Ensure the door opening is 36”. Install two spring-loaded door hinges and a magnetic door latch. Adjust the door closing speed with Allen key screws on the hinges. For pool railing, the door latch should be on the pool side, with the door swinging outward.
4. Door Lock Installation:
Install the door lock on the exterior (non-pool) side using an Allen key. Close the door and mark the lock’s cylinder center. Drill a 5/8’’ diameter hole 3/8’’ deep on the mark.
Tips and Final Adjustments
- Ensure all spigots are aligned on the centerline, plumb, and level.
- Use setting blocks to make fine adjustments.
- Use glass-to-glass clamps to align the top part of the glass panels.
- Regularly check the level and alignment throughout the installation process.
Congratulations! Your frameless glass railing installation is complete. We’d love to see your finished project. Snap a few photos and send them to us. Thank you for choosing The Glass Railing Store for your glass railing needs.

Let customers speak for us

The glass arrived in perfect condition. The hardest part was moving the glass from my driveway to my back deck. I used masking tape to create a line and then did all my markings on the tape. Excellent product, straight forward installation. Thank you
We are so pleased with the service of this company! We live 3 provinces away and the ordering and delivery both went smoothly. Everything came in a crate delivered right to our door with free shipping! All intact. Thank you so much. The quality appears great but I guess we will see when the rails are up and in place.🙂
I shopped for quite a long time and search from website to website but they were the only one to have the measurements I needed
I was hesitating between the glass railing store and invisirail but ultimately landed here because of better quality. Beautiful product, will buy again for other projects
I'm so happy I found you guys because I was getting quotes for like $180 per linear foot which is crazy! I was able to install it with my son for half of that because of glass railing store. Thank you so much for all the help in crafting the project, I will be recommending you guys from now on

Beautiful job! Incredibly happy with your prompt delivery and beautifully finished glass, will definitely be using your services again. 5-Stars!

Very satisfied with my order, glass is thick and strong. I love how the corners are a little rounded, I didn't even know that was going to be the case
good quality to price ratio, I recommend

Thank you so much to the team for delivering my glass railing! I am super grateful that I found you guys it just looks great! My husband installed it last night so I have a beautiful sunset picture for you guys to enjoy!
All my neighbours are going to order too, can I have a discount for referring

good
Just beautiful, will be ordering again for my son's house
I was a little skeptical at the beginning as I was worried that they may be cheap, but Marine in customer service assured me that they were good. They arrived last week and WOW they weight like 5 pounds each (of stainless steel!!) and come with adjustable screws (didn't even know)
The quality is amazing and I highly recommend them for hardware, this is really heavy duty stuff. I also like that they have a 10 year warranty on the rust, that we will have to wait 10 years to comment on but pretty good. Once again, thank you marine for assisting me
same review as the other connectors
I personally went with the big connectors as I have stronger winds coming from the lake, but I can see how someone may choose the smaller ones for less hardware.
I think the big ones offer more support

I had some doubts at the beginning as I have no clue how they ship glass, but everything arrives in a crate in great shape!
I mean look at that, definitely one of the most affordable options online too, especially compared with invisarail or like the home depot alternative.
Got the coupons too for an extra discount

Installation was a breeze. These hinges work perfectly.
Just don't forget to follow the instruction thing for the closing speed!
Glass Railing Near You
Discover how The Glass Railing Store has been delivering exceptional service to our customers, thanks to our dedicated and knowledgeable team and their love our glass railing products.