

Save $200–$400: Inspect Tile Slab Before Installing Glass Railing
Yes, you can install a glass railing on a tile balcony, provided the slab underneath and the anchor method meet code and structural requirements. The tile itself never carries the load; the concrete slab does. Your first move is measuring slab thickness and edge distance, or getting a contractor or structural engineer to confirm the substrate before anyone drills a single hole.
TL;DR:
- Most balconies with concrete slabs over tile are suitable for glass railing installation, provided structural and edge distance requirements are met.
- Using diamond core bits and water cooling is essential when drilling through tile into concrete to prevent cracking, especially on exposed or higher balconies.
- Cost varies from $60 to $250 per linear foot depending on system type, complexity, and whether you do it yourself or hire a professional.
- Building codes typically require guard heights of 36 to 42 inches, tempered or laminated glass, and verification of anchor spacing and load capacity.
- A structural engineer visit is advisable if slab condition is uncertain, the balcony is over two stories, or high wind exposure makes proper reinforcement critical.
Table of Contents
- Glass Railing on Tile Balcony: Which System Types Actually Work
- Is Your Tile Balcony Substrate Strong Enough?
- Anchoring Glass Railings Through Tile Without Cracking the Slab
- Installing Glass Railing on Tile: A Step-by-Step Checklist
- Building Codes and What Inspectors Actually Check
- What a Tile Balcony Glass Railing Actually Costs
- Keeping Balcony Glass and Hardware Looking New
- Should You DIY or Hire a Pro for This Job?
- Common Mistakes on Tile Balconies
- Getting a Quote for Your Tile Balcony Railing
- Sources
- FAQ
Glass Railing on Tile Balcony: Which System Types Actually Work
Three system families cover almost every balcony glass fence installation: framed, base shoe (frameless channel), and spigot/standoff designs, sometimes blended into hybrids. Each anchors differently, which matters more on tile than on wood decking because you’re drilling into a hard, brittle surface sitting over structural concrete.
- Framed systems use continuous top and bottom rails that clamp the glass, spreading anchor loads across more contact points, generally the most forgiving option for imperfect slabs.
- Base shoe (channel) systems hold the glass in a continuous U shaped track bolted to the slab edge, delivering a cleaner look with fewer visible fasteners.
- Spigots and standoffs use individual point mounts, giving nearly unobstructed views but concentrating load at just a few anchor points.
- Hybrids mix a base shoe with occasional standoffs for wind bracing on exposed balconies.
Frameless and spigot designs win on sightlines. Framed and base shoe systems tend to perform better in high-wind exposure because the load isn’t concentrated at a handful of points.
Is Your Tile Balcony Substrate Strong Enough?
Before you pick hardware, find out what’s actually under the tile. Most balconies fall into one of two categories: tile set directly over a structural concrete slab, or tile applied over a framed deck with plywood or a mortar bed underneath. The first is generally fine for glass railing anchoring. The second often is not, at least not without reinforcement.
Check these before ordering glass:
- Slab thickness, ideally confirmed by a core sample or existing architectural drawings, not a guess.
- Edge distance from where the anchor will sit to the edge of the slab. Installers commonly require at least 3 inches between an anchor and the slab edge to prevent concrete breakout under load.
- Visible cracking, spalling, or previous patch repairs near the balcony perimeter.
- Whether the balcony is a cantilevered slab, which behaves differently under lateral railing loads than a slab supported on all sides.
Pro Tip: If you can’t verify slab thickness and reinforcement from existing plans, a $200 to $400 site visit from a structural engineer is far cheaper than tearing out a railing that failed inspection.
Thin slabs, unknown build up layers, active cracking, or a balcony more than one story up are all reasons to stop and call a structural professional instead of proceeding on assumptions.
Anchoring Glass Railings Through Tile Without Cracking the Slab
Anchoring is where most tile balcony projects succeed or fail, and it comes down to matching the anchor type to what’s actually underneath the tile.
- Surface mounted spigots. Drill through the tile into the concrete slab using a carbide or diamond core bit, then set sleeve anchors or epoxy set threaded rods. Run the drill at low speed with water cooling to keep the tile from cracking around the hole, a detail that trips up more DIYers than any other step.
- Base shoe or channel systems. These need continuous anchoring along the slab edge or a reinforcing plate if the edge condition is compromised. Because the channel spreads load along its length rather than at single points, it tolerates minor substrate inconsistencies better than spigots do.
- Embedded shoes. These get set into a groove cut into the slab itself, but only when the slab edge geometry and thickness actually allow for it. This method requires stamped shop drawings before anyone touches a saw.
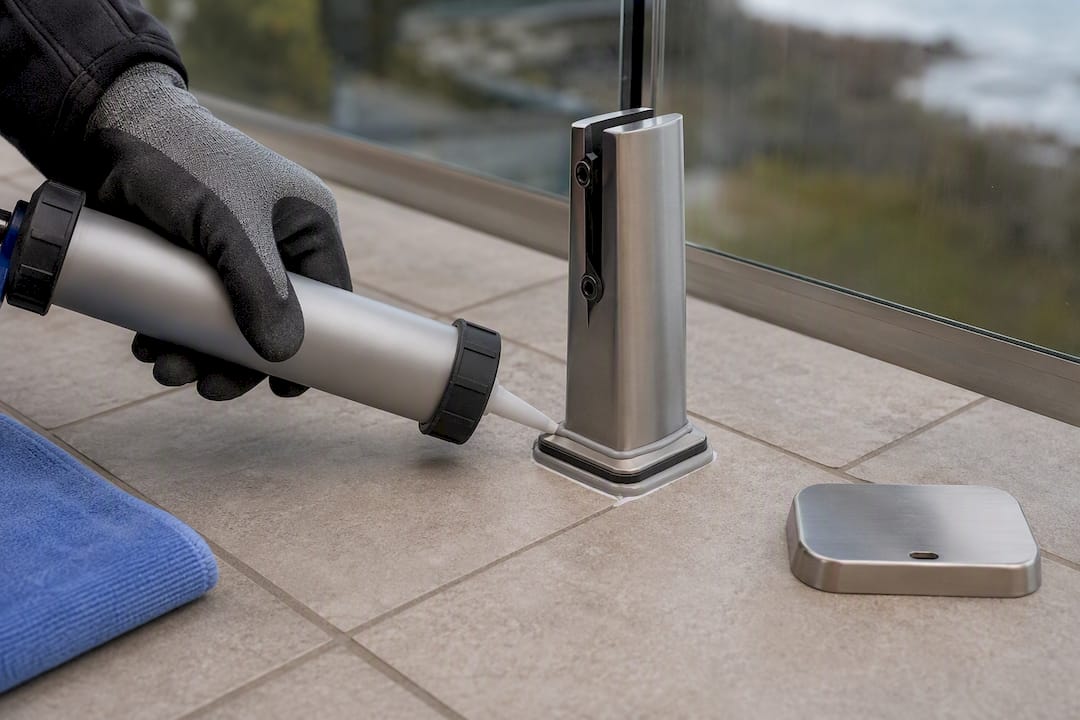
Waterproofing matters as much as the anchor itself. Every penetration through tile and slab needs a compatible sealant, usually a polyurethane or silicone sealant rated for exterior masonry, and any tile removed for anchor access should be patched with matching material and re-sealed before the railing goes on.
Pro Tip: Never rely on caulk alone around a spigot base. Use a proper sealant flashing detail or a stainless base cover plate with a gasket, or you’re inviting water into the slab within a season.
Installing Glass Railing on Tile: A Step-by-Step Checklist
A methodical sequence keeps a tile balcony project from turning into a redo.
- Confirm glass thickness and hardware specs against your shop drawings before ordering. Most exterior balcony applications use tempered glass around 12mm for adequate strength, sometimes laminated for added impact resistance.
- Mark the anchor layout on the tile, double checking edge distances against your slab assessment.
- Drill using masonry or diamond core bits designed for tile and concrete, ideally with a drill guide to keep holes straight and consistent.
- Set anchors, following manufacturer torque specifications for mechanical anchors or allowing full cure time (often 24 hours or more) for epoxy set threaded rods.
- Set the glass using suction cups for handling, checking plumb with a level, and shimming as needed before final tightening.
- Seal every penetration and inspect the full run before calling for inspection.
A few things worth double checking along the way:
- Verify hardware is stainless steel rated for exterior exposure.
- Confirm glass panel gaps meet code, usually no more than 4 inches, to prevent a sphere that size from passing through.
- Don’t rush epoxy cure time even if the schedule is tight.
Building Codes and What Inspectors Actually Check
Building departments look for the same handful of items on every balcony glass railing inspection, tile or otherwise. Guard height typically needs to hit 36 to 42 inches depending on your local code, and the glass itself has to be tempered or laminated safety glass, never annealed.
- Design load capacity, meaning the railing has to resist a specified lateral force without excessive deflection.
- Glass type and thickness documentation matching what’s actually installed.
- Anchor spacing and edge distance verification against approved shop drawings.
- Stamped calculations for exposed or high-wind balconies, which materially cuts down on approval delays with building departments.
Bring an inspector your anchor layout plan, edge distance measurements, and material spec sheet. Showing up with documentation instead of explanations is the difference between a five-minute inspection and a stop-work order.
What a Tile Balcony Glass Railing Actually Costs
Cost swings widely based on system type, glass thickness, access difficulty, and how much tile repair the project requires. Scaffolding or crane access for upper floor balconies adds real money fast, and engineering plus stamped shop drawings are a fixed cost regardless of railing length.
- Framed systems generally run $100 to $130 per linear foot according to Glassrailingstore’s pricing.
- Semi-frameless systems range from $165 to $250 per linear foot as listed on Glassrailingstore.
- DIY panel kits typically cost from $60 to $130 per linear foot as shown by Glassrailingstore.
- Industry-wide, full-service installed railings can range anywhere from $150 to $600 per linear foot depending on complexity.
Timeline typically runs two to six weeks from measurement to final inspection, with fabrication lead time and inspection scheduling as the most common delays.
Keeping Balcony Glass and Hardware Looking New
Glass itself is low maintenance, but hardware isn’t maintenance-free, especially near salt air. A quarterly rinse with mild soap and water keeps mineral deposits from etching the surface, since harsh or abrasive cleaners will dull tempered glass over time.
- Rinse hardware quarterly in coastal properties to prevent chloride attack on stainless fasteners.
- Inspect gaskets, fastener torque, and any corrosion signs annually.
- Replace worn gaskets yourself; leave glass replacement and re-anchoring to a professional.
Pro Tip: A light coat of automotive wax on stainless hardware twice a year slows corrosion in coastal climates far more than most homeowners expect.
Should You DIY or Hire a Pro for This Job?
Some tile balcony projects are genuinely DIY-friendly. A single-story balcony over a verified concrete slab, using a pre-engineered kit with clear instructions, is well within reach for a capable homeowner. DIY-friendly spigot and post systems exist for exactly this scenario, though accurate drilling and correct fasteners remain non-negotiable for safety and warranty coverage.
Hire a professional when the slab is unknown, the balcony sits above the second floor, wind exposure is significant, or the jurisdiction requires stamped drawings. When you do interview a contractor, ask for:
- Photos of past work specifically on tiled balconies, not just decks.
- Stamped calculations for your exact glass and anchor spec.
- Written insurance coverage and hardware warranty terms.
Common Mistakes on Tile Balconies
The same three errors keep showing up: skimping on edge distance, ignoring what’s actually under the tile, and skipping waterproofing because it slows the schedule down. Every one is preventable with a slab check and a real set of shop drawings before drilling starts. That upfront verification, plus a quote conversation with a supplier like Glass Railing Store, tends to save homeowners from the costliest surprises.
— Fuanne
Getting a Quote for Your Tile Balcony Railing
A glass railing supplier can provide a direct path from measurement to installed railing, reducing guesswork in matching hardware to your substrate. Product lines often support tiled slab installations, with planning support available before ordering.

Start by pulling your slab measurements and a few clear photos of the balcony edge and any existing tile condition. That’s what speeds up an accurate quote. From there, check current pricing across system types to see where your project lands, or go straight to request a frameless glass railing quote if you already know a frameless spigot system is the look you want. Either page gets you a real number instead of a rough estimate.
Sources
For code specifics, see Glassrailingstore’s building codes for glass railings page. For installation depth, review the frameless installation guide and DIY glass railing guide referenced throughout this article.
FAQs
1. Is Glass Railing Safe on a Balcony?
Yes, tempered or laminated safety glass railings are safe on balconies when installed to meet local building codes and properly anchored to a sound substrate.
2. Can You Drill Into Tile for a Glass Railing Anchor?
Yes, using diamond or carbide masonry bits at low speed with water cooling, though the anchor ultimately needs to reach the concrete slab beneath the tile, not just the tile itself.
3. What’s the Minimum Edge Distance for Anchors on a Tile Balcony?
Installers commonly require at least 3 inches between an anchor point and the slab edge to prevent concrete breakout under load, though your specific engineering requirements may call for more.
4. How Much Does a Glass Railing Cost per Linear Foot?
Framed systems typically run $100 to $130 per linear foot, semi-frameless runs $165 to $250, and DIY kits run $60 to $130, with Glassrailingstore listing current figures on its glass railing cost page.
5. Do I Need an Engineer for a Tile Balcony Glass Railing?
You need one when the slab condition is unknown, the balcony is exposed to high wind, or your jurisdiction requires stamped calculations and shop drawings for approval.