
How to Integrate Glass Railings with Wood: 2026 Guide
Glass and wood railing integration is a hybrid system that combines transparent tempered glass infill panels with wooden posts, frames, or handrails to create a railing that is both structurally sound and visually open. Knowing how to integrate glass railings with wood correctly means understanding how each material behaves, which mounting methods suit your project, and where precision matters most. Hybrid railing designs balance transparency with traditional warmth and structural redundancy, making them a popular choice in residential decks, staircases, and balconies. Glassrailingstore supplies the tempered glass panels and marine-grade hardware that make this combination work safely and cleanly.
How to Integrate Glass Railings with Wood: Materials and Tools You Need
The right materials determine whether your glass and wood railing design lasts a decade or a season. Start with the glass itself. Tempered glass panels used in railings typically range from 10mm to 12mm thick and undergo thermal processing to increase impact resistance. That thickness range is not arbitrary. It meets load resistance requirements for residential guardrails under the International Residential Code (IRC).
For the wood component, choose species that resist moisture and dimensional movement. Cedar, redwood, and pressure-treated pine are the standard choices for outdoor applications. Hardwoods like white oak work well indoors. Avoid softwoods that split easily when hardware is fastened through them.

Hardware is where most projects succeed or fail. Mounting methods for glass panels include base channels, spigots, clamps, and framed surrounds. Each offers trade-offs between visual minimalism and structural forgiveness. Base channels hide the glass edge inside a U-shaped track. Spigots grip the glass at the base and leave the panel edges exposed. Clamps attach to the face of a post and hold the panel from the side.
| Hardware type | Best use case | Visual result |
|---|---|---|
| Base channel | Continuous runs, outdoor decks | Clean, enclosed bottom edge |
| Side mount spigot | Frameless look alongside wood posts | Open, minimal appearance |
| Glass clamp | Framed or semi-frameless systems | Post-forward, glass recessed |
| Framed surround | Full wood frame with glass infill | Traditional, maximum alignment control |
Tools you need before starting:
- Tape measure and digital level
- Circular saw or miter saw for wood cuts
- Drill with wood and masonry bits
- Torque wrench for hardware fasteners
- Rubber mallet for seating glass panels
- Safety glasses and cut-resistant gloves
- Silicone sealant and applicator gun
Pro Tip: Buy 10% more glass panels than your measurements require. Tempered glass cannot be cut on site, so a single measurement error means waiting for a new panel.
What Design Approach Works Best for Combining Glass and Wood Railings?
The most effective glass and wood railing design treats wood as the structural frame and glass as the infill. Wood posts carry the load. Glass fills the space between them. This division of roles is what makes hybrid systems satisfy both visual and structural demands without compromise.
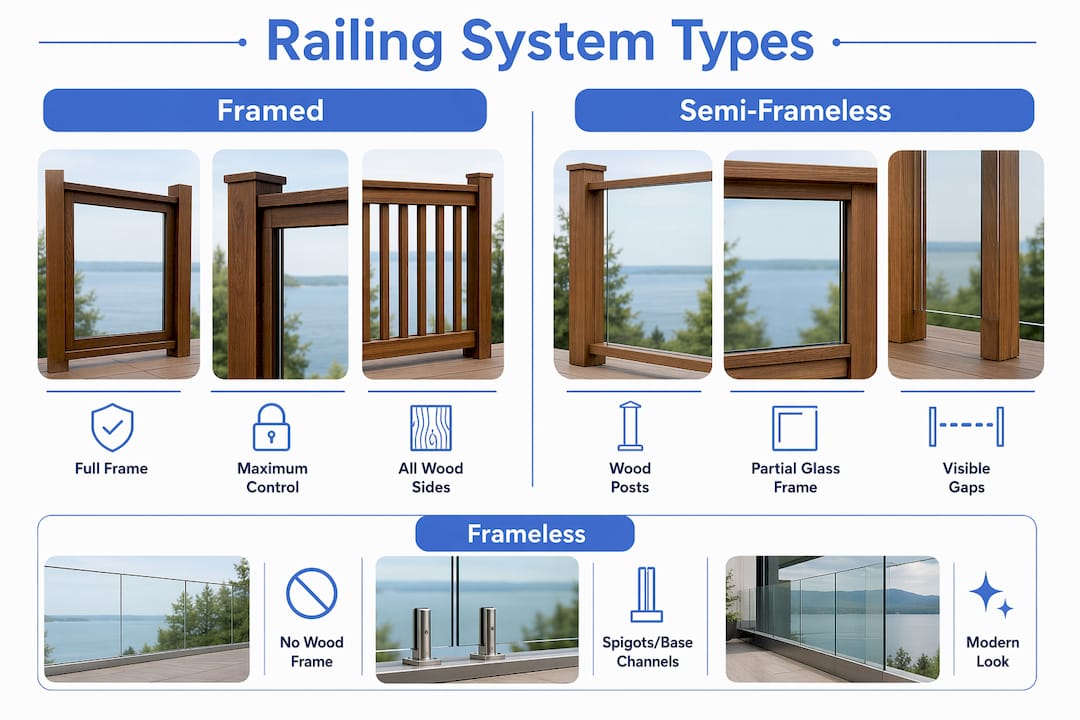
Three system types exist: framed, semi-frameless, and frameless. Each suits a different project context.
A framed system encloses the glass panel on all four sides with wood. This gives maximum alignment control and the most forgiveness for minor measurement errors. Wood frames surrounding glass panels help control alignment and accommodate environmental expansion and contraction better than frameless systems. Framed systems are the right call for outdoor conditions where temperature swings cause wood to move seasonally.
A semi-frameless system uses wood posts at intervals with glass panels spanning between them. The top edge of the glass is capped by a wooden handrail. This is the most common approach for decks and staircases because it looks clean while keeping wood as the primary structural element.
A frameless system mounts glass panels directly to the deck surface using spigots or base channels, with no wood framing around the glass. Wood appears only as a handrail on top. This approach demands the highest measurement precision because there is no frame to absorb error.
Pro Tip: For outdoor projects in climates with cold winters, always choose a framed or semi-frameless system. Wood expands and contracts by as much as 1% of its width per 4% change in moisture content. A frameless system has no tolerance for that movement.
Wood expansion is the detail most first-time installers underestimate. When wood swells against a glass panel without a buffer, the panel cracks. Silicone gaskets or rubber inserts between wood and glass cushion the panel and accommodate material movement. This is not optional in outdoor builds.
Step-by-Step Installation Process for Glass and Wood Railings
A clean installation follows a fixed sequence. Skipping steps or reversing the order creates alignment problems that are expensive to fix after glass is in place.
-
Survey and measure the site. Measure the full run of the railing, mark post locations, and check the deck surface for level. Note any slope. Record all measurements twice before ordering glass.
-
Prepare the wood structure. Cut posts to height and notch or dado them if your design requires glass to sit inside the post rather than against it. Sand all surfaces that will contact hardware. Apply a wood sealer or primer before any hardware goes on.
-
Install mounting hardware. Attach base channels, spigots, or clamps to the wood posts or deck surface. Hardware alignment is critical to successful glass railing installation. Use a digital level on every piece. A spigot that is 2 degrees off plumb will cause the glass panel to lean visibly. Torque all fasteners to the manufacturer’s specification.
-
Check alignment across the full run. String a line from the first post to the last. Every piece of hardware should align with that string. Correct any deviation before the glass arrives on site.
-
Fit the tempered glass panels. Glass panels should be installed only after the wood structure is precisely prepared and hardware is level and plumb. Lower each panel into its channel or spigot using a rubber mallet and a wood block as a buffer. Never strike glass directly. Seat silicone gaskets or rubber inserts before the panel goes in. Check the panel alignment after each one is placed.
-
Attach the wooden handrail. Cap the top of the glass run with your handrail. Use a square caprail connector to join sections cleanly. Secure the handrail to posts with structural screws, not finish nails.
-
Final finishing and safety check. Apply wood finish or stain to all exposed wood. Wipe glass clean with a lint-free cloth. Pull on each panel to confirm it does not rock. Check that no glass edge contacts bare wood without a gasket in between.
Pro Tip: Do a dry run with all panels before applying sealant. Place every panel in position without final fastening, then step back and check the visual line. Fixing a crooked panel before sealant sets takes five minutes. After sealant, it takes an hour.
What Are the Most Common Problems When Mixing Wood and Glass in Railings?
Measurement errors cause the most failures. Tempered glass cannot be trimmed after manufacture, so any inaccuracy in the site measurement gets locked into the panel order. A panel that is 5mm too wide will not fit. A panel that is 5mm too narrow will rock in its channel. Measure twice, order once.
Common problems and their fixes:
- Wood movement cracking glass: Fix: Install silicone gaskets between all wood-to-glass contact points. Leave a 3mm gap between the glass edge and any wood frame member.
- Hardware out of plumb: Fix: Re-drill the fastener hole and use a larger-diameter anchor. Never force a spigot into an off-angle hole.
- Glass panel rocking in base channel: Fix: Add setting blocks (small rubber pads) under the panel to center it in the channel and prevent lateral movement.
- Handrail splitting at fastener points: Fix: Pre-drill all fastener holes to 90% of the screw diameter. Use stainless steel screws to prevent rust staining on the wood.
- Water pooling at the base channel: Fix: Drill weep holes in the bottom of the channel every 600mm to allow drainage. Seal the channel-to-deck joint with a marine-grade silicone.
For a wood deck attachment that holds long term, the fasteners going into the deck framing matter as much as the hardware itself. Use lag screws into the joist, not just the decking boards.
How Do You Maintain a Glass and Wood Railing System?
Regular maintenance including cleaning and inspection prevents premature deterioration and keeps the system safe. A twice-yearly schedule covers most residential applications.
- Cleaning the glass: Use a non-abrasive glass cleaner and a microfiber cloth. Avoid ammonia-based cleaners on tinted or coated glass. Wipe in one direction to avoid streaking.
- Caring for the wood: Reapply wood sealer or stain every one to two years depending on sun and rain exposure. Check for soft spots, checking (surface cracks), or gray weathering that signals the finish has failed. Sand and refinish before the wood begins to absorb water.
- Inspecting the hardware: Check every fastener for looseness twice a year. Tighten any that have worked free. Look for rust staining around stainless steel hardware, which signals a lower-grade alloy was used. Replace any corroded components immediately.
Pro Tip: Apply a hydrophobic glass coating once a year. It causes water to bead off the surface, which reduces mineral deposits and cuts your cleaning time by half.
For guidance on structure reinforcement as your system ages, Glassrailingstore publishes detailed technical guides covering hardware upgrades and load compliance checks.
Key Takeaways
Successful glass and wood railing integration requires precise measurement, the right mounting hardware, and silicone gaskets at every wood-to-glass contact point to prevent cracking and movement damage.
| Point | Details |
|---|---|
| Choose the right system type | Framed systems suit outdoor climates; frameless systems demand the highest precision. |
| Glass thickness matters | Use 10mm–12mm tempered glass to meet residential load resistance requirements. |
| Measure before ordering | Tempered glass cannot be cut on site, so every measurement error means a new panel order. |
| Gaskets prevent cracking | Silicone or rubber inserts between wood and glass absorb movement and prevent stress fractures. |
| Maintain twice yearly | Inspect hardware, reapply wood finish, and clean glass every six months to extend system life. |
Why I Think Most Glass and Wood Railing Projects Fail at the Same Point
After reviewing dozens of glass and wood railing installations, the failure point is almost always the same. Builders spend hours choosing the right wood species and the right glass profile, then rush through the hardware layout. They eyeball the spigot placement instead of stringing a line. They skip the gaskets because the fit looks tight. Six months later, a panel cracks or a post leans.
The insight that changed how I think about these projects: wood and glass are not equal partners in this system. Wood is the structure. Glass is the finish. Once you accept that, every decision gets easier. You build the wood frame to the same standard you would use for any load-bearing element. Then you treat the glass installation like finish carpentry, where every millimeter shows.
The hybrid approach works because it plays to each material’s strength. Wood handles load transfer, post connections, and the handrail grip. Glass handles the view, the light, and the modern aesthetic. Fighting that division by trying to make glass carry structural load, or by making wood invisible, is where projects go wrong.
My strongest recommendation: do not order glass until every piece of hardware is installed, leveled, and torqued. Measure the actual opening, not the planned opening. Those two numbers are rarely the same.
— Fuanne
Glassrailingstore Has the Components Your Project Needs
Combining glass and wood in a railing system works best when every component is designed to work together. Glassrailingstore stocks tempered glass panels in standard heights suited to deck and stair applications, along with the full range of mounting hardware including side mount spigots, base channels, and clamps built from marine-grade stainless steel.
Every component ships as a matched system, which eliminates the guesswork of sourcing hardware from multiple suppliers. For projects that require compliance documentation, Glassrailingstore offers glass railing engineering testing services that verify your installation meets residential safety standards. Contact the team directly for a project quote or to confirm panel sizing before you order.
FAQs
1. What glass thickness is required for wood-framed railings?
Tempered glass panels for railings should be 10mm to 12mm thick to meet residential load resistance requirements. Thinner glass does not satisfy guardrail impact standards under the IRC.
2. Can I install glass railings on an existing wood deck?
Yes, provided the deck framing is structurally sound and the ledger connections are secure. Hardware must be fastened into joists with lag screws, not into decking boards alone.
3. How do I prevent wood from cracking glass panels?
Install silicone gaskets or rubber inserts at every point where wood contacts glass. Leave a 3mm gap between the glass edge and any wood frame member to allow for seasonal wood movement.
4. What is the best mounting method for a frameless glass and wood railing?
Side mount spigots attached to wood posts give the cleanest frameless appearance. They require precise leveling because there is no frame to absorb alignment errors.
5. How often should I inspect a glass and wood railing system?
Inspect hardware fasteners and wood finish twice a year, typically in spring and fall. Reapply wood sealer every one to two years depending on weather exposure.
Recommended
- Glass Railing Wood Deck Attachment: A Builder’s Guide – The Glass Railing Store
- How to Align Glass Railing Panels: A DIY Guide – The Glass Railing Store
- Structure Reinforcement for Glass Railings: 2026 Guide – The Glass Railing Store
- DIY glass stair railing: A complete homeowner’s guide – The Glass Railing Store