

Glass Railing Post Base Plate Explained: Installer's Guide
A glass railing post base plate is the metal mounting plate that anchors a railing post to your deck, concrete slab, or fascia and transfers every load the railing sees directly into the building structure. Without it, the post has nothing solid to grip. The plate is the structural handshake between the railing system and the framing below, and it is the component that most often determines whether a system passes or fails a code inspection.
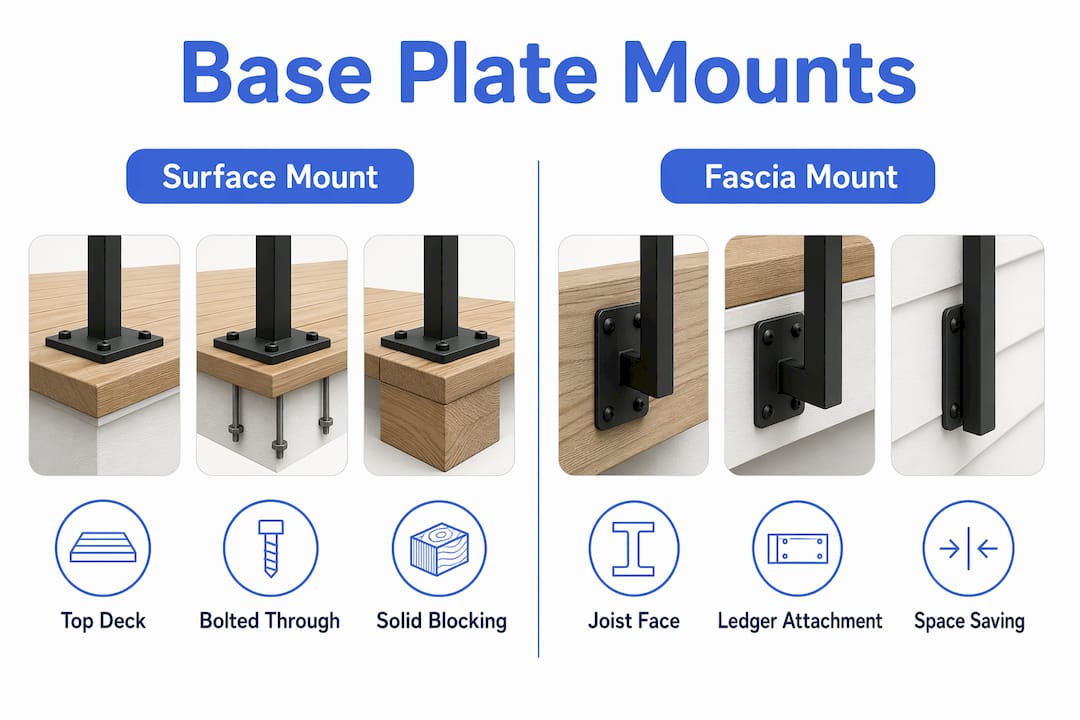
Post-mounted systems with base plates are the right call for surface-mounted deck installs, retrofit projects where you cannot cut into the deck surface, and any situation where you need a strong point-load connection to accessible blocking. The key standards governing these assemblies are ASTM E2353 (test methods for guard performance and post-breakage retention) and IBC guard requirements. Anchor tension demands on heavy-wall posts can be very high per anchor, which tells you immediately that this is an engineered component, not a cosmetic one. Glassrailingstore carries base plate kits with the hardware, datasheets, and anchor specs to back that up.
At a glance:
- Base plate = structural load-transfer element, not trim
- Preferred for surface-mount, retrofit, and top-mount post systems
- Governed by ASTM E2353, ASTM E2358, and IBC guard definitions
- Anchor capacity and backing quality determine system safety
Table of Contents
- What the base plate actually does inside a glass railing assembly
- What are the main base-plate mounting types?
- What materials and finishes should you specify?
- How do you read a base plate spec sheet?
- Step-by-step installation overview
- Why the base plate determines code compliance
- Post-mount base plates vs. U-channel base-shoe systems
- Inspection, maintenance, and when to replace hardware
- What to specify and order: the buying checklist
- What does a base plate kit cost, and how long does installation take?
- Key Takeaways
- The mistake most installers make with base plates
- Glassrailingstore base plate kits: hardware built for the load
- Key references and sources
What the Base Plate Actually Does Inside a Glass Railing Assembly
The load path in a post-mounted glass railing is straightforward but unforgiving. Force enters at the top rail when someone leans on the glass or a guard load is applied. That force travels down the post, concentrates at the base plate, and then distributes through the anchor bolts into the structural backing below. Every link in that chain has to hold.
The base plate’s job is to resist three types of force simultaneously: bending moment (the post wants to tip over), tension (the anchors want to pull out of the substrate), and shear (the plate wants to slide sideways). A plate that is too thin, too small, or bolted into inadequate backing fails on one of those three axes. The weakest link is almost always the connection to the deck, not the post or the glass.
Typical surface-mount plates have a square footprint with four anchor bolt holes at the corners. That footprint is not arbitrary; it gives enough moment arm to resist the tipping force without requiring an oversized plate. When you see a spec sheet, those dimensions are the first thing to verify against your post profile and your anchor spacing.
Load path summary:
- Top rail or glass panel receives applied force
- Force transfers down the post as a bending moment
- Base plate distributes that moment to four anchor points
- Anchors transfer tension and shear into blocking, concrete, or structural framing
What Are the Main Base-Plate Mounting Types?
Surface (Deck-Top) Mount
The plate sits flat on the deck surface and bolts through the decking into solid blocking or concrete anchors below. This is the most common residential configuration and the easiest to retrofit. The trade-off is that the plate is visible and adds a small amount of height at the post base. Composite decking boards alone are never sufficient backing; you need solid lumber blocking between the joists directly under each plate location.
Fascia (Face) Mount
The plate or bracket attaches to the rim joist or a ledger on the face of the deck framing rather than the top surface. This preserves the full deck surface and pushes the post outward, which can improve sightlines. The rim joist must be solid and well-connected; a single-ply rim joist is rarely adequate for the outward pull a railing post generates. Multi-ply blocking or a dedicated ledger bolted to the framing is the correct fix.
Through-Bolt Mount
Bolts pass completely through the deck structure and are secured with a backing plate or large washer on the underside. This method handles the highest tension loads and is preferred for heavy-wall posts where anchor demands approach the upper end of the load range. Access to the underside of the deck is required, which makes it impractical for some ground-level installations.
Retrofit and Expansion Anchors (Concrete or Masonry)
When the substrate is concrete, expansion anchors such as a 3/8" Hilti Kwik Bolt or equivalent are the standard choice. Epoxy anchors work where edge distances are tight or where the concrete has lower compressive strength. For wood substrates, structural screws into solid blocking are required — never rely on decking screws or decking boards alone.
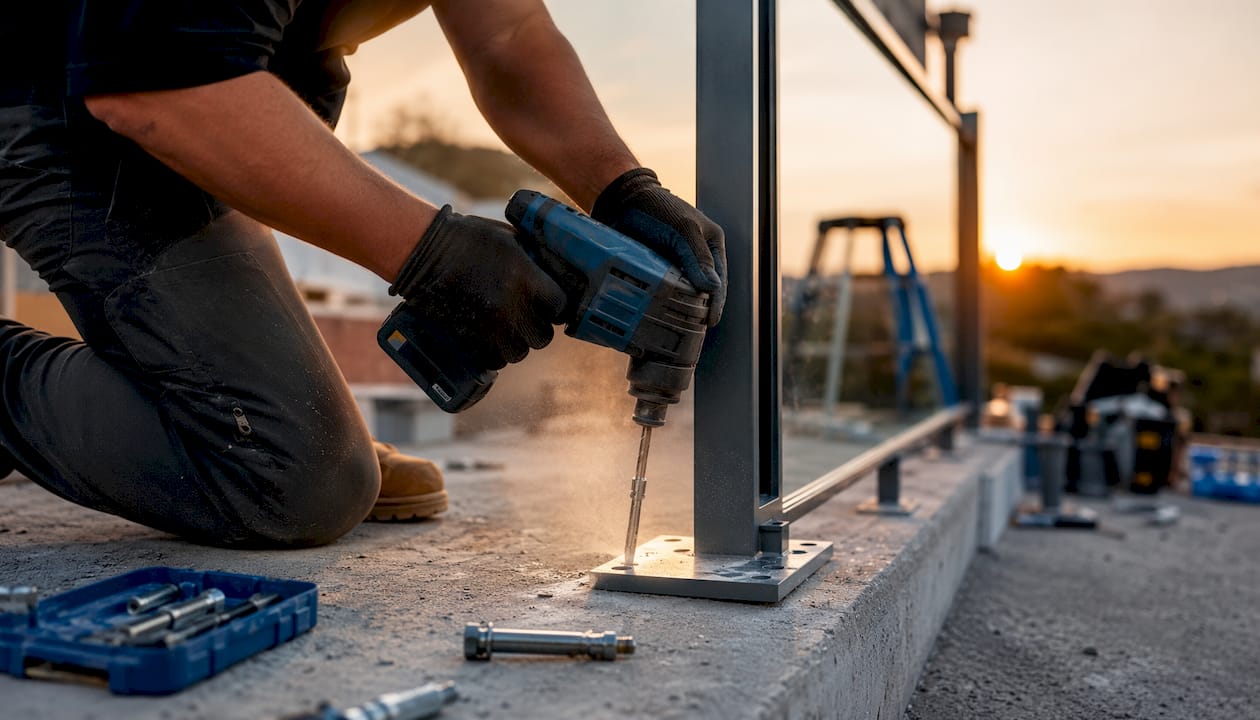
Pro Tip: Before finalizing plate locations on a composite deck, cut a small inspection hole or use a stud finder to confirm blocking is present directly under each post. Moving a post location by 6" is far cheaper than adding blocking after the decking is down.
What Materials and Finishes Should You Specify?
Material selection is where a lot of buyers make a costly shortcut. The plate lives at the base of the post, which is exactly where water pools, debris collects, and salt air concentrates. Corrosion here is not cosmetic; it degrades the anchor interface and can compromise holding capacity over time.
316 marine-grade stainless steel is the correct choice for coastal environments, pool surrounds, and any exterior installation within a few miles of salt water. The molybdenum content in 316 gives it meaningfully better chloride resistance than 304. For inland or protected installations, 304 stainless is acceptable, but 316 costs little more and eliminates the guesswork.
6061-T6 aluminum is common in extruded post systems and painted aluminum railing lines. It is lighter, takes anodizing and powder-coat well, and is structurally adequate for most residential loads. The critical detail with aluminum plates is fastener compatibility: steel anchors in direct contact with aluminum create a galvanic cell, especially in wet conditions. Use stainless fasteners or isolate dissimilar metals with a neoprene pad or compatible sealant.
Finishes to know:
- Passivation (stainless): removes free iron from the surface, improves corrosion resistance, no color change
- Powder-coat (aluminum or steel): durable color finish, good UV resistance, can chip at edges
- Anodizing (aluminum): integral surface hardening, excellent for high-traffic areas, limited color range
Plate thickness matters structurally. A 3/8" plate is a common benchmark for surface-mount applications; thinner plates can deflect under load and reduce the clamping force on the anchors. Always check the product datasheet for the rated thickness, not just the listed dimensions. For aluminum profiles and structural use, the alloy designation and temper (T6 in the case of 6061) tell you more about performance than the nominal thickness alone.
How Do You Read a Base Plate Spec Sheet?
Spec sheets for base plates are dense but follow a consistent pattern once you know what each field means. Here is what to look for and why each number matters:
| Spec Field | Typical Range | Why It Matters |
|---|---|---|
| Plate footprint | 4" x 4" (common) | Sets the moment arm and anchor spacing |
| Plate thickness | 3/8" minimum | Determines bending resistance under load |
| Anchor hole count | 4 (corner pattern) | Four anchors distribute load evenly |
| Anchor hole diameter | — | Must match anchor bolt diameter with clearance |
| Center-to-center distance | Varies by post size | Must clear post base and fit within deck framing |
| Material grade | 316 SS or 6061-T6 | Sets corrosion resistance and strength class |
| Anchor tension rating | 1,890–3,330 lb per anchor | Determines required anchor type and embedment |
| Finish | Passivated, powder-coat, anodized | Affects longevity in the installation environment |
The two numbers that directly govern structural performance are plate thickness and anchor tension rating. If a product listing shows a footprint and a finish but omits the load rating, ask for the datasheet before ordering. A plate without a rated anchor tension figure is an unknown quantity in a code-critical installation.
Step-by-Step Installation Overview
Pre-installation checks
- Confirm deck framing is sound and locate blocking or plan to add it under each post location.
- Lay out glass panel positions and post spacing per the manufacturer’s layout guide; verify spacing before drilling anything.
- Check the deck surface for level; note any slope that will require shimming.
- Identify substrate type (pressure-treated lumber, concrete, composite over framing) and select anchors accordingly.
Surface (deck-top) mount installation
- Position the plate template on the deck surface and mark anchor hole centers with a punch or pencil.
- Pilot-drill anchor holes to the diameter and depth specified for your anchor type.
- Confirm blocking is present below each hole; if not, stop and add blocking before proceeding.
- Set anchors (expansion anchors for concrete; structural screws for wood) and torque to the manufacturer’s specification using a calibrated torque wrench. Over-tightening crushes the substrate; under-tightening leaves the plate loose.
- Place a neoprene or EPDM shim pad under the plate to prevent water intrusion and galvanic contact between the plate and decking.
- Seat the plate, install the post, and verify plumb before final torque.
- Apply a bead of compatible sealant around the plate perimeter to prevent water migration under the plate.
Fascia mount installation
- Verify rim-joist thickness and condition; add multi-ply blocking or a through-bolted ledger if the rim joist is a single ply.
- Mark bracket positions on the fascia face and confirm they align with solid framing behind.
- Secure brackets with through-bolts where possible; verify outward pull resistance before loading the post.
Through-bolt installation
- Drill clearance holes through the full deck assembly at marked locations.
- Feed bolts through from the top; install a backing plate or large washer on the underside to distribute load.
- Torque nuts from below to specification; apply anti-seize compound to threads in exterior applications.
Tools required: torque wrench, hammer drill, masonry core bits (for concrete), shims, neoprene pads, compatible sealant, plate template, level.
Safety note: Test each anchor for secure seating before loading the post. Any movement, cracking sound, or soft feel in the substrate means the backing is inadequate. Do not proceed until the backing is corrected. For detailed anchor selection guidance, Glassrailingstore’s anchoring best practices guide covers substrate-specific recommendations.
Why the Base Plate Determines Code Compliance
Code compliance for a glass railing is an assembly question, not a glass question. The IBC defines guards as barriers that prevent falls from elevated surfaces, and the entire assembly, including hardware and connections, must meet the performance criteria, not just the glass panel.
ASTM E2353 sets the test methods for static strength, impact performance, and post-breakage retention. Post-breakage testing is the part that catches most people off guard: after a glass panel breaks, the assembly must still function as a barrier. That means the base plate and anchors must hold the post upright even after the glass is gone, unless laminated glass meeting the retention criteria is used. ASTM E2358 covers the specification side, defining performance requirements for glazing in permanent railing systems.
The anchor tension demands make this concrete. On heavy-wall posts, anchors must resist up to ~3,330 lb of tension per anchor under test loads. A 3/8" expansion anchor in shallow concrete or a structural screw into a single decking board will not provide sufficient holding capacity for heavy-wall post anchor demand. Using a tested assembly or following engineered attachment details is the only reliable path to compliance. For a full breakdown of current code requirements, Glassrailingstore’s building code compliance guide is a practical starting point.
Post-Mount Base Plates vs. U-Channel Base-Shoe Systems
These are the two dominant glass railing support systems, and they suit different situations. Neither is universally better; the right choice depends on your structure, aesthetic goals, and load demands.
Post-mount base plate strengths:
- Easier to retrofit on existing decks without cutting into the surface
- Strong point-load capacity when blocking is accessible
- Simpler integration with top-rail systems (caprail, handrail)
- Better suited for heavy-traffic decks and commercial applications
U-channel (base shoe) strengths:
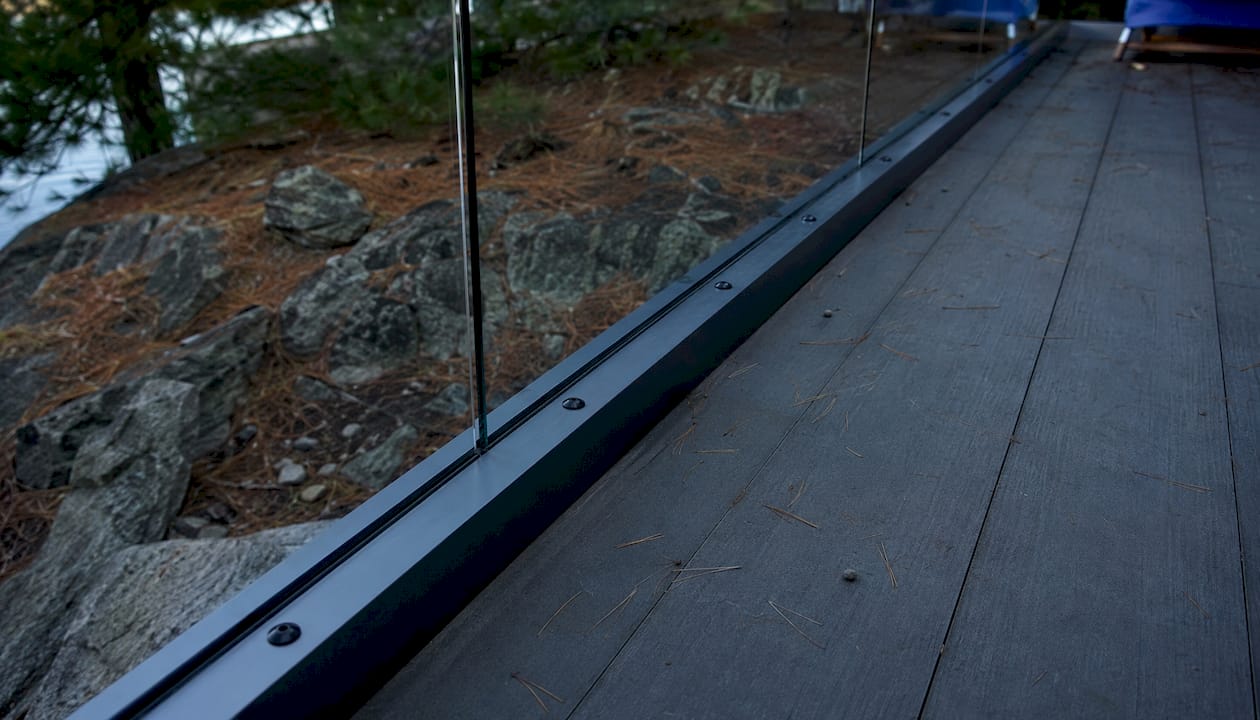
- Frameless look with no visible posts interrupting the view
- Continuous support along the glass bottom edge
- Often preferred for balconies and pool fences where unobstructed sightlines matter most
- Minimum glass bite requirements (h/10, not less than 3") and sealant compatibility are critical design details
When to choose post-mount: heavy-traffic deck, retrofit over existing framing, stair railing with complex geometry, or any install where you need a top rail for code compliance.
When to choose base shoe: frameless balcony or pool fence, new construction where the substrate can be designed for continuous channel support, or where the aesthetic priority is maximum glass visibility. For a deeper look at how base shoes work, Glassrailingstore’s base shoe guide covers the system in detail.
Inspection, Maintenance, and When to Replace Hardware
A glass railing post base plate does not need much attention, but it does need periodic inspection. Catching a problem early is the difference between tightening a bolt and replacing an entire post assembly.
Annual inspection checklist:
- Check anchor torque: any looseness indicates backing failure or anchor corrosion
- Inspect the plate for cracks, deformation, or visible rust at the fastener interfaces
- Look for movement at the post base when you apply lateral pressure by hand
- Check the sealant bead around the plate perimeter; cracked or missing sealant lets water in
- In coastal or pool environments, inspect for white or orange staining at fastener holes, which signals galvanic corrosion
Common problems and causes:
- Pull-out failure: missing or undersized blocking; anchors installed in decking boards only
- Corroded anchors: wrong fastener material for the environment; no isolation pad between dissimilar metals
- Loose screws: improper torque at installation; wood shrinkage in the first season after install
- Plate fatigue: repeated dynamic loads (high-traffic deck, children repeatedly pushing on the rail) over years
When to replace: visible plate deformation, any anchor that cannot be re-torqued to spec, or any post that moves under hand pressure. After an impact event (a vehicle strike, a heavy fall against the rail), have an engineer assess the assembly before trusting it again.
Warning: Never re-use expansion anchors in damaged or cracked concrete. The anchor’s holding capacity depends on intact concrete around the expansion zone. If the concrete is cracked, use an epoxy anchor with a clean hole, or consult a structural engineer for the correct repair detail.
For securing glass railing posts correctly the first time, Glassrailingstore’s installation guide covers torque specs and common mistakes in detail.
What to Specify and Order: The Buying Checklist
Getting the right plate on the first order saves a week of delays. Here is what to measure and specify before you click “add to cart.”
Measurements to take:
- Post profile dimensions (width and wall thickness determine the plate footprint needed)
- Required plate footprint and hole pattern (center-to-center distances)
- Deck surface thickness (affects anchor embedment depth calculation)
- Distance from post center to deck edge (affects anchor edge distance for concrete)
- Glass panel height and required post spacing
Anchor selection by substrate:
- Concrete or masonry: 3/8" expansion anchor (Hilti Kwik Bolt or equivalent) or epoxy anchor for tight edge distances
- Pressure-treated lumber with blocking: structural lag screws or through-bolts with backing plate
- Composite decking: always plan for blocking; composite boards provide no structural anchor value
What a complete kit should include:
- Base plate (correct footprint, material grade, finish)
- Anchor set or anchor specification sheet
- Neoprene or EPDM shim/isolation pad
- Hole-pattern template for accurate layout
- Installation instructions and load rating datasheet
Before ordering, confirm:
- Material grade (316 stainless or 6061-T6 aluminum)
- Finish (passivated, powder-coat, anodized)
- Whether a certified test report or load rating accompanies the plate
- Shipping lead time (hardware kits often ship separately from glass panels)
For hardware selection across the full system, Glassrailingstore’s hardware buyer’s guide walks through the decision points for each component.
What Does a Base Plate Kit Cost, and How Long Does Installation Take?
Cost and timeline vary more than most buyers expect, primarily because of blocking and substrate work, not the plate hardware itself.
Typical price ranges (hardware only, not glass):
- Single base plate, no anchors: low end of the market runs roughly $20–$50 per plate for standard aluminum; marine-grade 316 stainless plates run higher
- Full kit with plate, anchors, pad, and template: expect $50–$120 per post position for a quality kit
- Coastal-grade or engineered custom plates: pricing is not publicly listed and requires a quote
Installation timeline:
- Measuring, layout planning, and ordering: 1–3 days including shipping lead time
- Adding blocking (if needed): 2–4 hours per section for a carpenter; this is the step most DIYers underestimate
- Per-post installation time (experienced installer): 20–40 minutes per post once blocking is confirmed and anchors are on hand
- DIY with no prior experience: budget double the pro time per post for the first few posts
Factors that push cost and time up:
- Discovering missing blocking after decking is installed (requires cutting and patching)
- Concrete substrate requiring a hammer drill and expansion anchors
- Coastal-grade 316 stainless hardware vs. standard 304
- Engineered attachment details required by a local building department
Key Takeaways
A glass railing post base plate is the load-transfer point where anchor quality, plate thickness, and structural backing determine whether the entire system is safe and code-compliant.
| Point | Details |
|---|---|
| Base plate is structural, not cosmetic | It transfers bending moment, tension, and shear from the post into the building framing. |
| Blocking is non-negotiable | Anchors into decking boards alone will fail; solid blocking under each plate is required for wood substrates. |
| Anchor loads are substantial | Heavy-wall posts can demand high tension per anchor — specify anchors and embedment to meet load demands accordingly. |
| ASTM E2353 governs testing | Post-breakage retention testing means the base plate and anchors must hold the post even after a glass panel breaks. |
| Glassrailingstore provides kits with datasheets | Kits include material grade specs, anchor recommendations, templates, and installation guides for deck-top and fascia installs. |
The Mistake Most Installers Make with Base Plates
The most common error in post-mounted glass railing installs is not the plate itself. It is treating the plate as the last decision instead of the first. By the time someone is standing on a finished deck holding a base plate, the blocking is either there or it is not, and cutting into composite decking to add it is a painful fix.
The second mistake is trusting the anchor type that came in the box without checking it against the substrate. A 3/8" lag screw is not a structural screw. A structural screw into a single 2x6 rim joist is not the same as a through-bolt into doubled blocking. These distinctions matter at 3,000 lb of tension.
What actually works: plan blocking before the decking goes down, use the plate’s hole-pattern template to mark positions before drilling, and torque anchors with a calibrated wrench rather than an impact driver set to “tight.” For complex layouts or any install where the local building department wants engineered details, Glassrailingstore’s measurement services and frameless glass railing quote page connect you with the right support before you commit to a configuration.
Glassrailingstore Base Plate Kits: Hardware Built for the Load

Glassrailingstore’s base plate kits are built around the same load-path logic this guide covers: correct material grade, rated anchor specs, isolation pads, and a hole-pattern template so your layout is right before the drill touches the deck. Kits are available in 316 marine-grade stainless and aluminum configurations, with datasheets that list anchor tension ratings rather than leaving you to guess. For decks that also need glass panels, the 46" tempered glass panel pairs directly with post-mount hardware. For larger projects or any install that needs a custom configuration, the frameless glass railing quote page connects you with measurement support and a kit recommendation matched to your specific deck layout.
Key References and Sources
- ASTM E2353: Standard test methods for static strength, impact performance, and post-breakage retention in permanent railing systems; the primary testing reference for code-critical glass railing assemblies.
- ASTM E2358: Specification standard for performance of glazing in permanent railing systems, guards, and balustrades; defines what the system must achieve, while E2353 defines how to test it.
- Glass Magazine Code Q&A: Practical IBC interpretation covering guard definitions, when top rails are required, and how the full assembly determines compliance.
- Innovative Aluminum Systems buyer’s guide: Detailed technical notes on base plate dimensions, anchor tension demands (1,890–3,330 lb range), and substrate-specific anchor recommendations.
- Glassrailingstore installation resources: Step-by-step installation guidance, torque recommendations, and common mistake callouts for post-mounted glass railing systems.
- Glass Embedding design considerations (Glass.org): NGA guidance on minimum glass bite, sealant compatibility, and wet-glazing requirements for base-shoe and embedded systems.
Recommended
- Glass Railing Post Spacing Rules: A Safety Guide – The Glass Railing Store
- What Is Postless Glass Railing: a Homeowner’s Guide – The Glass Railing Store
- Glass Railing Surface Mount Explained for Decks – The Glass Railing Store
- How to Secure Glass Railing Posts the Right Way – The Glass Railing Store