

Shipping Glass Panels: A Contractor's & Homeowner's Guide
Ship tempered glass railing panels upright on certified racks, document any damage on the delivery note before the carrier leaves, and follow coated-glass handling rules without exception. That single sentence covers the difference between a clean delivery and a shattered, unclaimable panel. Here is the fast checklist:
- Ship panels vertically or near-vertical leaning at a slight angle on certified A-frame or stillage racks per professional glass transport protocol
- Include a complete packing list on every crate: product name, dimensions, thickness, sheet count, net weight, and production date
- Verify rack certification and max load ratings before loading
- Use separation pads, cork strips, or powder interleaving between sheets; never let coated surfaces contact each other
- Apply waterproofing and sealed packaging for coated panels; label coating orientation on the outside
- Strap and brace racks in the truck or container with wooden braces and crossbars
- Inspect and photograph every crate before the carrier departs; note any damage on the delivery note immediately
Key Takeaways
Shipping tempered glass railing panels safely requires vertical transport on certified racks, complete documentation at every stage, and a consignee who inspects and records damage before the carrier departs.
| Point | Details |
|---|---|
| Ship upright, always | Transport panels at 3° near-vertical on certified A-frame or stillage racks; flat transport causes breakage. |
| Label and document everything | Every crate needs a packing list with dimensions, thickness, sheet count, net weight, and production date. |
| Inspect before the carrier leaves | Note all damage on the delivery note immediately; unsigned notation forfeits your claim. |
| Plan container loading carefully | Map crate placement by weight, brace voids, and photograph the load before sealing the container. |
| Glassrailingstore ships complete kits | Order tempered panels and hardware together with logistics support and free shipping over $3,000. |
Table of Contents
- How should you pack glass panels for shipment?
- Which transport mode is right for your glass panel delivery?
- What should you do when glass panels are delivered?
- How should fabricators prepare panels before handing them to the carrier?
- What drives glass panel shipping costs, and how do you insure the load?
- Seller and buyer checklist before the shipment leaves
- How do you file a damage claim after delivery?
- Why these shipping standards are worth taking seriously
- Glassrailingstore makes ordering and shipping tempered panels straightforward
- Sources
How Should You Pack Glass Panels for Shipment?
Rack choice is the first decision, and it matters more than most buyers realize. A-frames and L-racks handle most panel sizes well; certified metal stillages suit heavier or oversized loads. Whatever rack you use, check the label for maximum load rating, fork-slot positions, and tie-down points. The TVITEC Shipping Handbook documents rack load ratings and the strapping and bracing procedures that keep racks stable in transit.
Metal crates make sense when panels need full enclosure, such as for sea freight or long-haul road shipments. Crates must have side openings wide enough for forklift tines and must not be stacked beyond their rated capacity.
Separation between sheets is non-negotiable. Cork strips and foam pads work for standard panels. For jumbo sheets or coated glass, powder interleaving prevents surface contact entirely. SGG PLANITHERM handling guidelines specify a slight transport angle, coated side facing inward, and separation by powder or pads throughout. Coated glass also needs sealed, waterproof outer packaging; moisture infiltration during transit can degrade the coating before the panel ever reaches the job site.
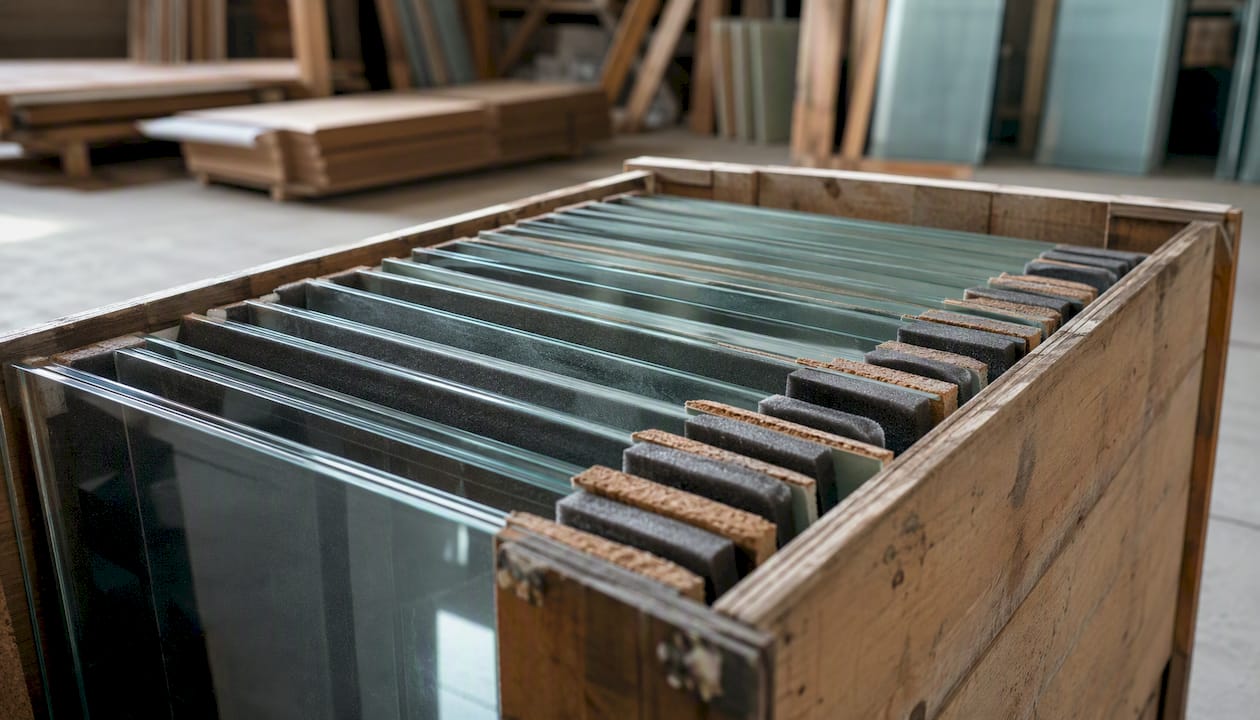
Edge protectors at corners prevent chipping during loading and unloading. Never apply tape directly to a coated surface.
Pro Tip: Label the coating orientation on the outside of every crate. A crew unloading at 6 AM without that label will guess, and guessing wrong on a coated panel can mean a return shipment.
Vertical orientation works because it distributes panel weight along the glass edge rather than across the face. Flat transport concentrates vibration stress on the largest surface area, which increases the risk of flex-induced breakage in tempered glass.
| Packing Element | Purpose | Key Spec |
|---|---|---|
| A-frame / stillage rack | Holds panels upright during transit | Check max load rating and tie-down points |
| Separation pads or powder | Prevents surface contact and scratching | Required for coated glass |
| Edge protectors | Shields corners from chipping | Apply at all four corners |
| Sealed outer packaging | Moisture barrier for coated panels | Label coating orientation externally |
| Strapping and wooden braces | Secures rack inside truck or container | Use crossbars and door-end restraints |
Which Transport Mode Is Right for Your Glass Panel Delivery?
Ground freight is the default for most domestic shipments: lower cost, flexible scheduling, and easier coordination with a local crane or forklift. For a single-project order of tempered railing panels, a flatbed or enclosed truck with a certified glass rack usually covers it.
Sea freight makes sense for large-volume orders, but it introduces longer transit times and more handling touchpoints. Container planning becomes critical. Optimizing container loading for architectural glass means mapping crate placement by weight distribution, maintaining low heavy crates, controlling voids with dunnage, and documenting a packing diagram and photos before the container doors close. Closed containers protect panels from weather; open-top containers are only appropriate when panel height exceeds standard container clearance and crane loading is the only option.
Air freight is expensive but justified for urgent, high-value panels on a tight project timeline. The cost premium is real, so reserve it for situations where a delayed delivery would cost more than the freight surcharge.
When selecting a carrier, ask specifically about:
- Experience handling glass racks and certified stillages
- Availability of crane or forklift services at both origin and destination
- Documented handling SOPs for fragile freight
- Cargo insurance coverage and claims contact details
- Container loading expertise, including bracing and void control
How carriers secure racks inside the truck matters as much as the rack itself. Strapping should run over the rack’s tie-down points, not around the glass. Wooden braces and crossbars prevent lateral movement. Door-end restraints stop racks from shifting when the truck brakes.
Pro Tip: For modular or phased construction projects, review glass railing planning considerations before scheduling shipments. Sequencing deliveries to match installation phases reduces on-site storage risk.
What Should You Do When Glass Panels Are Delivered?
SCHOTT’s guidance is direct: the consignee is responsible for correct unloading and must inspect and document any transport damage on the delivery note before the carrier departs. That window closes the moment the truck pulls away.
Before the carrier departs, walk through this sequence:
- Check the external condition of every crate and rack for visible damage, crushed corners, or broken strapping.
- Verify the packing list against what was delivered: panel count, dimensions, and product IDs.
- Photograph the crate from a distance and then close-up, capturing any damage clearly.
- Note every discrepancy or visible damage on the delivery note in writing.
- Keep all packing materials intact until the claim is resolved.
For unloading, keep packs upright throughout. Use a forklift or hoist with even support under the rack’s fork slots. For individual panels, distribute vacuum suction cups evenly across the face. Glassrailingstore’s guide on lifting glass railing panels safely covers on-site handling in detail. Never roll a crate on its edge or tip it to reposition it.
How Should Fabricators Prepare Panels Before Handing Them to the Carrier?
Pre-shipment preparation is where most avoidable damage originates. A panel that leaves the fabricator in poor condition will not survive transit regardless of how well it is packed.
Before loading:
- Confirm all dimensions and verify edgework is complete; no cutting or grinding after tempering
- Check that coating orientation is verified and labeled on the crate exterior
- Confirm tempering timing meets manufacturer windows; for coated glass, SGG PLANITHERM guidelines recommend washing before tempering and assembling insulating glass units promptly after tempering
- Verify the packing list includes: product name, dimensions, thickness, sheet count, net weight, and production date
- Photograph packed racks before the crate is sealed
Load balancing during loading directly affects panel survival. Place the heaviest crates low and centered in the truck or container. Use blocking and dunnage to fill voids and prevent movement. Avoid over-tight strapping, which creates localized stress points on the glass edge. Review glass thickness and weight considerations when planning rack loads for mixed-thickness orders.
Freshly tempered panels have a limited shelf life in some configurations. Sealed packaging with desiccant can extend viability, but the safest approach is to coordinate shipping windows with your installation timeline and lead times so panels move quickly from fabrication to site.
What Drives Glass Panel Shipping Costs, and How Do You Insure the Load?
Cost drivers for transporting glass panels break down clearly:
- Panel size and weight: larger, thicker panels require heavier racks and may push into oversized freight categories
- Pack type: certified metal racks cost less to insure and handle than custom crates; they also load faster
- Distance and mode: ground is cheapest per mile; sea adds port fees and longer exposure; air carries a significant premium
- Special handling: crane lifts, liftgate services, and escort vehicles add to the base rate
- Delivery timing: after-hours or weekend deliveries typically carry surcharges
For insurance, request cargo coverage with all-risks wording rather than named-perils. Named-perils policies often exclude vibration damage, which is one of the most common causes of glass breakage in transit. Confirm who is the named insured at each leg: the seller until delivery, the buyer after acceptance. Get the claims contact and filing deadline in writing before the shipment leaves.
To reduce costs: consolidate crates into full container loads where possible, choose certified rack types that carriers handle routinely, and schedule deliveries during normal working hours to avoid lift surcharges. Clearing the unloading zone in advance also prevents demurrage charges. For construction site coordination, debris removal and site clearance before delivery day keeps the unloading area accessible.
Seller and Buyer Checklist Before the Shipment Leaves
| Seller Must Complete | Buyer Must Complete |
|---|---|
| Confirm packing list is accurate and attached to crate | Confirm unloading equipment (forklift, crane, hoist) is on site |
| Label coating orientation on crate exterior | Arrange unloading crew and confirm access route |
| Secure panels on certified rack with rated strapping | Confirm carrier arrival window and inspection plan |
| Photograph packed racks before sealing | Identify claims contact and carrier form deadlines |
| Verify container load map and bracing plan | Confirm named insured on cargo policy for this leg |
| Agree on delivery note signing protocol with buyer | Set contact person to sign delivery note and note damage |
Both parties should agree in writing on the unloading plan, who signs the delivery note under disputed conditions, and which insurance policy covers each leg before the truck is loaded.
How Do You File a Damage Claim After Delivery?
Immediate steps at delivery:
- Mark the delivery note as damaged before signing; do not accept without notation if damage is visible.
- Photograph all damage and the crate condition from multiple angles with timestamps.
- Keep all packing materials and damaged panels intact; do not install a damaged panel.
Short-term preservation:
- Store damaged panels upright in a secure area with adequate support.
- Limit handling to prevent secondary breakage.
- Do not attempt repairs or modifications.
Filing the claim:
- Collect the packing list, delivery note copy, timestamped photos, and production date records.
- Email the carrier and supplier within their stated claim window, attaching all documentation.
- Follow the carrier’s claim form requirements precisely; missed deadlines forfeit the claim.
When damage appears linked to a coating or tempering defect rather than transit handling, contact the manufacturer directly and follow their inspection and notification protocol. For replacement panel ordering, Glassrailingstore’s guide on ordering replacement panels walks through the documentation and reorder process.
Why These Shipping Standards Are Worth Taking Seriously
Most glass panel damage in transit is avoidable. The protocol exists because tempered safety glass behaves differently from ordinary glass: it does not crack progressively, it shatters completely. A panel that arrives with an edge chip from poor packing, a stress fracture from flat transport, or a coating defect from moisture infiltration is not a repaired panel. It is a replacement order, a project delay, and a claims process.
What gets overlooked most often is not the big rules (everyone knows to ship upright) but the documentation gaps. A delivery note signed without damage notation, a crate photographed only after the carrier left, a packing list missing the production date. Those gaps are where valid claims die. The technical standards from SCHOTT, SGG PLANITHERM, and the industry shipping handbooks exist precisely because the consequences of skipping them are expensive and irreversible.
Glassrailingstore Makes Ordering and Shipping Tempered Panels Straightforward
Tempered glass railing panels are a significant investment, and getting them to your site intact requires the right product specs and the right logistics support from the start.

Glassrailingstore ships the 46" Height Tempered Glass Panel and matching hardware including the 90 Connector, Wall Connector, and Square Caprail Straight Connector as complete kits, with free shipping on orders over $3,000. The team can advise on crate specifications, carrier selection, and site readiness checks before your order ships. Contact customer support for a shipping quote or to confirm panel dimensions and packing requirements for your project.
Sources
- How To Transport Glass — A Complete Guide | Omni Cubed
- How To Optimize Container Loading for Architectural Glass | The Insulated Glass
Recommended
- Choosing Outdoor Glass Panels: A 2026 Homeowner’s Guide – The Glass Railing Store
- Staircase Glass Panel Fitting Guide for DIYers – The Glass Railing Store
- Deck Glass Panels: How to Choose the Right System for Your Outdoor Spa – The Glass Railing Store
- Glass Panels for Value Enhancement: A Smart Investor’s Guide – The Glass Railing Store