
Glass Railing Support Systems: What You Need to Know
Glass railing support systems look simple at first glance. Clean panels, a little hardware, and you’re done. The reality is more layered than that. The support system you choose directly affects how your railing performs under load, whether it passes inspection, and how it holds up after five years of weather and use. Glass railings offer unobstructed views and natural light flow that no wood or metal alternative can match, but getting the structural piece right is where most people stumble. This guide covers every decision point so you don’t have to learn the hard way.
Table of Contents
- Key takeaways
- Types of glass railing support systems
- Building codes and safety standards
- Choosing the right support system for your project
- Installation best practices
- Maintaining and troubleshooting your system
- My take on glass railing support trends
- Shop engineering-tested glass railing products
- FAQ
Key takeaways
| Point | Details |
|---|---|
| Support type shapes everything | Your choice of frameless, semi-frameless, post-mounted, or point-fixed system determines cost, glass thickness, and code compliance. |
| Code requirements are non-negotiable | Height minimums, load ratings, and opening limits vary by occupancy type and must be verified before ordering anything. |
| Glass spec matters as much as hardware | Laminated or tempered safety glass is legally required for guard applications, and thickness affects which support systems work. |
| Installation precision prevents failure | Shims, sealants, and proper anchoring techniques are the difference between a system that holds and one that shifts over time. |
| Maintenance extends system life | Routine hardware checks and correct cleaning practices protect your investment and keep the system code-compliant long term. |
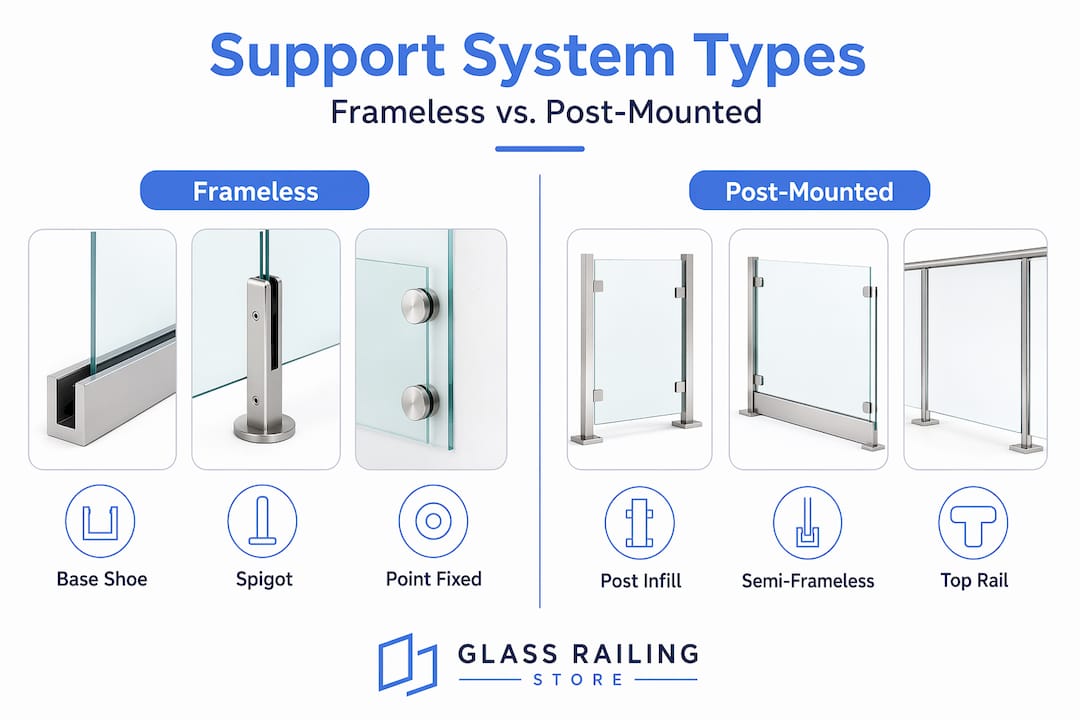
Types of glass railing support systems
The four main categories of support systems for glass railings each solve the same structural problem in a different way. Understanding how they differ saves you from buying the wrong product for your application.
Frameless glass railings rely on base shoe channels or spigots to hold panels in place without any perimeter framing. The hardware sits at the bottom or sides of the glass, leaving the top edge completely exposed. Frameless systems deliver the cleanest aesthetic but require thicker glass panels, typically 3/8 inch or 1/2 inch tempered, to compensate for the reduced lateral support. The installation tolerances are tighter and the cost per linear foot is higher. For decks, balconies, and poolside barriers where unobstructed views are the primary goal, this is the top-selling system type.
Semi-frameless systems add a post structure at intervals along the run, with glass panels infilled between the posts. You get structural reinforcement without a full frame surrounding each panel. The posts are typically stainless steel or aluminum, and the glass panels are smaller and thinner than in frameless builds. This system works especially well on longer runs where frameless would require bulkier base channels to maintain rigidity.
Post-mounted glass railings are the traditional approach. Posts anchor into the deck or floor substrate at regular intervals and carry a top rail, with glass panels acting as infill rather than the primary structural element. This design distributes load across the posts rather than relying on the glass, which makes it forgiving for DIY installations.
Glass railing point fixed systems use hardware fittings, called standoffs or spider fittings, that mount directly through or onto the glass face. Each fitting creates a localized connection between the glass and a structural backing surface. Point fixed systems have a genuinely architectural look and are common in commercial lobbies, staircases, and feature walls where visibility is critical. They require precise hole drilling, specific glass tolerances, and careful structural planning.
| System type | Best application | Glass thickness | Relative cost |
|---|---|---|---|
| Frameless base shoe | Decks, balconies, pools | 3/8 in to 1/2 in | High |
| Semi-frameless post | Long runs, commercial spaces | 1/4 in to 3/8 in | Medium |
| Post-mounted infill | Residential decks, stairs | 1/4 in to 3/8 in | Low to medium |
| Point fixed | Commercial, architectural | 3/8 in to 1/2 in | High |
Materials matter too. Marine-grade stainless steel (316 grade) resists corrosion better than 304 grade in salt air or high-humidity environments. Aluminum works well inland where weight and budget are priorities but can corrode faster near coastal areas without proper coating.
Building codes and safety standards
Most homeowners underestimate how detailed building codes are for glass railings. The IBC requires commercial guardrails to be at least 42 inches tall, while the IRC allows 36 inches for residential applications at certain floor heights. That six-inch difference affects which glass panels you order and how your base shoe is configured.
The 4-inch sphere rule is one of the most referenced requirements in railing code. Under IBC Section 1015.4, openings in the guard cannot allow a 4-inch sphere to pass through from the walking surface up to 36 inches in height. For glass railings this rule is straightforward since solid glass panels have no openings. Where it becomes critical is in semi-frameless systems where post spacing and any decorative cutouts in hardware could create gaps.
Load requirements drive hardware selection more than most people realize. Commercial railings must withstand a 200-pound concentrated lateral load at the top plus a 50 pound per linear foot line load. Those numbers determine what spigot size, anchor bolt diameter, and base plate thickness you need. Undersized hardware that looks correct visually can fail under code-required loads.
On stairs and egress routes, handrails must provide a continuous gripping surface without interruption. Newel posts or decorative hardware that breaks the grip surface can trigger a failed inspection in commercial settings, even when the glass and primary structure are perfect.
For glass specification, laminated or fully tempered safety glass is legally required for guard applications. Tempered glass shatters into small, blunt pieces on impact. Laminated glass holds together when broken, which is particularly valuable on elevated balconies where a falling panel creates a secondary hazard. Many engineers and jurisdictions now prefer laminated glass for any exterior elevated application even where tempered is technically allowed.
Pro Tip: Applying residential code exceptions to commercial occupancies is one of the most common compliance errors inspectors flag. If any part of your project involves public access, short-term rentals, or mixed-use occupancy, default to IBC commercial requirements and verify with your local building department before finalizing hardware specs.
State and local codes often add requirements on top of IBC and IRC minimums. You can review the regulatory constraints for your region through resources like the glass railing building codes overview from Glassrailingstore, which breaks down height, opening, and material requirements across jurisdictions.
Choosing the right support system for your project
The right system for a ground-level deck differs from the right system for a fourth-floor commercial balcony. Start with your site conditions before looking at aesthetics.
Assess these factors before selecting any hardware:
- Substrate type: Concrete, wood framing, and steel each require different anchor systems. Concrete needs sleeve anchors or epoxy anchors. Wood decking needs through-bolt base plates with backing.
- Exposure level: Coastal, poolside, and high-humidity environments demand 316 stainless steel hardware. Interior projects can use 304 grade.
- Run length and corner configuration: Longer runs and 90-degree turns create lateral forces that affect post spacing and base shoe sizing.
- Traffic level: Heavy foot traffic favors semi-frameless or post-mounted systems over purely frameless designs, which put more stress on individual panels.
Glass railing systems must balance compliance, safety, and aesthetics at every stage of planning. Choosing a beautiful frameless system for a deck that was built with inconsistent joist spacing is a setup for problems during installation, because frameless base channels need a flat, level, structurally continuous surface.
Budget is a real constraint. Post-mounted infill systems using 1/4-inch glass cost significantly less per linear foot than frameless systems with 1/2-inch panels and stainless base shoes. The minimum glass thickness for interior railings is 1/4 inch but that minimum increases with span length and wind exposure. Getting a quote that includes the correct glass spec for your actual conditions prevents expensive surprises after the order ships.
Pro Tip: Always pull your permit before finalizing your hardware order. Local plan checkers sometimes apply interpretations of IBC that affect glass thickness or post spacing. Finding out after delivery costs more than the permit application ever would.
Working with a supplier who provides engineering documentation for their hardware saves significant time during permit review. Ask specifically whether the product comes with load-test reports.
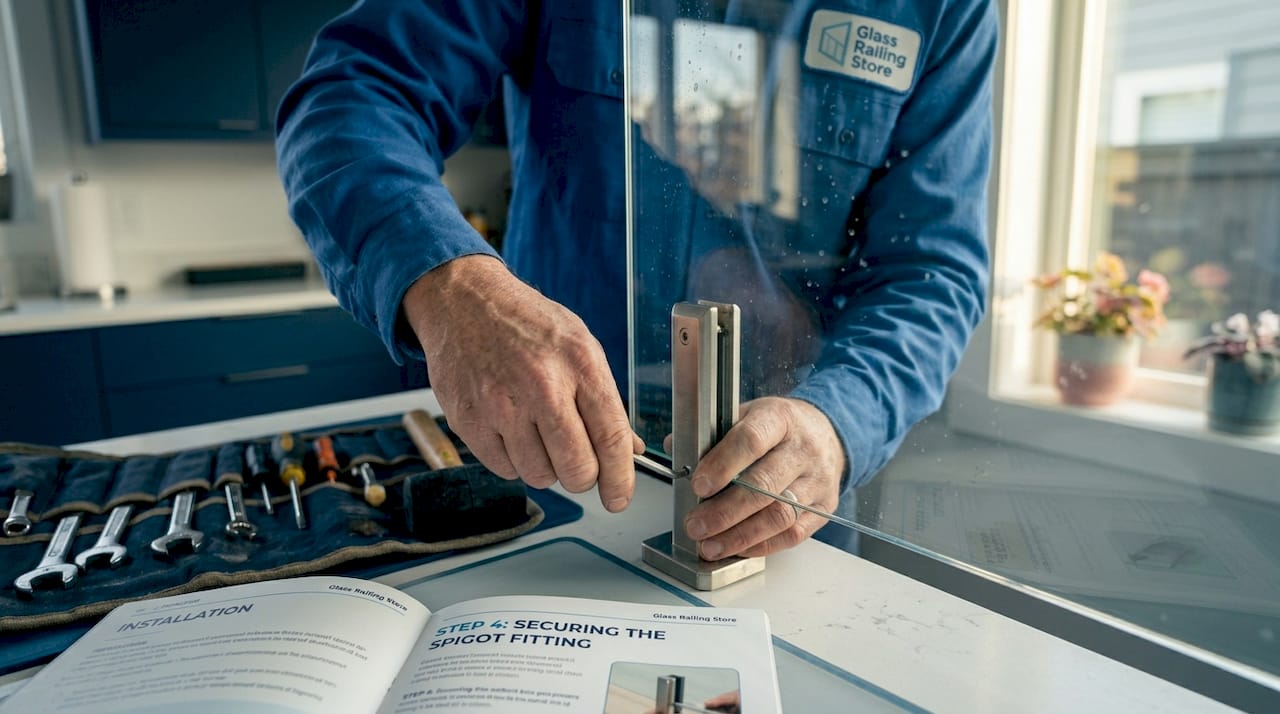
Installation best practices
Learning how to install glass railings correctly starts with thorough site preparation, not with the hardware itself.
- Measure and mark anchor points before any drilling. Lay out the full run on paper, mark post or base shoe locations, and verify each point lands on solid structural material. An anchor that misses a joist by an inch is a liability.
- Check substrate levelness across the full installation run. Even a 1/4-inch variation in a frameless base channel creates a visible lean in the glass panel. Shim the base before anchoring.
- Pre-drill at the correct depth for your anchor type. Sleeve anchors in concrete need a minimum embedment depth specified by the anchor manufacturer, which is typically tied to the load requirements of your system.
- Set panels with plastic shims in the channel before final tightening. Plastic shims and snap-on covers prevent glass panels from shifting laterally and protect the panel edge from metal-on-glass contact.
- Apply sealant around the base after the panel is plumb and secured. Use a sealant compatible with both the glass edge and the channel material. This step prevents water intrusion that degrades the base shoe and, over time, the structural anchor.
- Test the completed system by applying lateral hand pressure at the top of each panel. A properly installed system should have zero movement. Any deflection indicates under-anchoring or a shimming problem that needs correction before the inspection.
The most common installation pitfall is over-tightening spigot clamps or standoff fittings on glass railing point fixed systems. Excess torque creates stress concentrations in the glass that can cause cracking weeks after installation. Follow the torque specifications in the hardware documentation.
Maintaining and troubleshooting your system
A well-installed glass railing system requires less maintenance than wood or cable alternatives, but “less” is not the same as “none.”
- Inspect hardware fasteners every six to twelve months. Thermal cycling causes metal fasteners to back out slightly over time. A simple visual check plus hand-tightening where needed prevents a loose panel from developing.
- Clean glass with pH-neutral solutions. Acidic or alkaline cleaners degrade the silicone sealants at the base of frameless systems. Plain water and a microfiber cloth handle most surface dirt without damaging seals.
- Check for corrosion at anchor points, especially in coastal installations. Surface rust on 304 stainless hardware in salt air is not just cosmetic. It indicates the protective oxide layer has been compromised and the anchor’s load capacity may be reduced.
- Address panel movement immediately. Glass that has developed visible play in its channel or spigot is a safety hazard. Re-shim and re-torque before continued use.
- Evaluate older systems against current code if you are renovating a property built more than ten years ago. Guard heights, glass specs, and load requirements have evolved. An older system that met code when installed may not meet current standards and could affect liability or insurance coverage.
My take on glass railing support trends
I’ve spent a lot of time reviewing installations and working through the details of code compliance for glass railings, and the pattern I see most often is this: people fall in love with the frameless look before they’ve fully priced the structural work it requires.
Frameless systems are genuinely beautiful. But the substrate prep, the glass thickness, and the hardware cost add up fast, particularly on older decks that weren’t built to the flatness tolerances those systems demand. I’ve seen jobs where the homeowner got 80% of the way through a frameless installation before realizing the deck needed sistered joists and a new top surface before the base shoe could be properly anchored.
My honest advice to DIY enthusiasts is this: start with a semi-frameless or post-mounted system for your first installation. You’ll have more tolerance for minor substrate imperfections, the glass is thinner and easier to handle, and the system is more forgiving if your measurements are slightly off. Save the frameless design for a project where you’ve budgeted for professional installation or have the substrate conditions locked down before you order.
For professionals, the trend I’d pay attention to is the growing preference from inspectors for laminated glass over tempered in exterior elevated applications, even in jurisdictions where tempered is still technically compliant. Getting ahead of that shift in your hardware recommendations protects your clients and your reputation.
— Fuanne
Shop engineering-tested glass railing products
Getting your support system right starts with products that have the documentation to back them up.
Glassrailingstore carries a full range of code-compliant glass railing hardware, from frameless base shoes to post-mounted systems, all built with marine-grade stainless steel and designed to meet current IBC and IRC requirements. Every product page includes detailed specifications so you can match hardware to your structural conditions before you order. For projects where permit review requires load documentation, the engineering testing resources page provides test reports and hardware performance data. If you need jurisdiction-specific guidance, the building code overview covers height requirements, opening limits, and glass specifications across multiple states. Questions about your specific project? The Glassrailingstore team provides quotes and planning support to help you get the right system the first time.
FAQ
1. What is the minimum height for a glass railing guard?
For commercial applications under the IBC, guardrails must be at least 42 inches tall. Residential applications under the IRC allow 36 inches in some configurations, but always confirm with your local building department.
2. What glass thickness do glass railing support systems require?
The minimum for interior railings is generally 1/4 inch tempered or laminated glass, but frameless and point-fixed systems typically require 3/8 inch or 1/2 inch panels to compensate for reduced perimeter support.
3. What are glass railing point fixed systems best used for?
Point fixed systems work best in commercial or architectural settings, such as lobbies, feature staircases, and interior partitions, where maximum visibility and a high-end appearance are priorities. They require structural backing, precise glass drilling, and careful torque management during installation.
4. How do you prevent glass panels from slipping after installation?
Use plastic shims inside the base channel before applying snap-on covers and sealant. Shims center the panel, prevent lateral movement, and protect the glass edge from direct metal contact.
5. Do glass railings need a top rail or handrail?
On egress stairs and accessible routes, a graspable handrail is required regardless of the guard system type. Frameless glass guards without a top rail satisfy guardrail requirements but a separate compliant handrail must still be present on stairs.
Recommended
- Defining premium glass railing systems: a homeowner’s guide – The Glass Railing Store
- Glass railing durability: Build it right, build it to last – The Glass Railing Store
- Glass Railing Engineering Testing – The Glass Railing Store
- Choosing safe and stylish glass thickness for railings – The Glass Railing Store