

Frameless Glass Railing for Homeowners: Order and Structural Checklist
Frameless glass railing uses thick laminated glass panels held by base shoe channels, spigots, or standoffs, with no visible top rail or vertical posts breaking the view. It works well for most decks and balconies, but only when the substrate underneath is structurally sound and the glass meets guard code for laminated safety glazing. The real limiter isn’t the hardware. It’s whether your rim joist, ledger, or slab can carry the load, and whether your local building department signs off before you order glass.
TL;DR:
- Confirm that your substrate can support the load and meets guard code requirements before ordering glass panels to avoid costly reorders or structural issues.
- Use laminated glass between 9/16 inch and 5/8 inch thick, ensuring it can resist a 50-pound concentrated load per square foot, and verify guard height standards.
- Choose mounting systems based on your needs: base shoe for long runs and clean sightlines, spigots for minimal hardware, or standoffs to maximize deck space; each has specific structural considerations.
- Measure carefully and order panels with appropriate spacing for thermal expansion, ensuring panel widths match hardware tolerance and height meets local code minimums.
- Regularly inspect hardware, sealant, and glass for signs of damage or corrosion, especially in coastal areas, and reseal or replace components as necessary to maintain safety and durability.
Table of Contents
- What Is Frameless Glass Railing and How Do the Mounting Systems Differ?
- What Code and Structural Checks Should You Run Before Ordering Glass?
- What Tools, Materials, and Measurements Do You Need to Order Correctly?
- How Do You Install Base Shoes, Spigots, and Fascia Mounts Step by Step?
- How Do You Maintain Frameless Glass Railing and Fix Common Problems?
- What Support Does The Glass Railing Store Offer for Planning and Purchasing?
- The Gap Between a Good-Looking Railing and a Code-Compliant One
- Where to Buy Glass Panels and Hardware for Your Project
- Where to Verify Codes and Technical Specs
- Sources
What Is Frameless Glass Railing and How Do the Mounting Systems Differ?
Three mounting systems dominate the frameless glass railing category, and each pushes load through the structure differently.
Base shoe (U-channel) systems clamp the bottom edge of the glass in a continuous aluminum or stainless channel that runs the full length of the railing. The load spreads evenly along that line, which is why base shoe is the most common choice for long deck runs and why some channel products, like the ICC-ES certified Clearline system, can skip the top rail entirely when paired with the right laminated glass. You can read more on how these channels attach to framing in this base shoe systems guide.
Spigots grip the glass at two or three discrete points rather than the whole edge, giving you the thinnest possible sightline. That concentrated load means each spigot base needs a solid anchor point, and wood-framed decks often need extra blocking or reinforcement to handle it.
Standoffs or side/fascia mounts attach to the face of a structure instead of the top, which suits situations where deck surface space is tight or you want the glass to sit outside the walking line. These typically demand a backing plate behind the fascia board to spread the pull-out force.
- Base shoe: continuous support, cleanest sightline, best for long straight runs
- Spigots: minimal hardware, higher per-point structural demand
- Standoffs: frees up deck surface, requires fascia reinforcement
What Code and Structural Checks Should You Run Before Ordering Glass?
Guard height requirements differ by code body: the IRC generally sets residential guard height at 36 inches, while commercial work under the IBC often requires 42 inches, so confirm which code your jurisdiction enforces before you finalize panel height. Every guard system, regardless of height, must also satisfy the 4-inch sphere rule, meaning no gap in the assembly can allow a 4-inch sphere to pass through.
Load requirements aren’t optional extras, they’re the baseline test your railing has to survive. Building code requires guard infill to resist a 50 pound concentrated load applied to a one square foot area, and any top rail present must withstand a 200 pound concentrated load. Local amendments can raise these numbers, so verify with your building department rather than assuming the baseline applies.
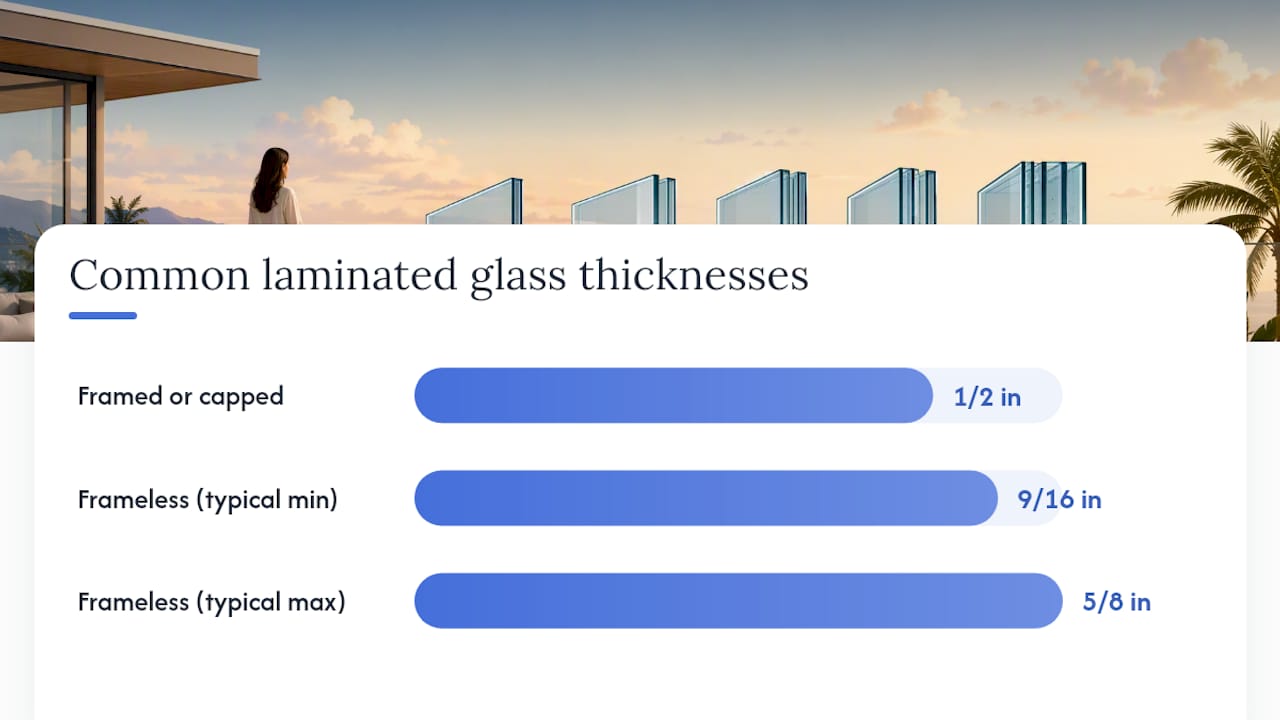
Glass specification is where DIY plans most often go wrong. Guards require laminated glass, not standalone tempered glass, because laminated panels hold together if the glass fractures, keeping the barrier intact. Frameless systems without a top rail commonly use 9/16 inch to 5/8 inch laminated glass, while framed or capped systems can sometimes use 1/2 inch laminated panels.
Structural checks before you order:
- Confirm rim joist size, species, and condition for base shoe or spigot mounting
- Check concrete deck thickness and rebar placement if bolting into a slab
- Have an engineer stamp the connection detail if your jurisdiction requires it for permit
- Call your local Authority Having Jurisdiction to confirm height, load, and permit requirements before ordering
Code snapshot: Guard infill must resist a 50 pound concentrated load per square foot, and any top rail must handle 200 pounds. Those two numbers decide whether your existing framing needs reinforcement.
What Tools, Materials, and Measurements Do You Need to Order Correctly?
Get your tool list right before glass arrives. You’ll need a laser level, tape measure, drill/driver with the correct bit sizes for your hardware, a torque wrench for spigot bolts, caulk gun, rubber mallet, and suction cup glass lifters rated for panel weight. Safety gear matters here more than on most DIY jobs: cut-resistant gloves, safety glasses, and a second person for any panel over roughly 4 feet wide.
- Measure the full railing run and divide into panel widths, leaving a consistent gap (typically 1/4 to 3/8 inch) between panels for thermal expansion and installation tolerance.
- Order glass panels sized to your base shoe or spigot spacing, plus the shoe/channel or spigot hardware, EPDM gaskets, setting blocks, structural sealant, and stainless fasteners rated for exterior use.
- Double check panel height against your confirmed code minimum before submitting the order, since reordering glass adds weeks.
- Confirm delivery access and staging, since a single panel can weigh over 100 pounds.
Pro Tip: Store glass panels vertically on edge, resting on the long bottom edge with padding between panels, never flat. Flat stacking concentrates weight unevenly and is a common cause of cracked panels before installation even starts.
How Do You Install Base Shoes, Spigots, and Fascia Mounts Step by Step?
Layout comes before any drilling. Snap a chalk line or use a laser to establish the true railing line, then use a square layout method to mark mounting points at consistent intervals, checking corners for true 90 degree angles before you commit to hardware positions.
Base shoe sequence:
- Dry fit the channel along the marked line and confirm it sits level across the entire run.
- Drill and through-bolt into the rim joist or slab at the manufacturer’s specified spacing.
- Install any cladding or cover trim over exposed fasteners.
- Apply structural sealant at the base, leaving a drainage path so water doesn’t pool inside the channel.
Spigot sequence:
- Mark the anchor pattern based on panel width and manufacturer spacing.
- Set anchors into verified solid substrate and torque to the hardware manufacturer’s spec, not by feel.
- Insert setting blocks and shims to keep panels plumb before final tightening.
Fascia/side mount specifics: these require a backing plate behind the mounting face to transfer pull-out loads into the framing rather than relying on the fascia board alone.
Once hardware is set, lift panels into place with suction cup lifters, brace temporarily, check plumb and level on every panel, then complete final tightening to torque spec. A caprail, where required, snaps or bolts on last.
- Test the installed section by applying hand pressure at multiple points to check for movement before removing bracing
- Photograph hardware torque settings, gasket installation, and panel spacing for your permit file
- Keep written notes on product technical data and any PE stamp documentation, since inspectors often ask for it on site
Frameless installations run several hundred dollars per linear foot installed once glass, hardware, and labor are figured in, with total cost swinging on panel size, thickness, and how much substrate reinforcement the site needs.
For a broader walk-through of planning and sequencing, the full installation guide covers additional layout scenarios.
How Do You Maintain Frameless Glass Railing and Fix Common Problems?
Clean panels with a non-abrasive glass cleaner and a soft cloth or squeegee. Avoid ammonia-heavy products near powder-coated or anodized hardware, since they can dull the finish over time, a concern that applies to any glass fitting exposed to weather, not just railing.
Inspect twice a year for loose fasteners, cracked gaskets, and corrosion at hardware bases, especially in coastal areas where salt air accelerates pitting on lower-grade stainless. If you see sealant separating at the base shoe or water pooling inside the channel, dig it out and reseal with fresh structural sealant rather than caulking over the old bead.
- Chipped or cracked laminated glass usually still holds together since the interlayer keeps shards in place, but replace it promptly
- Tape off and barricade a compromised panel immediately if it’s structurally loose
- In snow or high-wind regions, thicker laminated panels and tighter mounting spacing add real margin against lateral load
Pro Tip: Rinse hardware with fresh water after any exposure to de-icing salt or ocean spray. It takes thirty seconds and adds years to marine-grade stainless fasteners.
What Support Does The Glass Railing Store Offer for Planning and Purchasing?
An e-commerce platform stocks glass panels in common residential sizes, base shoe and spigot hardware, caprail connectors, and custom panel options for runs that don’t fit standard dimensions. The site’s installation guides and measurement resources are built to help you nail down panel widths and hardware spacing before you place an order, cutting down on costly reorders.
DIY installation makes sense for straightforward, low-rise runs on verified solid substrate. Call in a structural engineer or licensed contractor when you’re working over a walkout basement, on a rebuilt or aging deck, or anywhere your local AHJ requires stamped drawings. Before you contact a contractor or submit for permit, have your measurements, substrate photos, and intended glass thickness ready. It saves a round trip.
The Gap Between a Good-Looking Railing and a Code-Compliant One
Most frameless glass railing content online sells the aesthetic and glosses over the substrate. That’s backwards. A rim joist that can’t take a 200 pound concentrated load doesn’t care how clean your sightline looks, and a panel that’s the wrong thickness for your span will fail an inspection regardless of how well you leveled it.
The conventional advice treats measuring and ordering as an afterthought to the “fun part,” the installation. In practice, the ordering phase is where most expensive mistakes happen: wrong glass thickness, panel widths that don’t match hardware tolerance, or a height that violates local guard code. Fix that stage and the install itself becomes mechanical.
If you take one thing from this guide, prioritize the structural assessment and code verification before you spend a dollar on glass. Everything else, spigot versus base shoe, caprail or no caprail, is a design preference. The substrate check is not.
— Fuanne
Where to Buy Glass Panels and Hardware for Your Project
This supplier offers panels, connectors, and base shoe hardware sold direct to help avoid markup costs typically added by design-build firms.

The catalog covers 46-inch tempered glass panels for standard residential runs, plus 90 degree and 180 degree connectors for corners and inline caprail joints, wall connectors for fascia mounts, and square caprail corner connectors for finished top rail runs. If your layout doesn’t match standard panel sizes, the custom glass railing page handles bespoke dimensions and engineered configurations.
Run your measurements through the square layout method covered earlier, then request a quote with your panel widths and hardware selections to confirm pricing and lead time before you commit to a full order.
Where to Verify Codes and Technical Specs
- Colfax Glass installation and code guide: load and height requirements
- Glass Vice ICC-ES certified system: certified no-top-rail option
- Highco Metal frameless systems guide: cost and installation ranges
- One Day Doors & Closets glass guide: general safety glass handling
Sources
- Glass Railings for Decks & Balconies: Safety, Code & Installation Guide (2026)
- Ultimate Guide to Frameless Glass Railing Systems - Highco Metal