

Waterproofing Railing Posts Without Drilling the Membrane for Homeowners
The safest way to handle waterproofing around railing posts is to avoid puncturing the finished membrane at all: choose a stanchion, embed, or fascia-mounted post instead of a surface-mounted baseplate. If you’re stuck with a surface-mounted post already in place, lift it, dry the substrate, re-flash with membrane-compatible materials, and reseal with the right sealant chemistry. Before doing anything, check for staining under the deck or wiggle the post base to confirm that’s actually where the water is coming from.
TL;DR:
- Avoid puncturing the membrane by using embedded or fascia-mounted posts instead of surface-mounted bases whenever possible to minimize leak risks.
- Properly re-flash and seal existing surface-mounted posts with membrane-compatible materials, stainless fasteners, and continuous sealant beads for effective waterproofing repairs.
- Use pre-planned anchors or fascia mounts during initial construction to bypass penetrations altogether and ensure long-term deck waterproof integrity.
- Select polyurethane or silyl-terminated polyether sealants that bond well with the membrane and resist weathering, avoiding common failures caused by silicone caulk.
- Regularly inspect posts every 6 to 12 months and reseal every 1 to 3 years, especially in sun or salt-exposed environments, to prevent small issues from escalating into major leaks.
Table of Contents
- Why Railing Post Penetrations Cause Leaks
- How Do You Waterproof a Surface-Mounted Post?
- What’s the Alternative to Drilling Through the Membrane?
- Which Sealants Actually Hold Up Around Posts?
- When Should You Call a Professional?
- How Often Should You Inspect and Reseal Railing Posts?
- Which Waterproofing Membranes Work Best Around Posts?
- Why Do Sealant Repairs Keep Failing at the Same Spot?
- Where Installers Get It Wrong on the Jobsite
- Get the Right Hardware Before You Seal Anything
- Sources
- FAQ
Why Railing Post Penetrations Cause Leaks
Every screw driven through a waterproofing membrane is a hole that has to be sealed forever, and forever is a long time for a caulk bead to hold. Railing-post penetrations rank among the leading causes of leaks on waterproofed decks precisely because post-installed fasteners puncture the membrane and then depend on a sealant joint to do a job the membrane was supposed to do on its own.
Several things typically go wrong at once:
- The membrane gets punctured after it’s already installed, instead of being detailed around the post location from the start.
- The sealant used isn’t chemically compatible with the membrane, so it debonds within a season or two.
- Wind and foot traffic flex the post over time, fatiguing the sealant bead until it cracks.
- Trades don’t coordinate. The railing installer shows up after the waterproofing crew has already left the job.
To trace a leak back to a post, look directly underneath it first. Staining, rust streaks, or hairline cracks in the sealant at the base are the classic tells, especially if the leak only shows up after wind-driven rain or a fast snowmelt. Push on the post laterally. Movement at the base plate means the fastening system has already fatigued, even if the surface caulk still looks intact.
How Do You Waterproof a Surface-Mounted Post?
Surface-mounted posts are the most common setup on existing decks, and they’re fixable if you work through the repair in order rather than just squeezing more caulk on top.
- Document and inspect. Note the exact post location, remove the base plate, and check the substrate underneath for softness, rot, or standing moisture. Let it dry fully before moving forward.
- Reinforce the substrate. Add blocking or repair the deck surface so the plate sits flush, or slightly recessed, rather than perched on an uneven surface. Recessing the plate into the substrate reduces stress on the membrane around each fastener and gives you a cleaner surface to tool sealant against.
- Flash before you seal. Use a preformed collar or flashing tape around the penetration where the geometry allows it. Fill the fastener threads with sealant before driving them, and back-coat the underside of the plate so water can’t wick in from below.
- Tool a continuous bead. Run one unbroken sealant line around the plate’s perimeter, matched to the membrane’s chemistry, not just whatever tube was on the shelf.
- Use the right hardware. Stainless fasteners, sacrificial washers, and hand-tight torque. Overtightening deforms the membrane around the hole and creates a wick path you can’t see until it’s already leaking.
- Verify the repair. Run a hose over the area or watch it through the first real rain. Any dark spot under the deck within a day or two means the flashing detail failed, not just the surface bead.
Pro Tip: Photograph every post location and label the sealant product you used before you close anything up. Six months later, when you’re trying to figure out what’s compatible with a repair, that photo saves you a guessing game.
What’s the Alternative to Drilling Through the Membrane?
The lowest-risk approach skips the penetration problem entirely by planning around it before the waterproofing goes down.
- Stanchion or embed anchors. The anchor gets set before the membrane is poured or applied, the membrane terminates cleanly around it, and the post slides on afterward. This method avoids puncturing the waterproofing at all because there’s no post-installed fastener going through finished material.
- Fascia-mounted posts. Attaching the post bracket to the rim joist instead of the deck surface keeps the membrane continuous across the walking surface. It’s usually the best fit where code and railing geometry allow the load to transfer to the fascia rather than straight down through the deck.
- Choosing between them comes down to load requirements, post spacing, and how early you can get the railing contractor talking to the waterproofing crew. Coordinating trades before the membrane goes down is what separates a deck that lasts decades from one that’s back on a repair schedule within a few years.
New construction and full deck rebuilds are the natural point to make this call. Retrofitting a stanchion system onto an already-membraned deck is possible, but it usually means more demolition than most homeowners expect going in.
Which Sealants Actually Hold Up Around Posts?
Standard silicone caulk is a common mistake here. It doesn’t chemically bond well to most polyurethane or PVC waterproofing membranes, so it looks fine for a season and then peels away from the membrane surface while staying stuck to the metal plate, leaving a gap you can’t see from above.
Polyurethane, silyl-terminated polyether (STPE), or a sealant the membrane manufacturer explicitly approves will bond correctly and move with the membrane instead of fighting it. Sealant failure and movement-related fatigue, not the membrane itself, cause most leaks around fasteners, which is exactly why matching the sealant to the membrane matters more than brand loyalty to whatever product is already in your garage.
Before buying anything, pull up the membrane manufacturer’s product data sheet or call their technical line. It takes ten minutes and saves you from a redo.
A basic materials list for a surface-mount repair or install:
- Membrane-compatible sealant (polyurethane or STPE, matched to spec)
- Preformed collars or flashing tape sized to the post
- Stainless steel fasteners and sacrificial washers
- Backer rod or backing material for deep joints
- Solvent-based cleaner for surface prep
- Gloves and eye protection
Preformed collars and flashing tape consistently outperform a plain caulk mound in field use, since a collar spreads load and sheds water mechanically instead of relying on adhesion alone.
When Should You Call a Professional?
Not every leaking post needs a contractor, but some do, and knowing the difference saves you money either way.
- Tier 1, DIY territory: the membrane underneath is intact and the substrate is sound. Lift the plate, reseal with compatible sealant, reseat, done.
- Tier 2, moderate repair: the penetration itself needs re-flashing, or a small area of membrane needs patching or welding, or the substrate under one post needs to dry out or get replaced locally.
- Tier 3, call a professional: substrate rot spreading beyond one post, delamination across multiple sections of membrane, or several posts leaking at once. At that point you’re not patching a joint, you’re likely dealing with a systemic waterproofing failure.
A rough rule of thumb: if the fix requires more than one afternoon, more than one post, or you’re finding soft wood under more than one location, stop treating it as a caulk job. Resealing without addressing the underlying penetration or load path usually just delays the same failure, sometimes by only a season.
How Often Should You Inspect and Reseal Railing Posts?
A simple maintenance rhythm catches most problems while they’re still cheap to fix.
- Every 6 to 12 months, walk the deck and visually check each post base for cracking, gaps, or discoloration in the sealant. This cadence lines up with what installers generally recommend, though heavy sun or coastal salt exposure can shorten the interval.
- Reseal every 1 to 3 years, depending on your climate and the sealant product’s own life expectancy. UV-heavy locations wear through sealant faster than shaded decks.
- After winter and major storms, do a targeted check: hairline cracks, any new lateral movement at the base, rust streaks, or a missing section of bead are all early warning signs.
Pro Tip: Keep a small kit on hand: a tube of the same sealant you used originally, a putty knife, and rubbing alcohol for surface prep. Catching a hairline crack early is a five-minute fix. Catching it two years late is a Saturday project.
Avoid mounding sealant on top of a joint as a shortcut. It looks like more protection but actually traps water against the plate instead of shedding it, and back-coating the underside of the plate before installation prevents that trapped-water scenario from the start.
Which Waterproofing Membranes Work Best Around Posts?
Not all deck membranes behave the same way once a post gets involved, and the differences matter more at penetration points than anywhere else on the deck.
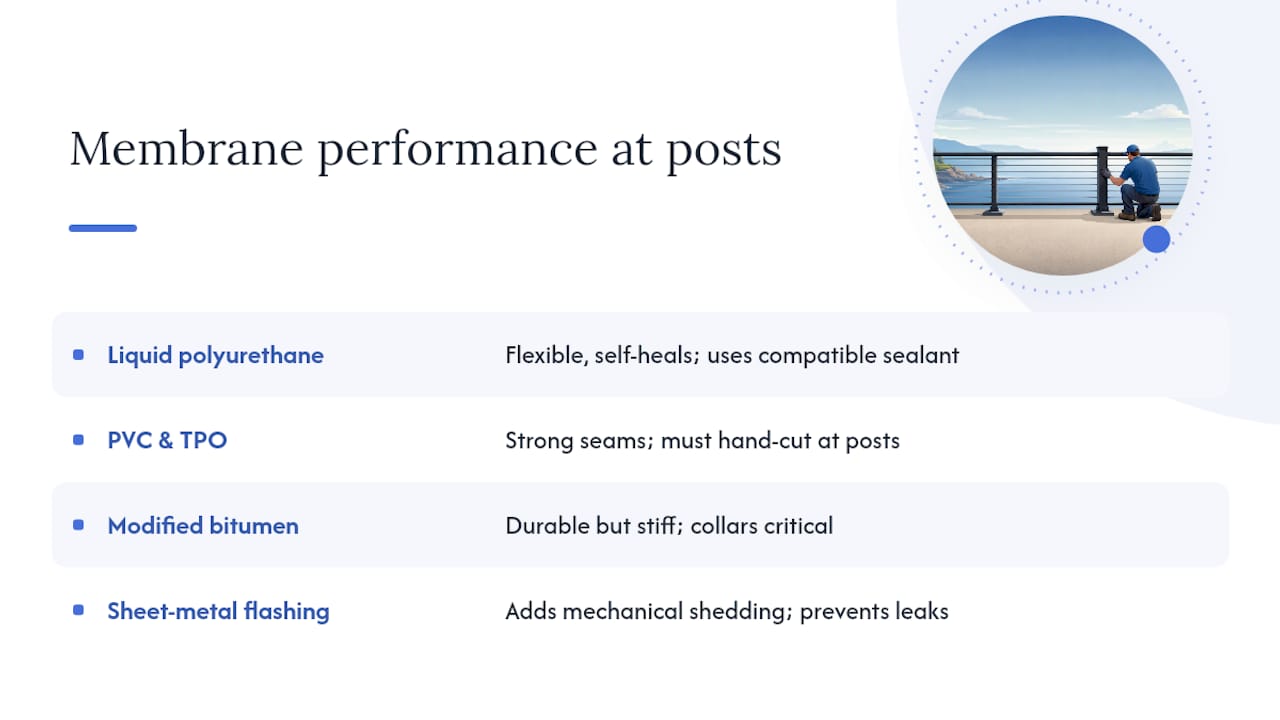
Liquid-applied polyurethane membranes flex well and self-heal minor surface scuffs, which helps at fastener points that see slight movement. They’re relatively forgiving during a re-flash repair, but they need a compatible sealant, not standard silicone, or you’ll get the debonding problem described earlier.
PVC and TPO sheet membranes offer strong seam integrity and consistent thickness, which is good news everywhere except around a post penetration, where the sheet has to be cut and detailed by hand. Poorly detailed cuts around a post are one of the more common failure points on sheet-membrane decks.
Modified bitumen and torch-down systems are durable and widely used on flat roof decks, but they’re stiffer than liquid or sheet alternatives, which means less give around a post that flexes under load. Detailing collars matter even more here.
Sheet-metal flashing paired with any membrane type adds a mechanical water-shedding layer on top of the chemical bond, and it’s the detail most trade guides point to as the difference between a penetration that lasts and one that doesn’t. Whatever membrane you’re working with, matching the flashing and sealant to that specific product’s spec sheet, rather than treating all membranes as interchangeable, is what actually prevents repeat leaks.
Why Do Sealant Repairs Keep Failing at the Same Spot?
Sealant shrinkage is the quiet killer of post repairs. Most sealants lose a small percentage of volume as they cure, and if the bead was applied too thin or without backer rod, that shrinkage opens a hairline gap right where you need continuous coverage. The fix is applying sealant at the manufacturer’s specified joint depth, not just running a thin cosmetic line over the top.
UV degradation shows up as chalking, discoloration, or a sealant surface that’s gone hard and brittle instead of staying slightly flexible. Sun-facing posts on south exposures degrade faster than shaded ones, sometimes by a wide margin, which is why the same product can last three years on one side of a house and one year on the other.
Fastener back-out is another repeat offender. Wood substrates expand and contract with moisture, and if a fastener isn’t seated with a sacrificial washer, it slowly works itself proud of the plate, cracking the sealant bead around its head. Check for slightly raised screw heads during your regular inspection.
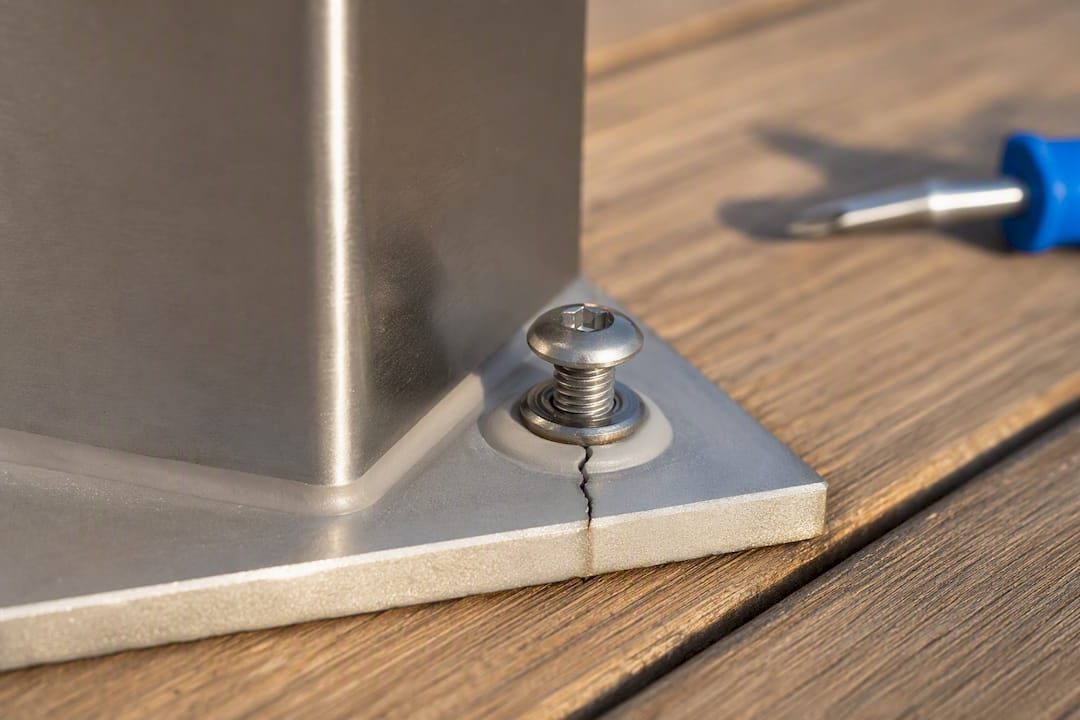
Cold-weather cracking happens when sealant gets applied outside its rated temperature range and never fully cures with the flexibility the product is designed to have. If you’re resealing in late fall, confirm the product’s application temperature window before you start, or you’re setting up next season’s failure now.
Where Installers Get It Wrong on the Jobsite
The recurring mistake isn’t bad sealant. It’s sequencing. Railings get installed after the waterproofing crew has packed up, so the post becomes an afterthought punched through finished work instead of a planned detail on the drawings. Coordinate the post locations with your waterproofing contractor before the membrane goes down, not after.
Wherever the load allows it, a stanchion or pre-planned embed anchor beats a surface-mounted plate every time, since it removes the penetration problem instead of managing it. Ask your installer for a written checklist of post locations, anchor type, and sealant chemistry before work starts. That single document prevents most of the callbacks I see traced back to poor coordination.
— Fuanne
Get the Right Hardware Before You Seal Anything
There are post hardware and planning resources available that make waterproofing detail work easier from day one, instead of forcing a retrofit later. Choosing the correct post mounting style up front, whether that’s a framed, semi-frameless, or frameless system, or a DIY glass panel kit for a smaller project, cuts down on the penetration risks this article just walked through.

The installation guides on securing posts correctly walk through hardware selection and mounting sequence in more detail than a single article can cover, and the weatherproof railing features guide breaks down which hardware options hold up best against sun, salt, and moving water over years of exposure. If your project involves a frameless system where post detailing really matters, request a frameless glass railing quote and get the planning conversation started before the membrane goes down, not after.
Sources
- Railing Penetrations and Waterproof Deck Leaks: What Causes Failures and How to Prevent Them
- Why Balconies Leak Around Railing Posts | Valordek
FAQ
Can I Waterproof Around an Existing Surface-Mounted Post?
Yes. Lift the base plate, dry and repair the substrate underneath, then re-flash with a membrane-compatible collar or tape before resealing with a matched sealant. Skipping the flashing step and just recaulking usually only delays the same failure.
What’s the Best Sealant for Railing Posts on a Waterproofed Deck?
Polyurethane or STPE sealants generally outperform silicone because they bond properly to most deck membranes instead of debonding within a season. Always confirm compatibility against your specific membrane manufacturer’s data sheet before buying.
How Do I Know if My Railing Post Is the Source of a Leak?
Look for staining, rust streaks, or hairline sealant cracks directly under the post base, especially after wind-driven rain. These visual patterns are the standard way installers trace a leak back to a specific penetration point.
Does Glassrailingstore Sell Post Hardware for Waterproof Installations?
Yes. There are framed, semi-frameless, and frameless glass railing systems available, along with DIY panel kits, all typically sold with hardware and installation guidance suited to outdoor, weather-exposed installs. Current pricing and specifications are listed on the glass railing cost page.
How Often Should I Reseal Around Railing Posts?
Plan on resealing every 1 to 3 years depending on sun exposure and sealant type, with a quick visual check every 6 to 12 months in between. Sun-facing posts and coastal locations typically need the shorter end of that range.