

Glass Railing Kits for Decks: Your Complete Buying Guide
Frameless glass railing kits are the best first choice for most homeowners who want unobstructed views and a modern look. If budget, simpler DIY assembly, or a heavy-duty handrail is your top priority, a framed or top-rail kit makes more sense. Either way, three checks come before you order anything.
Before you buy, confirm these three things:
- Measure your deck perimeter accurately. Total linear footage, panel span between posts, and the height from deck surface to top of rail all affect which kit fits.
- Check your local building code. The International Residential Code (IRC) sets a minimum guardrail height of 36" for decks less than 30" above grade and 42" for higher decks, but your municipality may be stricter.
- Know your deck material. Composite decking and wood framing require different anchor types and fastener specs. Confirm compatibility before ordering hardware.
Ready to skip ahead? Request a frameless glass railing quote from Glassrailingstore and get a custom recommendation based on your exact measurements.
Pro Tip: If your deck is exposed to coastal salt air or high wind, flag that upfront when requesting a quote. It changes both the glass thickness recommendation and the hardware grade you need.
Table of Contents
- What are the main types of glass railing kits for decks?
- What’s actually inside a glass railing kit?
- How does installation actually work?
- How do you choose the right kit for your deck?
- Which glass and hardware materials hold up best outdoors?
- What design choices affect cost and appearance?
- What U.S. code requirements apply to deck glass railings?
- What warranty and maintenance should you expect?
- How do you order and get an accurate quote?
- Key Takeaways
- Why premade frameless kits from a specialist make sense
- Ready to get your frameless glass railing quoted?
- Useful sources and further reading
What Are the Main Types of Glass Railing Kits for Decks?
A glass railing kit is a prefabricated system that includes the glass panels, mounting hardware, and connectors needed to build a code-compliant guardrail without custom fabrication. You get everything matched and spec’d together, which cuts both the guesswork and the risk of ordering incompatible parts.
Two primary categories exist, and the choice between them shapes every other decision you make.
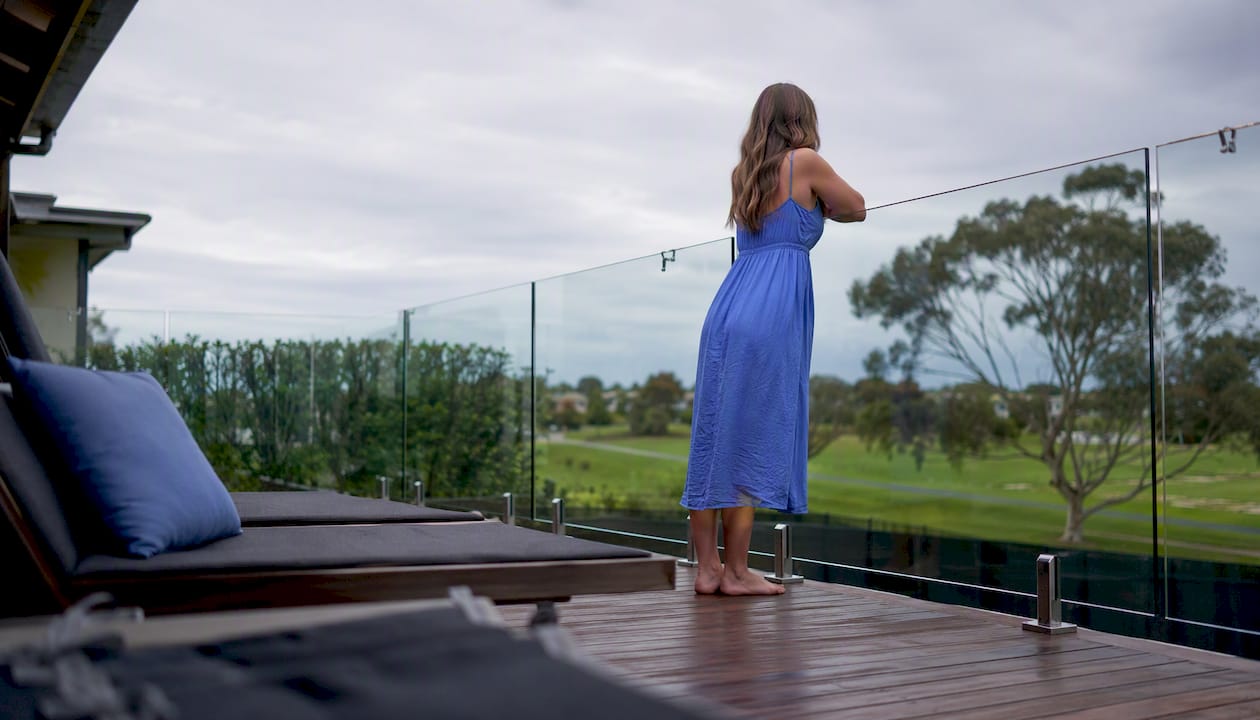
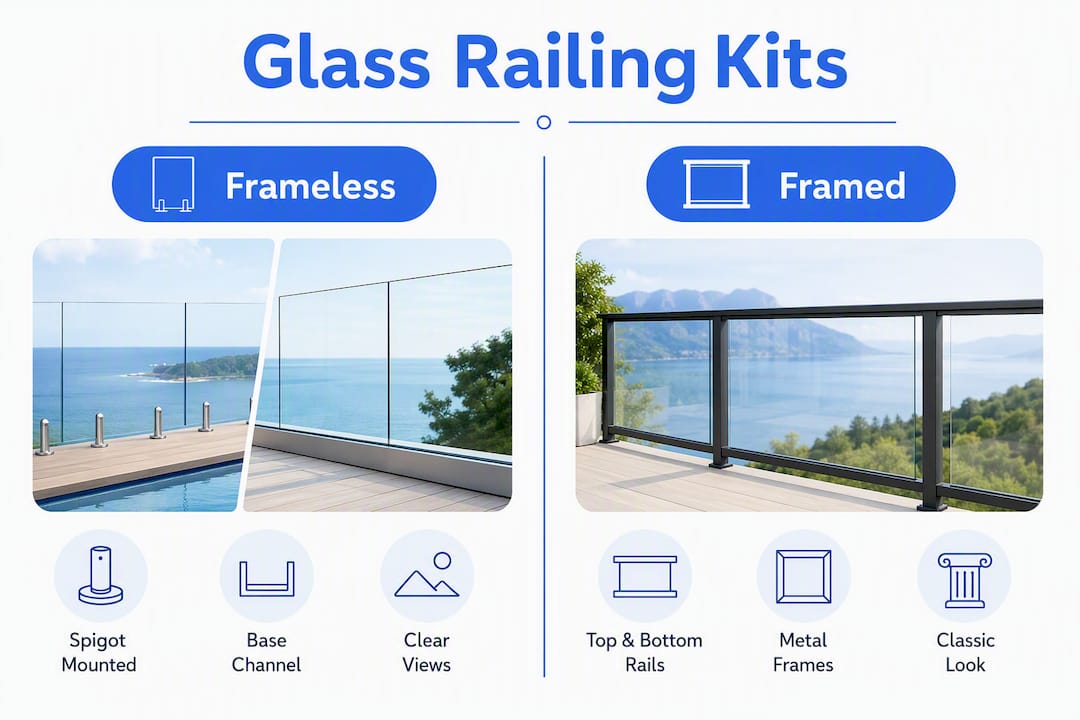
Frameless (spigot or base-channel mounted): The glass panels are the structure. Stainless steel spigots or a continuous base channel grip the bottom edge of each panel, leaving the top open or fitted with a minimal caprail. The result is a nearly invisible barrier that keeps your sightlines wide open. This is the frameless glass system most homeowners picture when they search for a premium deck railing.
Framed or post-mounted: Vertical posts anchor to the deck framing, and glass panels drop into the space between them as infill. A full caprail or handrail runs across the top. Installation is more forgiving for DIYers because the posts carry the structural load, not the glass itself. Cost per linear foot tends to be lower, and the top rail doubles as a graspable handrail where code requires one.
When to choose each:
- Frameless: panoramic views, pool surrounds, rooftop decks, or anywhere aesthetics are the priority
- Post-mounted: tighter budgets, decks where a graspable handrail is required, or spans with irregular framing
Pro Tip: High-exposure decks, those facing open water or sitting above 30 feet, often need thicker glass or closer spigot spacing to handle wind loads. A frameless kit that works fine in a sheltered backyard may need an upgrade in a coastal or high-altitude setting. Always flag your exposure when requesting a quote.
What’s Actually Inside a Glass Railing Kit?
Knowing exactly what a kit includes prevents the frustrating mid-project discovery that you’re missing a critical piece. Here’s what a complete kit should contain, and what’s often sold separately.
| Spec Field | What to Verify |
|---|---|
| Glass type | Tempered or laminated (laminated preferred for overhead/elevated use) |
| Glass thickness | 3/8" (10mm) minimum for most residential spans; 1/2" (12mm) for longer spans |
| Hardware material | 316 stainless steel for coastal; 304 stainless or aluminum for inland |
| Finish | Brushed, polished, powder-coated, or anodized |
| Load rating | Stated in lbs/linear ft; must meet IRC/IBC minimums |
| Panel dimensions | Width and height in inches; confirm they match your span and code height |
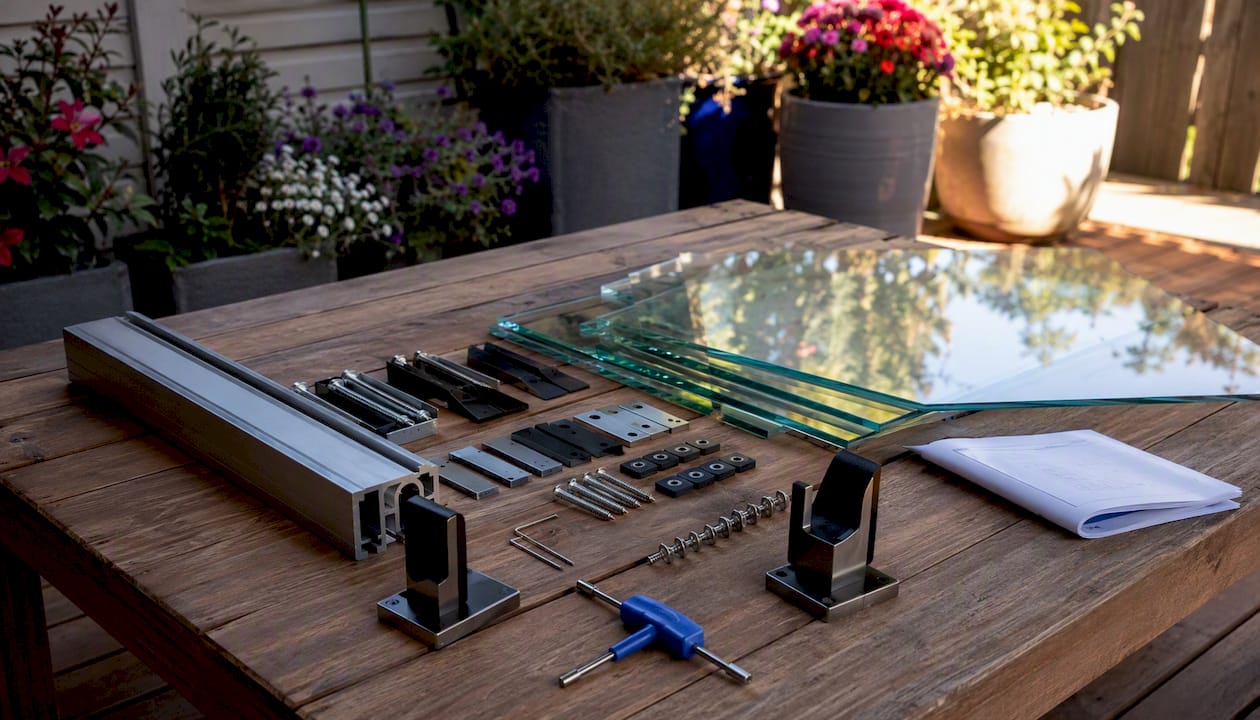
Standard components in a complete kit:
- Tempered or laminated safety glass panels in your specified height and width
- Spigots or base channel (the primary mounting hardware)
- Corner connectors (90-degree and straight-through types)
- Caprail or top-rail sections (sometimes optional or sold separately)
- Wall connectors for end conditions where the railing meets a house wall
- Fasteners, anchors, and setting blocks
- Gaskets and edge protection to cushion glass in hardware
- Installation guide and measurement template
What’s often sold separately: custom-cut panels, end posts, caprail end caps, and LED lighting accessories. Always confirm the kit’s exact contents before checkout. Vendors that publish detailed spec sheets with glass thickness per span, hardware materials, and installation notes make the DIY selection process safer and reduce permit friction.
Pro Tip: Ask specifically whether the caprail connectors are included or priced separately. A 40-foot run can require six or more connectors, and that adds up fast if they’re not in the base kit price.
How Does Installation Actually Work?
The honest answer: a frameless spigot system is a two-person job that most capable DIYers can complete in a weekend. A post-mounted framed system is slightly more forgiving. Either way, the sequence is the same.
Step-by-step installation sequence:
- Measure and order. Confirm total span, panel widths, and required height. Order panels and hardware.
- Prepare the deck structure. Verify that framing is solid and blocking is in place where anchors will land. Add structural reinforcement if needed.
- Lay out hardware positions. Mark spigot or post locations per the installation guide, checking spacing against code opening limits.
- Install base hardware. Bolt spigots, base channel, or post bases to the deck. Use the anchor type specified for your deck material.
- Set glass panels. Lower panels into spigots or channel with setting blocks and gaskets. Never let glass contact metal directly.
- Secure and level. Tighten hardware to spec, check plumb on each panel, and verify that no panel rocks or shifts.
- Install caprail and connectors. Attach top rail sections using square caprail straight connectors and corner pieces. Seal any penetrations per the manufacturer’s instructions.
Tools you’ll typically need: drill/driver, level, tape measure, torque wrench, rubber mallet, silicone sealant, and safety glasses. For composite decking, use the specific fastener type recommended for your deck brand — standard lag bolts can strip composite framing. Glassrailingstore’s guide on installing glass railing on composite decking covers anchor selection in detail.
Timeline and cost: A DIY kit-only install on a 40-foot deck typically runs one to two weekends. Professional installation, including labor and permit fees, adds cost on top of materials. Structural reinforcement or flashing work, required when the deck ledger or rim joist needs upgrading, adds time and should be completed before any railing hardware goes in.
Structural note: If your deck was built before current IRC standards, the framing may not handle the lateral load a glass railing transfers to the structure. Have a contractor or structural engineer check the rim joist and ledger connection before you order.
How Do You Choose the Right Kit for Your Deck?
Use this checklist while comparing kits or talking to a vendor. Missing any of these items before you order is the most common source of returns and re-orders.
Measurement checklist:
- Total linear footage of railing run
- Individual panel span widths (distance between spigots or posts)
- Required panel height (36" or 42" minimum per IRC; confirm locally)
- Edge clearances at walls, corners, and stairs
- Deck surface material and substructure framing depth
Glass specs to require:
- Confirmed tempered or laminated safety glass (not just “safety glass” with no spec)
- Minimum 3/8" thickness for standard residential spans; 1/2" for longer or higher-exposure runs
- Polished or flat-ground edges (no raw cut edges in hardware)
Hardware and mounting questions:
- Anchor type and compatibility with your deck material (wood, composite, concrete)
- Spigot or channel spacing relative to panel width and code opening limits
- Whether a wall connector is included for end conditions at the house
Vendor questions to ask:
- Lead time from order to delivery for tempered panels
- Warranty on glass, hardware, and finish separately
- Return policy for standard vs. custom-cut panels
- Whether an engineering letter or stamped drawings are available for permit submission
Red flags: no published load rating, missing glass spec (thickness and temper not stated), no installation instructions or datasheet, and vague answers about what’s included in the kit price.
Which Glass and Hardware Materials Hold Up Best Outdoors?
Glass type and hardware finish are the two decisions that most affect how your railing looks in ten years.
Glass options:
- Tempered safety glass is the standard for most residential deck railings. It’s heat-treated to be four to five times stronger than annealed glass and shatters into small, blunt pieces on impact. The most common thicknesses are 3/8" (10mm) and 1/2" (12mm).
- Laminated safety glass bonds two glass lites with a PVB or SGP interlayer. When it breaks, fragments stay bonded to the film rather than falling. Laminated panels are preferred for elevated decks, overhead applications, and anywhere falling glass poses a serious hazard.
| Material | Durability | Best Use Case | Maintenance |
|---|---|---|---|
| 316 stainless steel | Excellent (salt-resistant) | Coastal, poolside, high-humidity | Rinse regularly; minimal upkeep |
| 304 stainless steel | Good (inland conditions) | Inland residential decks | Annual inspection for surface rust |
| Anodized aluminum | Good (lightweight) | Inland; weight-sensitive structures | Wipe down seasonally |
| Powder-coated aluminum | Moderate | Budget builds; color matching | Inspect coating annually |
Pro Tip: Within a mile of the ocean, 304 stainless will show surface rust within a few years. Spend the extra money on 316 stainless or anodized aluminum. The weatherproof hardware guidance from Glassrailingstore covers this tradeoff in detail.
What Design Choices Affect Cost and Appearance?
Panel height is the first decision that drives both code compliance and visual impact. A 36" panel on a low deck feels open and casual. A 42" or 46" panel on an elevated deck reads more formal and provides better wind protection. The 46" tempered glass panel from Glassrailingstore is a popular choice for elevated decks where the extra height adds both safety margin and a more substantial look.
Top rail options and their tradeoffs:
- No top rail (true frameless): cleanest look, lowest profile, but requires the glass itself to meet all load requirements
- Minimal caprail: adds a graspable surface without visual bulk; connects with square caprail straight connectors and corner pieces
- Full handrail: required by code where the deck is used as a means of egress; adds cost but satisfies graspability requirements in one step
Integrated LED lighting strips can be added to most caprail profiles after installation. Glass tint (gray, bronze, or blue) and custom powder-coat colors on hardware are the two small decisions that most affect final price. Clear glass with brushed stainless is the most cost-effective combination and also the most timeless.
Pro Tip: If your deck overlooks a pool or garden with strong color, order a small sample panel before committing to tinted glass. Tint reads very differently against green landscaping versus blue water.
What U.S. Code Requirements Apply to Deck Glass Railings?
The International Residential Code (IRC) and International Building Code (IBC) set the baseline guardrail requirements that most U.S. jurisdictions adopt, sometimes with local amendments.
Key code parameters to know:
- Minimum guardrail height: 36" for decks less than 30" above grade; 42" for decks 30" or higher
- Opening limits: no opening in the railing that allows a 4" sphere to pass through (this governs spigot spacing and panel gap sizing)
- Structural load: guardrails must resist a 200 lb concentrated load applied at the top in any direction, per IBC Section 1607.8
- Glass type: safety glazing (tempered or laminated) is required for all glazing in guardrail applications under IRC Section R308
What to request from your vendor:
- Datasheet confirming tempered or laminated glass to ASTM C1048 or C1172
- Published load rating in lbs per linear foot
- Engineering letter or ICC-ES report if your jurisdiction requires stamped drawings for permit
Local jurisdictions often modify these baseline requirements. Always verify with your local building department before finalizing your order.
Pro Tip: Keep a copy of the vendor’s stamped drawings and the glass datasheet in a folder with your permit. Inspectors frequently ask for both, and having them on hand avoids delays.
What Warranty and Maintenance Should You Expect?
A well-specified kit should carry separate warranty terms for glass, hardware, and finish. Glass warranties typically cover manufacturing defects, not breakage from impact. Hardware warranties on 316 stainless commonly run five years or longer. Powder-coat and anodized finish warranties vary widely, so read the fine print before assuming coverage.
Routine maintenance schedule:
Quarterly:
- Rinse glass panels with fresh water (especially in coastal areas)
- Wipe hardware with a damp cloth; check for surface discoloration
Annually:
- Inspect all fasteners and anchors for loosening; re-torque to spec
- Check gaskets and edge protection for cracking or compression set
- Inspect any sealant at deck penetrations; re-apply if cracked or separated
- Photograph the full installation for your records
Pro Tip: Record panel serial numbers and photograph hardware markings at installation. If a warranty claim comes up two years later, that documentation cuts the resolution time significantly.
How Do You Order and Get an Accurate Quote?
Getting a quote right the first time saves two to three weeks of back-and-forth. Vendors need specific information to quote tempered glass panels accurately, because panels are cut to order and typically non-returnable once fabricated.
What to provide for a fast, accurate quote:
- Total linear footage and number of individual panel spans
- Panel height required (36", 42", or 46")
- Deck material (wood, composite, concrete) and framing depth
- Edge conditions: how many corners, wall connections, and stair sections
- Site photos showing the deck perimeter and any obstacles
- Your local jurisdiction (so the vendor can flag code-specific requirements)
Lead times and shipping: Tempered glass panels are typically fabricated to order and ship in two to four weeks depending on the supplier’s production schedule. Hardware ships faster. Plan your project timeline around the glass lead time, not the hardware.
Return policy: Standard-size panels may be returnable; custom-cut panels almost never are. Confirm the policy in writing before you order. Glassrailingstore’s project planning guide walks through how to prepare measurements and what to double-check before submitting an order.
Pro Tip: Submit a simple sketch or diagram with your quote request, even a hand-drawn one with dimensions. It eliminates the most common source of quoting errors: ambiguous corner conditions.
Key Takeaways
Frameless glass railing kits give most homeowners the best combination of views, code compliance, and long-term durability when the right glass and hardware specs are matched to the deck’s exposure and structure.
| Point | Details |
|---|---|
| Measure before you order | Confirm total span, individual panel widths, required height, and edge conditions before requesting a quote. |
| Match hardware to exposure | Use 316 stainless steel or anodized aluminum within a mile of the coast; 304 stainless works well for inland decks. |
| Verify code requirements | IRC sets 36" minimum for low decks and 42" for decks 30" or higher; always confirm with your local building department. |
| Request full documentation | Ask for glass datasheets (ASTM C1048 or C1172), load ratings, and engineering letters before permit submission. |
| Glassrailingstore as your source | Glassrailingstore offers tempered glass panels, stainless hardware, connectors, and quote support for frameless deck railing projects. |
Why Premade Frameless Kits from a Specialist Make Sense
The conventional wisdom in home improvement circles is that glass railings are a contractor-only project. That was true fifteen years ago, when every panel was custom-fabricated and hardware was sourced from three different suppliers. Premade frameless kits changed that equation, but only when the kit comes from a supplier that publishes real specs.
Here’s what most buyers underestimate: the documentation matters as much as the product. A kit with a published load rating, a glass datasheet referencing ASTM standards, and clear installation instructions is a fundamentally different purchase than a kit with vague marketing copy and no engineering backup. The first one gets through a permit inspection. The second one creates problems at the worst possible moment, usually when the inspector shows up and the homeowner has no paperwork.
Glassrailingstore focuses specifically on tempered glass railing systems with marine-grade stainless hardware and documented specs. That focus means the products are designed to work together, the installation guides are written for real deck conditions, and the quote process is built around getting the measurements right before panels are cut. For a homeowner doing this once, that kind of specialist support reduces the risk of a costly re-order far more than a lower sticker price from a general hardware supplier.
Ready to Get Your Frameless Glass Railing Quoted?
Glassrailingstore gives you a direct path from measurements to a complete, code-ready frameless railing system, without the markup of a general contractor or the guesswork of sourcing panels and hardware separately.

Start with the products that fit most residential deck projects. The 46" tempered glass panel is the go-to choice for elevated decks where code height and visual presence both matter. Corner runs use the 90 connector for glass railing to keep the frameless look clean through direction changes. Wall connections at the house are handled by the wall connector, and caprail sections link together with square caprail straight connectors for a finished top edge.
To get started: pull your measurements, take a few photos of the deck perimeter, and note your deck material and local jurisdiction. Then request a frameless glass railing quote and Glassrailingstore’s team will confirm specs, flag any code considerations, and get you a panel-by-panel quote ready for permit submission.
Useful Sources and Further Reading
Use these references to validate specs, check code requirements, and access installation resources before you finalize your order.
Building codes and standards:
- International Residential Code (IRC) — guardrail height, opening limits, and safety glazing requirements for residential decks
- International Building Code (IBC) — structural load requirements for guardrails (Section 1607.8) applicable to commercial and multi-family projects
- ASTM C1048 (tempered glass) and ASTM C1172 (laminated glass) — the standards your vendor’s datasheet should reference for safety glazing
Glassrailingstore installation and design resources:
- How to install deck railing — step-by-step installation guide with tool list and timeline
- Tempered vs. laminated glass for decks — technical comparison to help you choose the right glass type
- Glass railing durability guide — maintenance, hardware selection, and long-term performance
When to request an engineering letter: If your jurisdiction requires stamped drawings for a permit, ask your vendor early in the quote process. Upload site photos and your deck framing details with your quote request so the supplier can flag whether a third-party engineering letter is needed for your specific span and load conditions.
Recommended
- Glass Railing for Deck: Planning a Project That Lasts – The Glass Railing Store
- Deck Glass Panels: How to Choose the Right System for Your Outdoor Spa – The Glass Railing Store
- Glass Railing Kit Contents Explained for 2026 Builds – The Glass Railing Store
- Glass Railings for Decks and Patios: Enhancing Outdoor Views – The Glass Railing Store