
Deck Safety Railing Upgrade: A Homeowner's Guide
A deck safety railing upgrade is the process of replacing or reinforcing existing deck railings with modern, code-compliant, and durable materials to improve both structural safety and visual appeal. Wobbly, cracked, or rotting railings are not just eyesores. They are genuine hazards. Over 500 deck injuries occur annually in the US from structural failures, including railing collapses. Whether you manage a single-family home or a multi-unit property, understanding when to upgrade, which materials to choose, and what codes require will save you money and prevent accidents.
When Should You Replace vs. Reinforce Your Deck Railing?
The right answer depends on the condition of your posts, not the appearance of your rails. Around 70% of wobbly railings can be reinforced rather than fully replaced, provided the core posts remain structurally solid. That means a full tear-out is often unnecessary if you catch problems early.
Signs That Point to Full Replacement
- Cracks or rot deeper than 1/4 inch in posts or rails
- Railing movement under moderate hand pressure
- Visible rust, corrosion, or fastener failure at post bases
- Wood posts with soft, spongy bases indicating hidden interior rot
Signs That Reinforcement Will Work
- Surface-level cosmetic damage only
- Solid, firm posts with no flex when pushed
- Loose fasteners that can be re-tightened or replaced
- Minor surface weathering without structural compromise
Wood posts are often the first failure point because rot develops inside the post before it shows on the surface. A post can look fine and still be structurally compromised. Probe the base of each post with a screwdriver. If it sinks in easily, the post needs replacement regardless of how it looks.
Pro Tip: Use a moisture meter at post bases before deciding to reinforce. Readings above 19% moisture content in wood signal active decay, even when the surface appears dry and intact.
Cost is a major factor in this decision. Full replacement runs $20–$50 per linear foot including materials and labor, while DIY reinforcement typically costs under $10 per linear foot. Reinforcing when structurally sound can save 60–80% compared to full replacement.
What Are the Best Materials for a Railing Upgrade?
Material choice determines how long your railing lasts, how much maintenance it demands, and how your deck looks for the next decade. Each option carries real tradeoffs.
Cheapest upfront materials often cost more over 10–15 years due to maintenance and early replacement cycles. Aluminum, composite, and glass each offer 25–30 year lifespans with significantly lower upkeep than wood.
| Material | Upfront Cost | Lifespan | Maintenance | Best Style Fit |
|---|---|---|---|---|
| Wood | Low | 10–15 years | High (staining, sealing) | Traditional, rustic |
| Aluminum | Moderate | 25–30 years | Low | Modern or traditional |
| Composite | Moderate | 25–30 years | Very low | Contemporary |
| Tempered glass | Higher | 25–30 years | Low | Modern, view-focused |
| Cable railing | Higher | 20–25 years | Low | Industrial, coastal |
Wood delivers a classic look at a lower upfront price, but it demands annual sealing, staining, and rot inspections. Aluminum offers slim profiles, rust resistance, and fits both modern and traditional aesthetics without the upkeep burden. Composite materials mimic wood grain without the rot risk and hold up well in humid climates.
Tempered glass panels are the strongest choice for preserving views. They work especially well on elevated decks overlooking water, gardens, or city skylines. Glass requires proper engineering and post spacing to handle wind loads, but the result is a railing that adds significant curb appeal and property value. For weatherproof glass railing performance in varied climates, tempered panels outperform wood and most composite options.
Cable railing uses stainless steel cables stretched between posts. It delivers clean sight lines and handles coastal environments well, though the cable tension requires periodic adjustment.
Pro Tip: Local environmental factors like salt air accelerate metal fastener corrosion. Coastal homeowners should specify marine-grade stainless steel hardware and plan for shorter inspection intervals than inland properties.
How Do You Meet Code Requirements During a Railing Upgrade?
Code compliance is not optional. Failing an inspection after installation means tearing out work and starting over. Getting it right the first time protects both safety and budget.
Building codes require railings to be at least 36 inches high for decks more than 30 inches above grade. Some states mandate 42 inches. Check your local jurisdiction before purchasing any materials, since height requirements vary by state and municipality.
The baluster spacing rule is equally non-negotiable. A 4-inch sphere must not be able to pass through any opening in the railing. This rule exists specifically to prevent children from getting their heads trapped between balusters.
Here are the key structural and code requirements to address during any upgrade:
- Confirm railing height: Measure from the deck surface to the top of the rail. Minimum 36 inches; verify if your state requires 42 inches.
- Check baluster spacing: No gap should exceed 4 inches. Use a 4-inch block as a physical gauge during installation.
- Mount posts to the rim joist, not the deck boards: Deck boards are non-structural. Posts surface-mounted to deck boards will fail under lateral pressure. Through-bolt posts into blocking behind the rim joist.
- Space posts correctly: Posts set 6–8 feet apart provide the structural support needed to handle the lateral forces a railing must resist.
- Pull a permit: Most jurisdictions require a permit for railing replacement. An inspection confirms your work meets code and protects you from liability.
- Avoid surface mounting: Improper structural mounting is one of the most common installation mistakes. It creates railings that look solid but fail under real-world loads.
For detailed guidance on securing railing posts correctly, the post-to-rim-joist connection is the single most critical structural point in any railing system.
What Does a Deck Railing Upgrade Actually Cost?
Budget planning starts with understanding the full cost picture, not just the material price tag. Labor, permits, and long-term maintenance all factor into the real number.
Key cost factors to account for:
- Full replacement: $20–$50 per linear foot including materials and labor
- DIY reinforcement: Under $10 per linear foot for hardware and fasteners
- Permits: Typically $50–$200 depending on your municipality
- Long-term maintenance: Wood requires annual treatment; aluminum, composite, and glass do not
Long-term value favors durable materials like composite and glass over low-cost wood, which demands frequent upkeep. A wood railing installed for $15 per linear foot may cost more than a composite railing at $30 per linear foot when you factor in 15 years of staining, sealing, and partial replacement.
The smartest budget move is to reinforce when posts are solid and replace only what is structurally compromised. Replacing the full railing run when only two posts are failing wastes money. Pair that with a low-maintenance railing material and your total cost of ownership drops significantly over time.
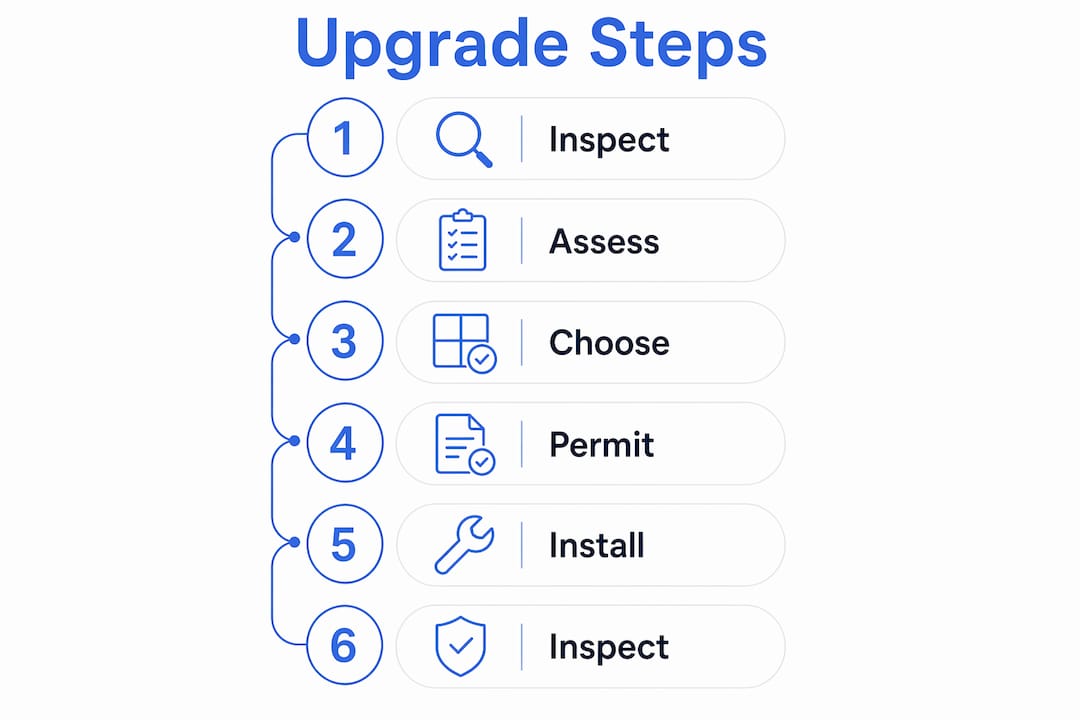
How to Plan and Execute Your Deck Railing Upgrade
A well-executed upgrade follows a clear sequence. Skipping steps, especially the inspection phase, is where most homeowner projects go wrong.
- Inspect every post and connection: Push each post firmly from multiple directions. Probe wood bases with a screwdriver. Check fasteners for rust and looseness.
- Review local building codes: Confirm height requirements, baluster spacing rules, and permit requirements before ordering materials.
- Measure your railing run: Calculate total linear footage, number of posts needed, and corner configurations. Add 10% to material orders for waste.
- Select your material: Match material to your climate, maintenance tolerance, and style goals. Glass and aluminum suit modern builds; composite suits traditional ones.
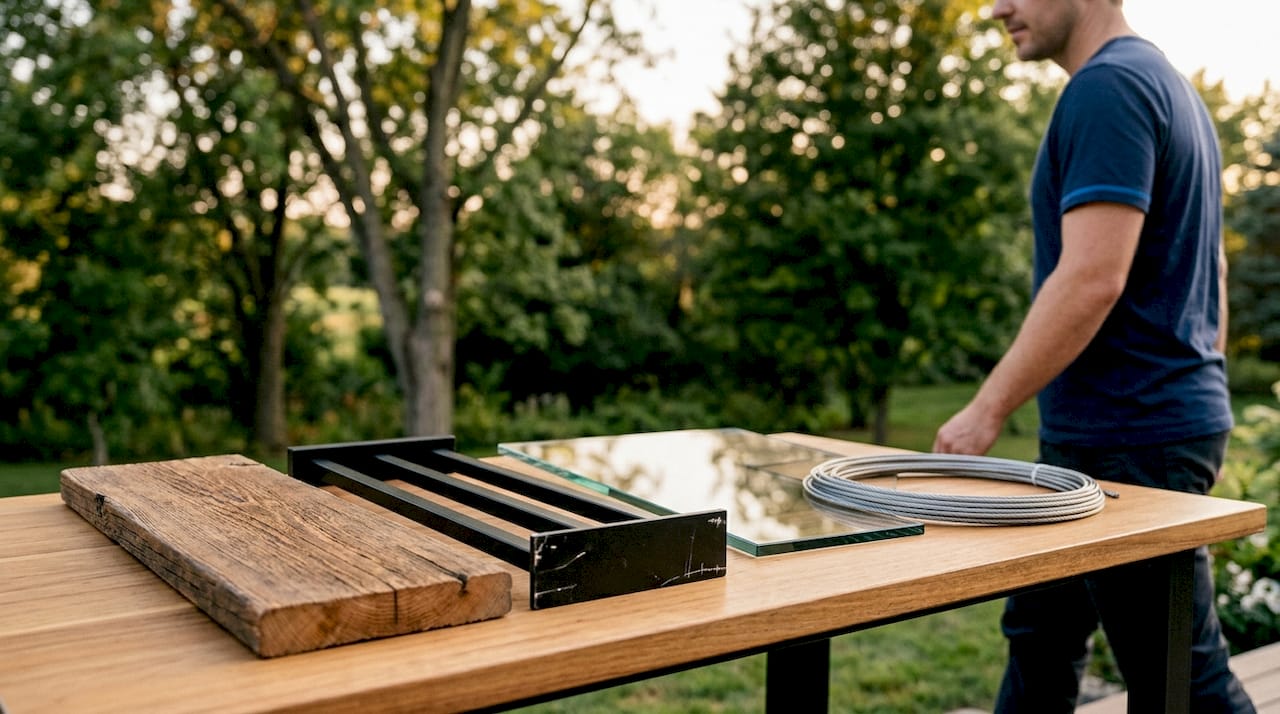
- Gather tools and hardware: You will need a drill, level, post hardware, through-bolts, and blocking material at minimum. For glass systems, add panel clamps and a torque wrench.
- Remove old railing sections: Work from the top rail down. Remove balusters, then rails, then posts. Inspect the rim joist for rot or damage before mounting new posts.
- Install new posts first: Through-bolt each post into blocking behind the rim joist. Use a level to confirm plumb before tightening.
- Attach rails and infill: Follow manufacturer specifications for rail attachment and baluster or panel spacing. Do not improvise spacing.
- Add finishing touches: Install post caps, seal any wood components, and select hardware finishes that match your exterior. For ideas on railing finishing options, matching cap and hardware finishes ties the whole system together visually.
- Test and inspect: Apply firm lateral pressure to every post. Verify all gaps with a 4-inch gauge. Schedule your permit inspection before using the deck.
Pro Tip: The most common homeowner mistake is choosing a material and style before confirming structural integrity and code compliance. Always inspect the frame and posts first, then select your material.
For a full walkthrough of deck railing installation from prep to final inspection, step-by-step guidance covers both reinforcement and full replacement scenarios.
Key Takeaways
A deck safety railing upgrade requires assessing structural integrity first, selecting the right material for your climate and budget, and meeting local code requirements before any aesthetic decisions.
| Point | Details |
|---|---|
| Inspect before deciding | Probe post bases and test for movement before choosing reinforcement or full replacement. |
| Cost comparison matters | Full replacement costs $20–$50 per linear foot; DIY reinforcement costs under $10 per linear foot. |
| Material lifespan drives value | Aluminum, composite, and glass last 25–30 years with low upkeep; wood costs more long-term. |
| Code compliance is non-negotiable | Railings must be 36–42 inches high with baluster gaps no wider than 4 inches. |
| Post mounting is the critical step | Through-bolt posts into rim joist blocking. Never surface-mount to deck boards. |
What I've Learned from Watching Homeowners Get This Wrong
After years of working with deck railing projects, the pattern I see most often is homeowners who fall in love with a material before they understand what is underneath their existing railing. They order beautiful glass panels or composite rails, start demo day, and then discover that two or three posts are rotted through at the base. The project doubles in scope and cost before a single new piece goes in.
My honest advice: treat the inspection like a separate project. Spend an afternoon testing every post, checking every fastener, and probing every wood base before you spend a dollar on materials. That one step changes everything about your budget and timeline.
The other thing I see consistently is homeowners who skip the permit because they assume a railing swap is too minor to require one. It is not. A failed inspection after the fact means removal and reinstallation. The permit fee is always cheaper than that outcome.
Glass railings are worth the higher upfront cost if you have a view worth protecting or a property where curb appeal drives value. The long-term durability of glass railing systems, when properly engineered and installed, outperforms wood in every climate metric. The mistake is buying glass panels without understanding the post spacing, load requirements, and hardware specifications that make the system actually safe.
Prioritize structure. Then pick your style. That order is not negotiable.
— Fuanne
Glass Railing Systems Built for Safety and Style at Glassrailingstore
Glassrailingstore offers engineering-tested glass railing systems designed to meet building code requirements while delivering the clean, modern aesthetic that wood and aluminum simply cannot match. Every panel is tempered safety glass, and the hardware is marine-grade stainless steel built for coastal and high-humidity environments.
Whether you are planning a full deck railing replacement or upgrading to glass for the first time, Glassrailingstore carries the panels, connectors, and hardware to complete the project. The team also provides quotes and planning support for homeowners who want expert guidance before ordering. For homeowners who want to see what modern glass looks like on a real deck, modern glass deck designs show finished installations across a range of deck styles and sizes.
FAQs
1. When does a deck railing need to be replaced vs. reinforced?
Replace when posts show rot deeper than 1/4 inch or move under pressure. Reinforce when posts are solid and only fasteners or surface components are failing.
2. What height does a deck railing need to be?
Most building codes require a minimum of 36 inches for decks over 30 inches above grade. Some states require 42 inches, so always verify local requirements before installation.
3. What is the 4-inch baluster spacing rule?
The 4-inch rule requires that no gap between balusters or railing components allows a 4-inch sphere to pass through. This standard prevents children from getting trapped or falling through the railing.
4. How much does a deck railing upgrade cost?
Full replacement typically costs $20–$50 per linear foot including labor. DIY reinforcement of structurally sound railings costs under $10 per linear foot.
5. Is glass a safe material for deck railings?
Yes. Tempered glass panels used in engineered railing systems meet building code requirements and are designed to handle wind loads and lateral pressure. Proper post mounting and hardware selection are critical to the system’s safety.
Recommended
- How to Plan Balcony Railing: a Homeowner’s Guide – The Glass Railing Store
- DIY glass stair railing: A complete homeowner’s guide – The Glass Railing Store
- Low-Maintenance Railing Materials: 2026 Homeowner Guide – The Glass Railing Store
- How to install deck railing for a safe, stylish deck – The Glass Railing Store