
Railing Corner Installation Guide for DIY Homeowners
A railing corner is defined as the structural junction where two railing sections meet at an angle, requiring a dedicated post, specialized hardware, and precise measurements to maintain safety and code compliance. Getting this junction right determines whether your entire railing system holds up under load, passes inspection, and looks clean from every angle. Most DIY failures happen here, not in the straight runs. This guide walks you through every stage of corner railing installation, from tool prep to final tension checks, so you finish with a result that is both safe and worth looking at.
What You Need Before Starting Railing Corner Installation
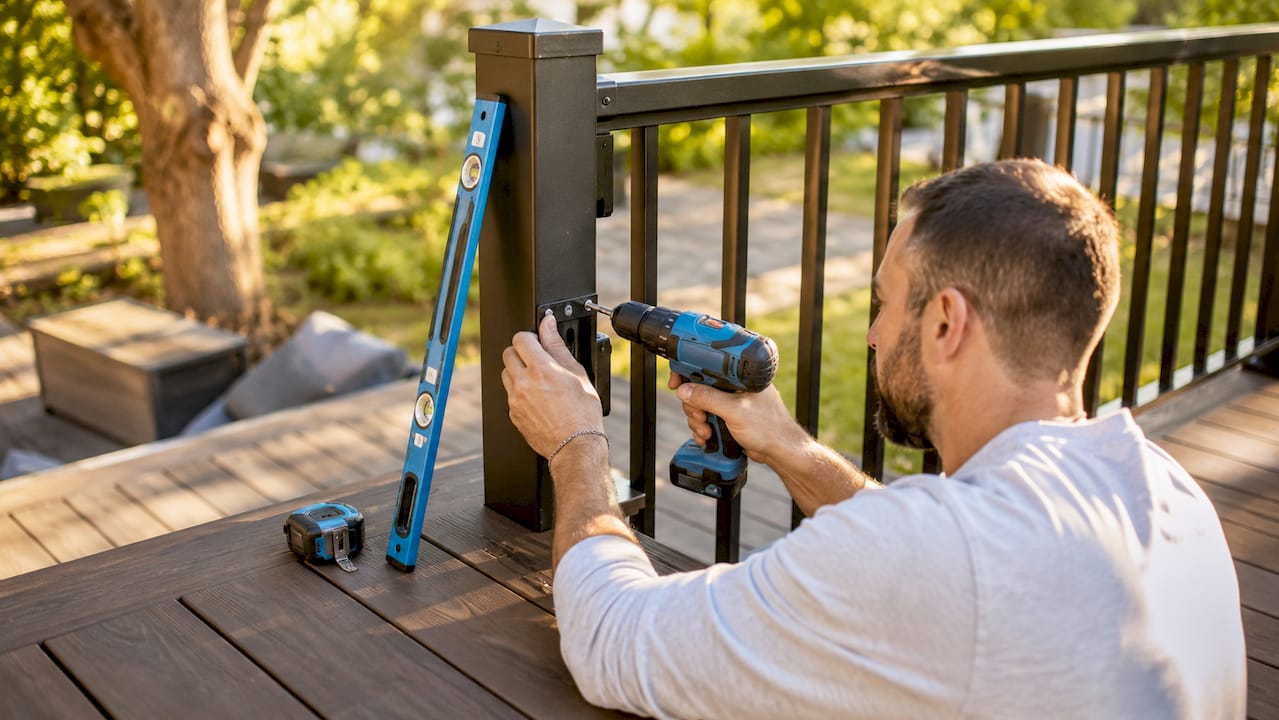
Preparation separates a clean install from a frustrating one. Before you touch a drill, gather every tool and measurement you need, because mid-project trips to the hardware store cost more than time.
Tools required:
- Power drill with bits sized for your post diameter
- Torpedo level and 4-foot level
- Tape measure and speed square
- Adjustable wrenches and hex key set
- Cable tensioners or a tension gauge (for cable railing systems)
- Offset drilling template (more on this below)
Materials checklist:
- Corner posts (single or double post, depending on your design)
- Post base hardware and anchor bolts
- Cable or glass panels sized to your run lengths
- End fittings, turnbuckles, and tension hardware
- Railing end caps for a finished look at terminal posts
- Handrail and connectors sized to your corner angle
The measurements that matter most are post spacing and handrail height. Handrail height on stairs must fall between 34 and 38 inches, measured vertically from the stair nosing. This means you measure straight up from the nose of each tread, not along the slope of the stringer. For flat decks, the standard is 36 inches from the deck surface to the top of the graspable handrail.
| Measurement | Code Requirement |
|---|---|
| Stair handrail height | 34 to 38 inches vertically from stair nosing |
| Deck handrail height | 36 inches from deck surface |
| Maximum opening size | Less than 4 inches (sphere test) |
| Post spacing (typical) | 4 to 6 feet on center |
| Double post corner spacing | 4 to 8 inches apart |

Pro Tip: Buy or print an offset drilling template before you start. Drilling holes at a 1/4 to 1/2 inch vertical offset in corner posts prevents cable lines and hardware from colliding inside the post, which is one of the most common sources of project delays.
How to Install Railing Corners Step by Step
This section covers cable and glass railing corner panel setup, since both share the same post and measurement logic even though the infill differs.
-
Mark your corner post location. Use a chalk line and speed square to mark exactly where the corner post base sits. The post centerline should align with the outside corner of your deck or stair structure.
-
Set and anchor the corner post. Drill anchor bolt holes into the substrate (concrete, wood framing, or steel). Set the post base plate, insert anchor bolts, and torque to the manufacturer’s specification. Check plumb on two perpendicular faces using your level before tightening fully.
-
Choose single post or double post. A single corner post handles both cable runs from one post body. A double post setup places two posts 4 to 8 inches apart, with each post dedicated to one cable run. Double post corners distribute cable tension across two anchor points, making hardware installation simpler and reducing stress concentration.
-
Drill cable holes using an offset template. Standard turnbuckles and end fittings are bulky. Offset drilling by 1/4 to 1/2 inch vertically staggers the cable lines so hardware does not collide inside the post cavity. Mark each hole with a center punch before drilling to prevent bit walk.
-
Run cables or set glass panels. For cable systems, thread each cable through the post holes, attach the fixed end fittings on the anchor post side, and leave the tensioning hardware accessible on the opposite end. For glass railing corner panel setup, seat each panel into the base channel or clamp hardware, confirm the panel is plumb, and tighten clamps in a cross pattern to distribute load evenly.
-
Tension cables to specification. Use a tension gauge to reach the manufacturer’s recommended tension, typically 200 to 250 pounds per cable. Under-tensioned cables can spread under lateral pressure, causing the system to fail the 4-inch sphere test even when initial spacing looks correct.
-
Install the handrail and end caps. Attach the handrail to the post tops using your connector hardware. At corner transitions, use a 90-degree connector or a mitered splice depending on your rail profile. Snap or screw railing end caps onto all terminal post ends for a finished appearance and to protect hardware from moisture.
- Run a final level and plumb check. Confirm every post is still plumb after tensioning. Cable tension pulls posts inward, and a post that was plumb before tensioning can shift slightly. Adjust base hardware if needed before signing off.
Pro Tip: On stair corners, re-measure handrail height after tensioning. The vertical measurement from stair nosing to the top of the rail must stay between 34 and 38 inches at every point along the run, including at the corner post itself.
Common Challenges and Troubleshooting Tips
Corner railing installation surfaces problems that straight runs never create. Knowing what to expect keeps your project on schedule.
-
Cable tension interference. When two cable runs meet at a single corner post, the opposing tension forces can pull the post out of plumb. If you notice lean after tensioning, back off tension on both runs, re-plumb the post, and re-tension in alternating increments rather than fully tensioning one side first.
-
Hardware clearance failures. Standard turnbuckles are often too wide to fit cleanly inside a single corner post without colliding with the opposing cable line. Switching to low-profile jaw-and-jaw turnbuckles or moving to a double post layout solves this without modifying the post.
-
Gaps that fail the 4-inch sphere test. Railing openings must not allow passage of a 4-inch diameter sphere anywhere in the system, including at corner transitions where geometry can create wider-than-expected gaps. Use a physical 4-inch sphere template or a 4-inch PVC cap to test every opening before calling the project complete.
-
Incorrect stair height measurement. The most common DIY error on stair corners is measuring handrail height along the slope rather than vertically from the nosing. Measuring from the stair nosing vertically is the code-required method, and getting this wrong at a corner transition is a guaranteed inspection failure.
-
Aesthetic misalignment at corner transitions. A handrail that changes height visibly at a corner looks unprofessional even if it passes code. Use a laser level to project a consistent height reference line across both railing runs before drilling any post holes.
- Corner geometry is more complex than it looks. Installers consistently underestimate how tension, post placement, and hardware bulk interact at a 90-degree turn. Budget extra time for the corner post specifically, and treat it as the most critical point in your entire railing project.
For additional guidance on safe baluster spacing around corner transitions, Glassrailingstore provides a detailed breakdown of code-compliant spacing calculations.
Single Post vs. Double Post Corner: Which One is Right for You?
The choice between these two designs affects hardware complexity, aesthetics, and how easily you can manage cable tension.
| Feature | Single post corner | Double post corner |
|---|---|---|
| Post count | 1 post at the corner | 2 posts spaced 4 to 8 inches apart |
| Cable tension management | Both runs anchor to one post | Each run anchors to its own post |
| Hardware clearance | Tight; requires offset drilling or low-profile hardware | Generous; standard hardware fits cleanly |
| Aesthetics | Cleaner, more minimal look | Slight visual gap between posts |
| Installation difficulty | Moderate to high | Lower; more forgiving for beginners |
| Best for | Experienced installers, minimal design preference | DIY beginners, high-tension cable runs |
| Code compliance risk | Higher if hardware collides | Lower; tension is easier to control |
Single post corners work well when you want a minimal, modern look and you are comfortable with precise offset drilling. Double post corners are the better choice for most DIY homeowners because they separate the tension anchoring into two independent points, which makes it far easier to keep both posts plumb and both cable runs at correct tension. Glassrailingstore’s guide on securing glass railing posts covers double post layouts in detail, including load distribution principles.
How to Verify Code Compliance at Corners Around Stairs and Decks
Code compliance is not optional, and corners are where inspectors look hardest. These are the specific requirements you need to confirm before closing out your project.
-
Handrail height on stairs: 34 to 38 inches measured vertically from the stair nosing at every point, including the corner post. The vertical measurement from nosing is the code standard under IRC R311.7.8.1, and it applies consistently through every transition.
-
Deck handrail height: 36 inches from the deck surface to the top of the graspable rail.
-
4-inch sphere rule: Clear baluster openings must be less than 4 inches everywhere, including around corner posts and along the bottom rail. This rule exists specifically to prevent child entrapment, and corners are where gaps tend to widen.
-
Handrail extensions on stairs: Building codes require a 12-inch horizontal extension at the top of a stair run and a one-tread-depth extension at the bottom. If your corner sits near a stair landing, confirm these extensions do not conflict with corner hardware placement.
- Bottom rail gap: The space between the bottom rail and the deck surface must also pass the 4-inch sphere test. This is frequently overlooked at corners where the base channel or post base hardware raises the bottom rail slightly.
Glassrailingstore’s building code compliance resource covers these requirements in full, including state-specific variations that can affect your project.
Key Takeaways
Successful railing corner installation requires precise post placement, correct handrail height measurement from the stair nosing, and verified 4-inch sphere compliance at every opening and transition.
| Point | Details |
|---|---|
| Measure from the stair nosing | Always measure handrail height vertically from the nosing, not along the slope. |
| Use offset drilling at corners | Stagger cable holes by 1/4 to 1/2 inch to prevent hardware collisions inside the post. |
| Double post corners reduce risk | Two posts spaced 4 to 8 inches apart simplify tension management for DIY installs. |
| Test every opening with a 4-inch sphere | Corners and bottom rails are the most likely failure points for the sphere test. |
| Tension cables in alternating increments | Fully tensioning one side before the other pulls corner posts out of plumb. |
What I’ve Learned From Watching Corner Installs Go Wrong
I have reviewed enough railing projects to say with confidence that the corner post is where most DIY installs either succeed or quietly fail. The geometry looks simple on paper. Two runs meet at 90 degrees, you put a post there, and you connect everything. What actually happens is that cable tension from two directions pulls the post in competing ways, hardware that fits fine on a straight run suddenly has no room to operate, and the handrail height that was perfect on the straight section drifts out of compliance at the transition.
The single most underrated tool in this process is a physical 4-inch sphere template. Most homeowners skip it because the spacing looks right to the eye. It is not always right to the eye. Corners create diagonal openings that are wider than the face-on view suggests, and a child’s head does not care what the opening looks like from the front.
My honest recommendation for first-time installers is to go with a double post corner every time. Yes, it uses one more post. Yes, there is a small visual gap between the two posts. But the ability to tension each cable run independently, with full hardware clearance on both posts, is worth far more than the minimal aesthetic trade-off. I have seen single post corners done beautifully, but they require a level of precision with offset drilling and low-profile hardware that most homeowners are not set up for on their first project.
One more thing: re-check your handrail height after tensioning, not before. Cable tension moves posts. A post that was perfectly plumb and at the right height before you tensioned the cables can shift enough to take your handrail out of the 34 to 38 inch window. That final check takes five minutes and can save you from a failed inspection.
— Fuanne
Get The Right Hardware For Your Corner Installation
Glassrailingstore stocks the specific components that make corner installations clean and code-compliant, from 90-degree glass connectors designed for precise 90-degree glass panel junctions to adjustable connectors that handle non-standard angles without custom fabrication.
Every product in the Glassrailingstore catalog is backed by engineering testing documentation so you know your hardware meets load and safety standards before it ships. If you are planning a custom stair or deck corner and need panels cut to exact dimensions, the custom glass railing option lets you specify your exact measurements and angle requirements. The team also provides installation guidance and quotes to help you plan your project before you buy.
FAQs
1. What is the 4-inch sphere rule for railing corners?
The 4-inch sphere rule requires that no opening in a railing system, including corners and bottom rail gaps, allows passage of a 4-inch diameter sphere. Corners are especially prone to wider-than-expected diagonal openings, so physical testing with a sphere template is the only reliable check.
2. How do I measure handrail height correctly on stairs?
Handrail height on stairs must be measured vertically from the stair nosing, not along the slope of the stringer. The required range under IRC R311.7.8.1 is 34 to 38 inches, and this measurement applies at every point along the run, including at corner posts.
3. Should I use a single post or double post at a railing corner?
Double post corners are the better choice for most DIY homeowners because each post handles one cable run independently, which makes tension management and hardware clearance significantly easier. Single post corners require offset drilling and low-profile hardware to avoid cable collisions inside the post.
4. What causes a corner post to go out of plumb after installation?
Cable tension from two opposing runs pulls a corner post inward from both directions simultaneously. Tensioning one side fully before the other amplifies this effect. Alternate tension increments across both runs and re-check plumb after each round of adjustments.
5. Do railing end caps affect code compliance?
Railing end caps are primarily a finishing component that protects terminal post hardware from moisture and creates a clean visual termination. They do not directly affect code compliance, but an uncapped post end with exposed hardware can create a sharp projection that some inspectors flag under graspability requirements for handrails.