

Deck Framing for Glass Railing: A Builder's Guide
A properly framed wood deck for glass railing uses joist-depth blocking, a continuous load path, and tested fastener schedules so the assembly meets the 500-lb applied load test and passes inspection. Get those three things right before you order a single panel.
Here’s what that means in practice:
- Joist-depth blocking at every post or channel anchor point, not just a 2x spacer between joists
- Continuous load path per 2021 IRC R507.10.1, transferring lateral guard loads from the post connection all the way into the deck joists
- Tested fastener schedules that meet ICC-ES AC273 criteria, the testing standard for glass guard hardware
- No end-grain-only fasteners at any post-to-rim connection; the 2021 IRC prohibits relying on them
- Rim/joist condition verified before ordering glass; a single 2x8 rim can flex visibly under the moment loads a 42-inch guard generates
Virginia Tech testing found that many common blocked post connections failed to meet the design load. The details that passed used reinforced blocking and structural screws with precise placement offsets. That’s the standard your framing needs to match.
Key Takeaways
Proper deck framing for glass railing requires joist-depth blocking, a continuous load path per 2021 IRC R507.10.1, and tested fastener schedules that meet the 500-lb applied load standard before any glass is ordered.
| Point | Details |
|---|---|
| Joist-depth blocking is mandatory | Install full-depth 4x4 blocks behind the rim at every post or anchor location, not 2x spacers. |
| End-grain fasteners are prohibited | The 2021 IRC R507.10.1 requires load transfer into joist webs; end-grain-only connections fail this requirement. |
| 500-lb test is the design target | Tested details from major manufacturers are designed to exceed typical design load requirements with safety factors. |
| Corrosion class must match environment | Use 316 stainless in coastal zones; hot-dip galvanized is acceptable for inland applications. |
| Frameless systems need engineering documentation | Inspectors routinely require manufacturer anchor data or an engineer stamp for frameless glass guard installations. |
Table of Contents
- Which glass railing systems fit wood decks and when to use each
- U.S. code requirements and structural loads you must design for
- Framing layouts and post-to-frame connections that work for glass railings
- Step-by-step framing and installation checklist for each mounting method
- How to spot weak framing and avoid the most common failures
- Exactly what to order: glass specs, hardware, and finishes
- A tested connection example that meets the 500-lb standard
- What the framing actually tells you before the glass goes on
- Sources
Which Glass Railing Systems Fit Wood Decks and When to Use Each
Three primary system families work on wood decks, and each one puts different demands on your framing.
Frameless base shoe (continuous channel). A continuous aluminum or stainless channel bolts along the top of the rim joist and holds glass panels with wedge seals or rubber gaskets. No posts, no handrail posts breaking the view. The tradeoff: the rim joist must be level, stiff, and in good condition across its entire run. Any deflection in the rim telegraphs directly into the glass. On a new deck with a doubled rim or steel subframe, this system delivers the cleanest look. On an older deck with a springy rim, you’re adding a stiffening job before you can even think about glass. Frameless base-shoe installs concentrate loads along the full channel length, which can simplify load distribution but demands a reliable substrate.
Post-mounted systems (channel or clamp between posts). Posts anchor to the deck framing at intervals, typically 36–48 inches on center, and glass panels drop into channels or clamp between the posts. This approach is more forgiving of minor rim irregularities because loads transfer at discrete post locations rather than continuously. It’s the better call on older decks where the rim joist has some history, or where you’re retrofitting rather than building new. The Glassrailingstore builder’s guide covers retrofit blocking requirements in detail for both frameless and post-mounted scenarios.
Standoff/spigot point-fix systems. Individual spigots bolt through the decking surface or into the rim face and grip each panel at two points near its base. Common in commercial applications and short-span residential runs. They require precisely engineered anchor points because each spigot carries the full lateral load of its panel. Framing must be solid at every spigot location, and the manufacturer’s anchor detail is non-negotiable.
Decision triggers to work through before you commit:
- Deck age and rim condition (new build vs. retrofit)
- Coastal or high-humidity environment (drives corrosion class selection)
- Panel height above 42 inches (triggers laminated glass and likely engineering review)
- Finish preference: frameless for unobstructed views, post-mounted for a more traditional profile
- Budget and timeline: post-mounted systems typically install faster with less framing prep
Pro Tip: Before choosing a system, walk the rim joist and press down on it at midspan. If it springs noticeably, plan to double it or add blocking before any glass hardware goes on. A stiff rim is the foundation every system depends on.
For a side-by-side look at where frameless glass works best versus where a framed system makes more sense, the frameless vs. framed comparison at Glassrailingstore breaks down the application differences clearly.
U.S. Code Requirements and Structural Loads You Must Design For
The IRC treats glass guards the same as any other guardrail assembly. That means the framing behind them must meet the same structural performance targets, and inspectors will check the attachment details, not just the glass.
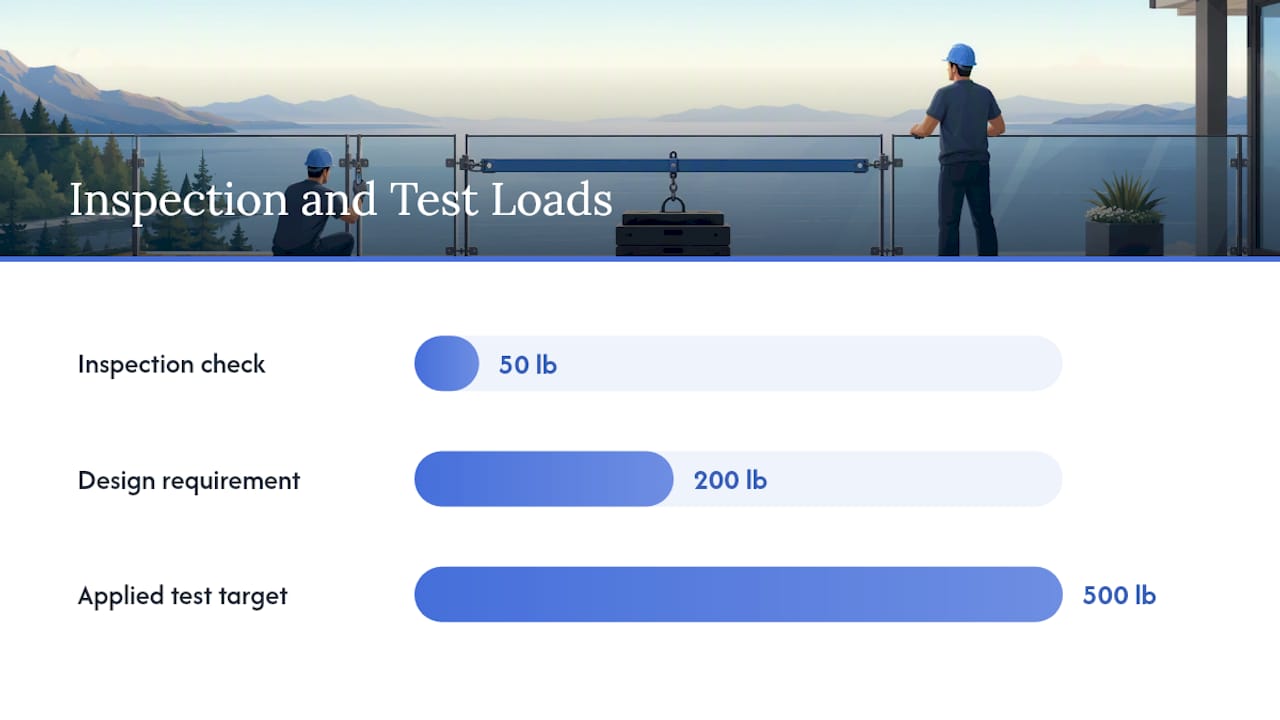
The key load requirement: guardrails must resist a 200-lb concentrated lateral load applied at the top of the guard. Many tested connection details are designed to a 500-lb applied test load, which represents the 200-lb design load multiplied by a 2.5 safety factor. That’s the threshold Simpson Strong-Tie and FastenMaster used when developing their published blocking and screw details.
2021 IRC R507.10.1 requires that guards supported on deck framing transfer loads through a continuous load path to the deck joists. Connections relying only on end-grain fasteners don’t satisfy this requirement. The code is explicit: load must travel from the post, through blocking, into the joist web, not just into the end of a rim board.
ICC-ES AC273 is the acceptance criteria for glass guard hardware. When a manufacturer’s base shoe or spigot carries an ICC-ES evaluation report referencing AC273, it means the hardware has been tested to defined load levels. Always request this documentation before specifying hardware for a permitted project.
What inspectors focus on:
- Guard height minimums for decks above a certain height according to code
- Opening limits (4-inch sphere rule for balusters; glass panels typically satisfy this automatically)
- Attachment details showing how lateral loads transfer into joists
- Manufacturer anchor data or engineer stamp for frameless systems, unusually tall guards, or multi-story applications
Statistic callout: The applied test load with a safety factor is the benchmark that tested post-to-frame details from major manufacturers are built around. If your connection detail hasn’t been tested to that level, it needs engineering.
Inspectors in many jurisdictions treat frameless glass guard systems as requiring manufacturer anchor data or engineering by default. Have that documentation ready before the rough inspection.
Framing Layouts and Post-to-Frame Connections That Work for Glass Railings
The blocking pattern is where most failures originate. A single 2x block between joists doesn’t transfer moment loads the way a full-depth vertical block does.
Joist-depth blocking. Cut vertical 4x4 blocks to the full depth of the joist bay and install them tight behind the rim joist at each post location. Side-grain screw penetration into these blocks dramatically improves pull-out resistance compared to end-grain connections. The blocks prevent the rim joist from rotating under lateral load and give your structural screws or through-bolts solid wood to bear against.
Double-joist and doubled rim strategies. Where posts land near the end of a joist bay or where the rim shows any flex, double the rim joist or sister a full-length joist alongside the existing one. A single 2x8 rim can flex visibly under the moment loads a 42-inch guard generates, especially on longer spans. Doubling the rim cuts that deflection roughly in half and gives you a much more reliable anchor surface.
Fastener options and placement:
- Through-bolts with tension ties: A 1/2-inch galvanized or stainless through-bolt with a tension plate (lateral connector) seats against the blocking and joist face. Precise alignment is required; the plate must bear against both the blocking and the joist web, not just the rim face. Tension-tie hardware transfers load into the joist and prevents rotation.
- Structural screws (SDWS/ThruLok/HeadLok-style): Long structural screws driven at staggered offsets through the post, rim, and into blocking provide excellent withdrawal resistance when placement is correct. Screw offsets must be staggered to avoid intersecting inside the block. Pilot holes are mandatory in most hardwoods and recommended in any dense PT lumber to prevent splitting.
- End-grain prohibition: Never rely on screws or bolts driven into the end grain of a rim joist as the primary load path. The IRC and tested connection research are consistent on this point.
Corrosion class: Use appropriate corrosion-resistant fasteners for coastal environments, such as 316 stainless steel, and acceptable alternatives inland. Standard zinc-plated or electroplated fasteners are not rated for exterior deck use.
| Post location | Recommended blocking | Primary fastening method |
|---|---|---|
| Rim joist (mid-span) | Full-depth 4x4 vertical block behind rim | Structural screws through post, rim, and block |
| End joist / corner | Double joist + 4x4 block at post | Through-bolt with tension plate |
| Ledger area | Ledger-backed blocking to band joist | Lag screws or through-bolts into ledger |
| Fascia-mount (face of rim) | Doubled rim or steel subframe | Manufacturer anchor bolts per ICC-ES detail |
Pro Tip: Cut all your blocking to exact joist depth before the decking goes on. Retrofitting blocking through the decking surface costs three times as long and rarely fits as tightly.
Step-by-Step Framing and Installation Checklist for Each Mounting Method
Frameless Base Shoe
- Verify rim joist is level within 1/8 inch over any 10-foot run. Shim or sister as needed.
- Install full-depth blocking at 16-inch intervals behind the rim (or per manufacturer spacing).
- Mark anchor bolt locations per the manufacturer’s layout drawing. Drill pilot holes through the decking and rim.
- Set the base channel dry, confirm levelness, and mark any high/low spots for shimming.
- Apply a continuous bead of marine-grade sealant under the channel before final bolt-down.
- Torque anchor bolts to manufacturer spec. Do not overtighten aluminum channels.
- Insert rubber setting blocks at panel base locations. Dry-fit panels before final wedge seal.
- Install wedge seals or structural glazing tape, set panels, and cap the channel.
Post-mounted Channel or Clamp System
- Lay out post locations at 36–48 inches on center (or per manufacturer). Mark blocking locations.
- Install joist-depth 4x4 blocking at each post location before decking.
- After decking, drill post base holes through decking and rim. Install tension ties or through-bolts.
- Set posts plumb, torque fasteners, and check for any rim flex under hand load.
- Attach channel or clamp hardware to posts at the correct height for your glass panel size.
- Dry-fit panels, check plumb and spacing, then install gaskets and final clamps.
- Install caprail, connecting sections with straight connectors or 90-degree connectors at corners.
Spigot/Standoff Point-Fix
- Confirm manufacturer’s anchor detail and required substrate thickness.
- Mark spigot locations precisely. Each spigot must land over solid blocking or a steel plate.
- Drill anchor holes per the template. Install anchor bolts with appropriate embedment.
- Set spigots, check plumb in both directions, and torque to spec.
- Dry-fit panels in spigots. Adjust rubber pads for panel plumb.
- Install final rubber inserts and tighten spigot clamps. Cap exposed bolt heads.
Measurement checklist before ordering glass:
- Panel height: measure from top of decking to top of caprail, subtract channel depth and cap clearance
- Glass thickness: 3/8 inch tempered for standard residential heights; 1/2 inch for panels over 42 inches or high-wind zones
- Panel width: measure each bay individually; fabrication tolerance is typically ±1/16 inch
- Edge clearance: confirm minimum 3/4-inch glass-to-metal clearance on all sides
- Caprail overlap: most systems require 1–1.5 inches of glass inside the caprail channel
How to Spot Weak Framing and Avoid the Most Common Failures
Most glass railing failures trace back to the framing, not the glass or hardware. The glass just makes the problem visible faster.
Common failure modes:
- Insufficient blocking: Rim joist deflects under lateral load, loosening anchors and cracking sealant over time
- End-grain-only fasteners: Screws driven into the end of a rim board pull out under repeated loading; this is the #1 cited failure mode in tested connection research
- Single rim joist on long spans: Visible flex under hand pressure is a red flag; doubling the rim is the fix
- Wrong corrosion class: Zinc-plated fasteners in coastal environments corrode within 2–3 seasons, compromising the connection
- Loose shims: Shims under base channels that aren’t bonded with sealant migrate over time and create panel rattle
- Omitted cap sealing: Water infiltrates the base channel, accelerates corrosion, and degrades the rubber setting blocks
Pre-glass inspection checklist:
- [ ] Blocking present at every post or anchor location, full joist depth
- [ ] Rim joist doubled or stiffened where required
- [ ] Fastener type and corrosion class confirmed for the environment
- [ ] No end-grain-only connections in the load path
- [ ] Anchor bolt count and placement match manufacturer or engineer detail
- [ ] Rim levelness within tolerance for the system specified
- [ ] Drainage path clear under base channel
Post-install inspection checklist:
- [ ] All panels plumb and seated fully in channel or spigots
- [ ] Caprail continuous with no gaps at connectors
- [ ] Sealant applied at all channel-to-decking interfaces
- [ ] No visible rim flex when 50 lbs of lateral force is applied at guard height
- [ ] Fastener heads capped or sealed against moisture
Red flags that require an engineer:
- Multi-story guards (second floor or higher)
- Frameless systems on decks with suspect or unverified framing
- Panels taller than 42 inches (laminated glass and engineering review typically required)
- Any condition where the manufacturer’s standard anchor detail doesn’t match the actual framing
Statistic callout: Virginia Tech testing found that many common blocked post connections failed to meet the 200-lb design load. Only details with reinforced blocking and correctly placed structural screws consistently met the 500-lb applied test target.
Exactly What to Order: Glass Specs, Hardware, and Finishes
Get the glass and hardware list right before you place the order. Rework on fabricated glass is expensive and slow.
Glass specifications:
| Panel height | Recommended glass thickness | System type |
|---|---|---|
| Up to 36 inches | 3/8 inch tempered | Frameless base shoe or post-mounted |
| 36–42 inches | 3/8 or 1/2 inch tempered | Post-mounted or frameless with stiff rim |
| Over 42 inches | 1/2 inch tempered or laminated | Engineering review recommended |
| High-wind or commercial | 1/2 inch laminated tempered | Engineer-specified |
Tempered glass is standard for most residential deck guards. Laminated tempered (two plies bonded with an interlayer) is recommended when panels exceed 42 inches or when local wind loads require it. Laminated glass holds together if broken, which matters for overhead or high-exposure applications.
Hardware checklist:
- Base channel or post bases sized to your glass thickness (3/8 or 1/2 inch)
- Cover caps for base channels (aluminum or stainless to match finish)
- Post/spigot spacing per manufacturer (typically 36–48 inches on center)
- Wall connectors for end conditions where the railing terminates at a wall or fascia
- Caprail in the correct profile (round, square, or flat) with straight and corner connectors
- Rubber setting blocks and wedge seals or structural glazing tape
- 316 stainless or HDG anchor bolts per corrosion class requirement
- Marine-grade sealant (silicone or polyurethane rated for exterior metal-to-wood joints)
Ordering tips:
- Measure each panel bay individually. Deck framing is rarely perfectly uniform.
- Add fabrication tolerance: order glass 1/8 inch narrower than the clear opening to allow for edge clearance.
- Confirm the manufacturer’s anchor detail matches your actual blocking layout before glass goes into production.
- Order a 46-inch tempered panel for standard residential 42-inch guard height runs; the extra height accommodates channel depth and caprail overlap.
For cabin decks and smaller outdoor structures, the role of decked areas in cabin design offers useful context on how deck framing decisions affect the whole structure.
A Tested Connection Example That Meets the 500-Lb Standard
The FastenMaster ThruLok/HeadLok-style detail, developed with Virginia Tech testing context, is one of the most referenced tested approaches for post-to-frame connections. Here’s what it looks like in practice.
The basic assembly:
- A 4x4 vertical block cut to full joist depth is installed tight behind the rim joist at the post location
- The post sits on the decking surface directly over the block
- Long structural screws (ThruLok or HeadLok-style, typically 6–10 inches) are driven through the post, through the rim joist, and into the blocking at staggered vertical offsets
- A second set of screws or a through-bolt ties the blocking to the adjacent joist to prevent rotation
Fastener schedule example (generic, for 2x joist framing):
| Connection | Fastener type | Count | Length |
|---|---|---|---|
| Post to rim + block | Structural screw (ThruLok-style) | 2 per side | 6–8 inches |
| Block to joist (lateral) | Structural screw or lag | 2 | 3–4 inches |
| Post base to decking | Post base hardware according to manufacturer’s specifications | Per spec | Per spec |
Screw offsets must be staggered vertically by at least 1.5 inches to avoid intersecting inside the block. Pilot holes are required in dense or dry lumber to prevent splitting, which would compromise the connection.
Where this detail applies and where it doesn’t. This approach works for standard post-mounted systems at rim joist locations on residential decks with 2x joist framing. For fascia-mounted base shoes, frameless systems, or posts at end joists, the framing geometry changes and the detail needs to be adapted. A Fine Homebuilding write-up on code-compliant guardrail posts covers the variations in detail. Any condition outside the tested geometry requires a manufacturer-specific layout or engineer review.
Pro Tip: Make a plywood template with the screw hole pattern before you drill a single post. It takes 20 minutes to build and eliminates the risk of screws intersecting inside the block, which is the most common way a good blocking job gets ruined at the last step.
What the Framing Actually Tells You Before the Glass Goes On
There’s a moment on every glass railing job, right after the blocking is in and before the decking goes down, where you can see exactly what you’re working with. That’s the moment to be honest about what you’ve got.
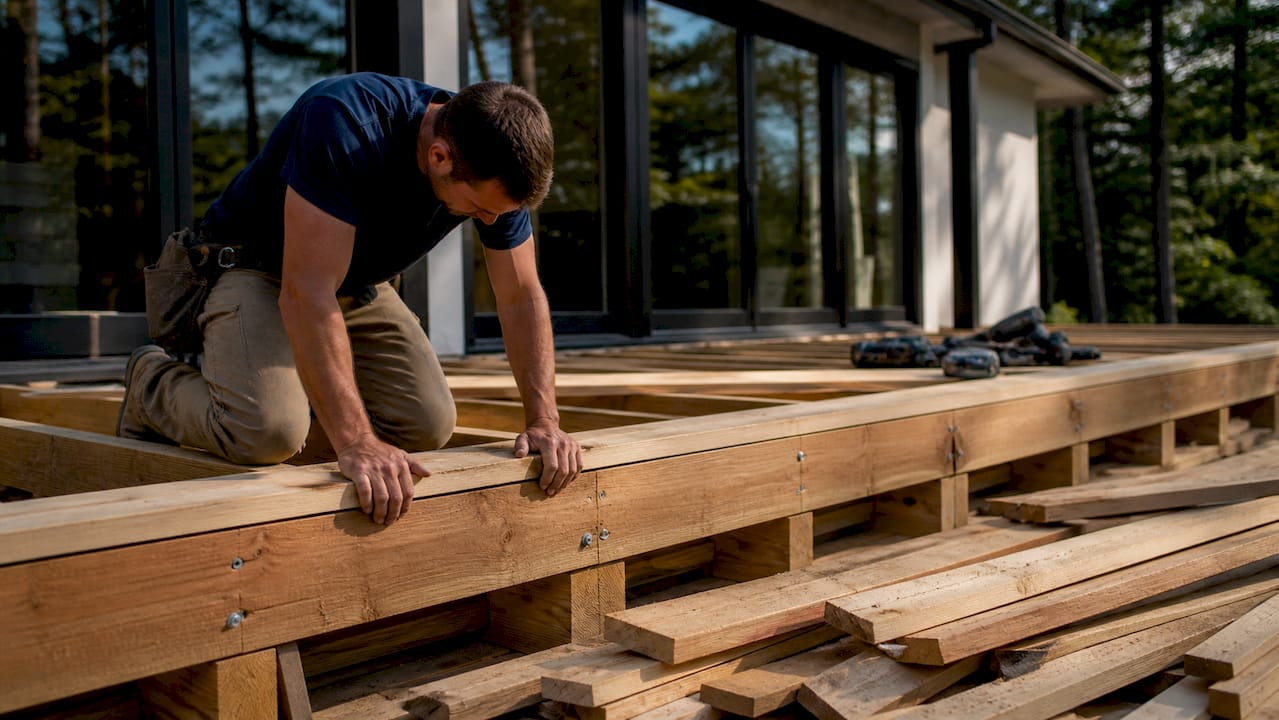
A rim joist that springs under hand pressure isn’t going to get better once the glass is on. It’s going to get worse, slowly, over a few seasons of thermal cycling and wet-dry movement. The fix is always cheaper before the decking is down. Doubling the rim, adding a steel angle subframe, or sistering a joist takes a few hours at rough framing. After the deck is finished, the same fix takes a full day of teardown.
The other thing worth saying plainly: the 500-lb test standard isn’t a bureaucratic hurdle. It represents roughly what happens when someone falls hard against a guard or a crowd pushes against a railing at a party. Framing that passes that test is framing you can stand behind. Framing that doesn’t is a liability that the glass and hardware can’t compensate for, no matter how good the product is.
Frameless systems look better than anything else on a deck. They also demand more from the framing than any other system. If the framing isn’t there, the right call is to either fix it or choose a post-mounted system that’s more forgiving of the substrate. Choosing a frameless system and hoping the framing is good enough is how callbacks happen.
Sources
Use these sources to verify code requirements, review tested connection details, and confirm product specifications before glass goes into fabrication.
Code and testing references:
- How To Build Code-Compliant Guardrail Posts - Fine Homebuilding
- DeckMath glass-railing-mount
- Local
- Glass Railings in Langley, installation, BC code, and what works on suburban decks | Jeff and Simon Ironworks
System selection and permit guidance:
Glassrailingstore resources:
Recommended
- Glass Railing Wood Deck Attachment: A Builder’s Guide – The Glass Railing Store
- Frameless vs. Framed Glass Railings: Design Differences Explained – The Glass Railing Store
- Frameless Glass Railing Retrofit for Decks – The Glass Railing Store
- Structure Reinforcement for Glass Railings: 2026 Guide – The Glass Railing Store